Want to integrate Newegg with Zendesk, Freshdesk, Help Scout, Gorgias, Re:amaze, Zoho Desk, Kustomer, or Onsite Support? All you have to do is complete four simple steps:
Click on any screenshot to view it at full resolution.
1. Sign in or Sign Up
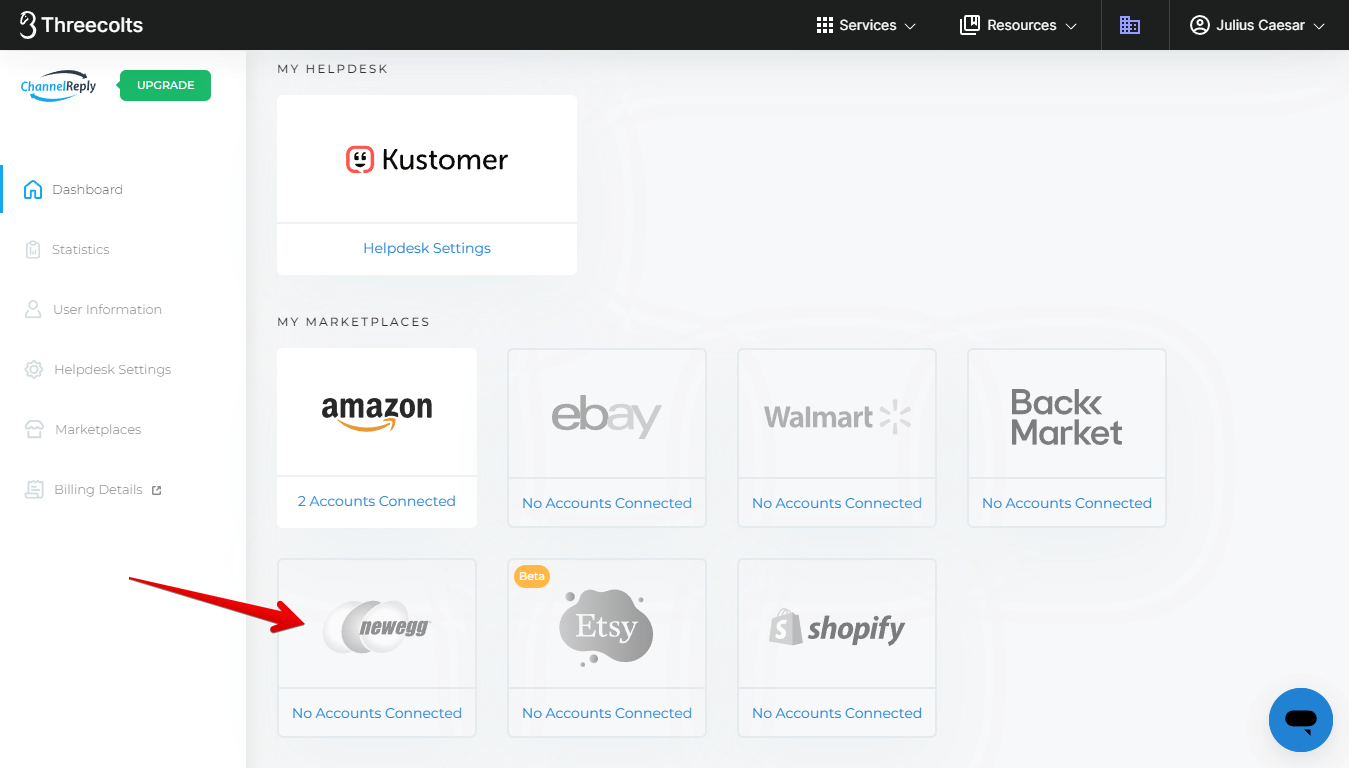
If you already have ChannelReply, sign in here. Choose Newegg on your dashboard.
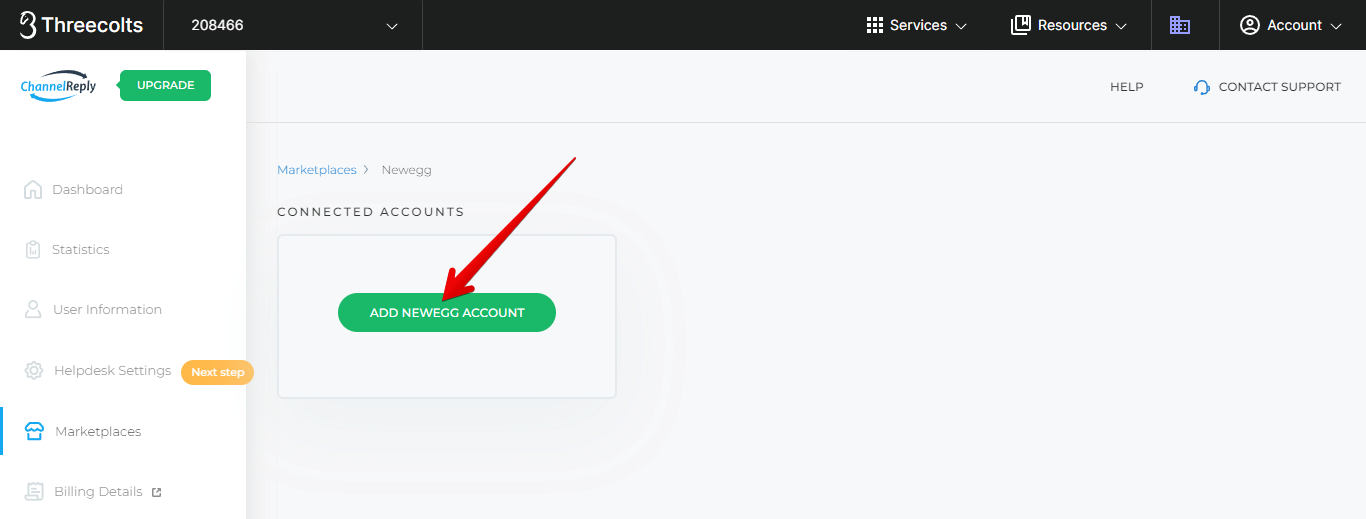
Click "ADD NEWEGG ACCOUNT." Then skip to step 2.
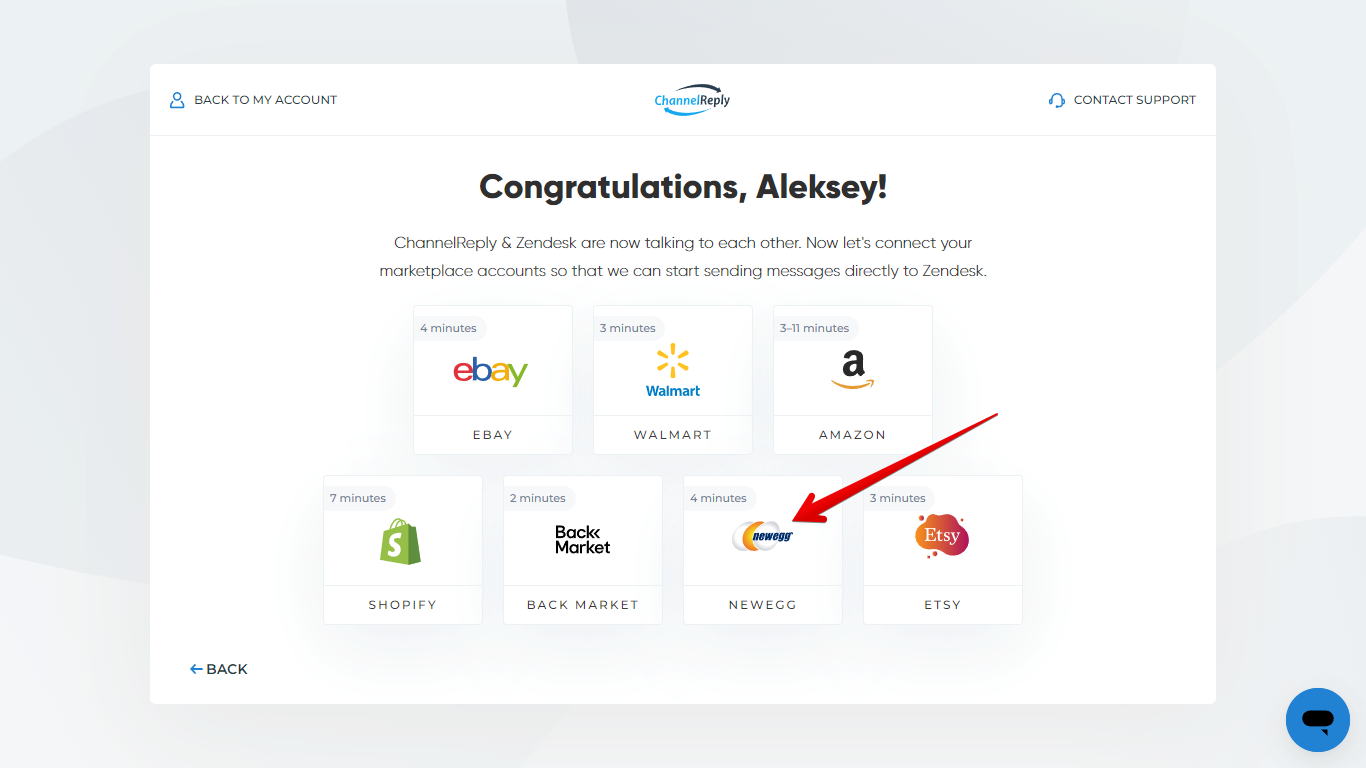
If you don't have a ChannelReply account yet, start your free 14-day trial here. Follow the prompts to integrate Zendesk, Freshdesk, Help Scout, Gorgias, Re:amaze, Zoho Desk, Kustomer or Onsite Support. Choose Newegg when you reach a screen like the one shown below.
2. Pick Your Platform
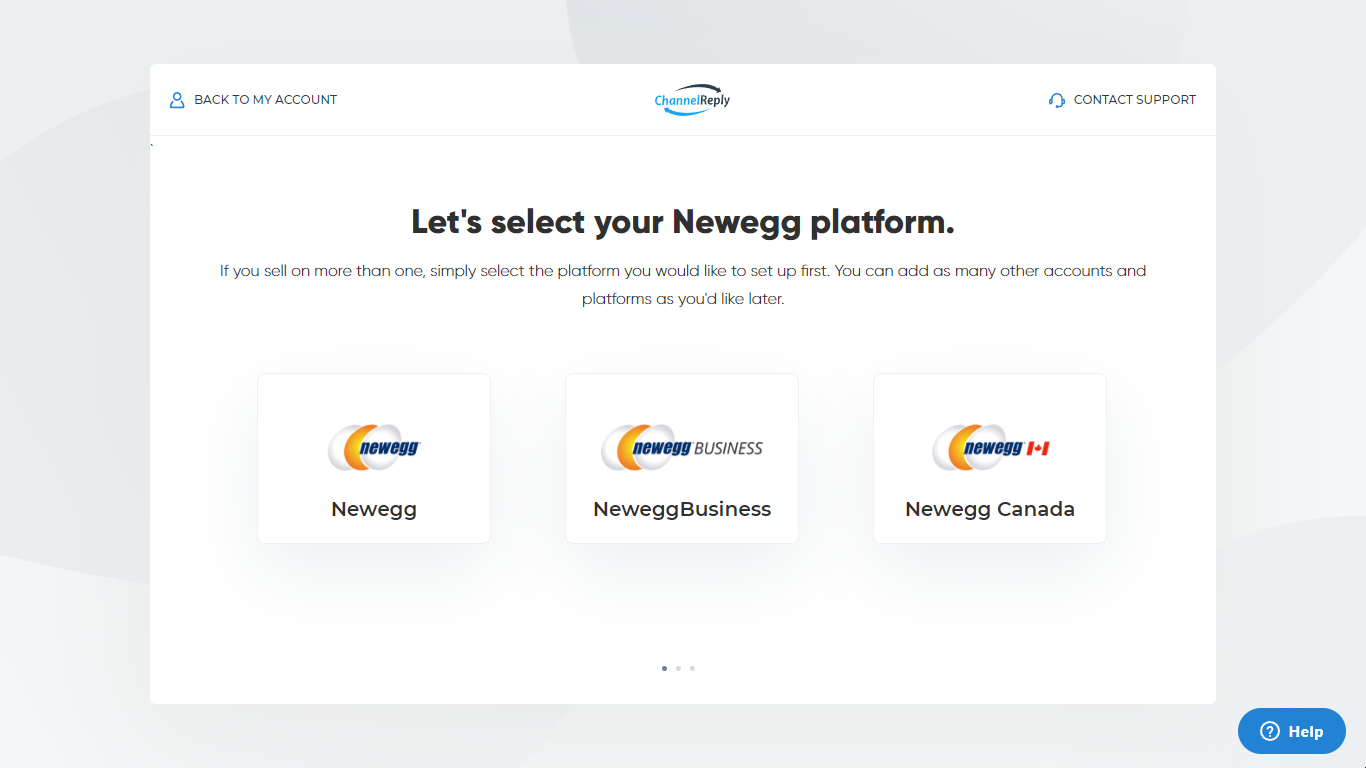
To get started, select your Newegg platform.
- Choose Newegg if you sell on newegg.com.
- Select NeweggBusiness if you sell on neweggbusiness.com.
- Click Newegg Canada if you sell on newegg.ca.
You can add as many other accounts and platforms as you want later.
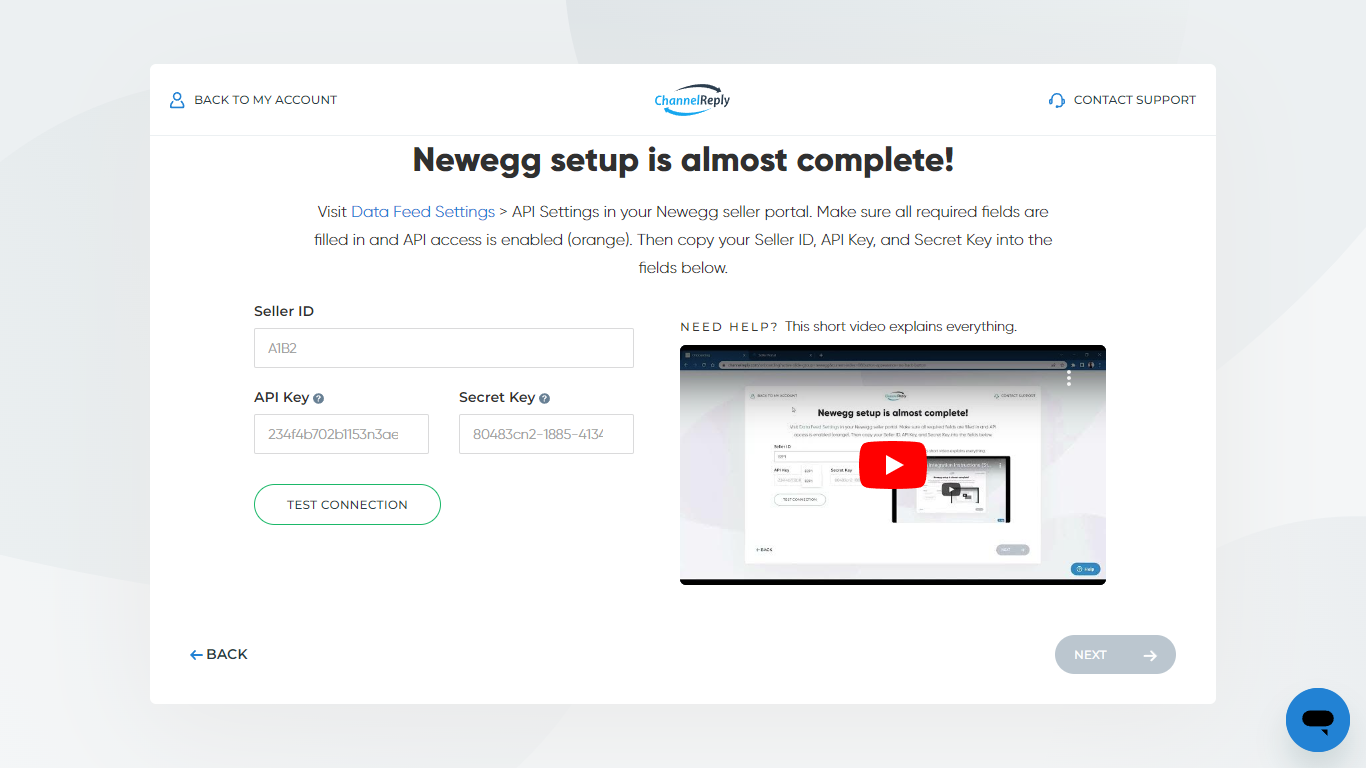
3. Enter Your API Credentials
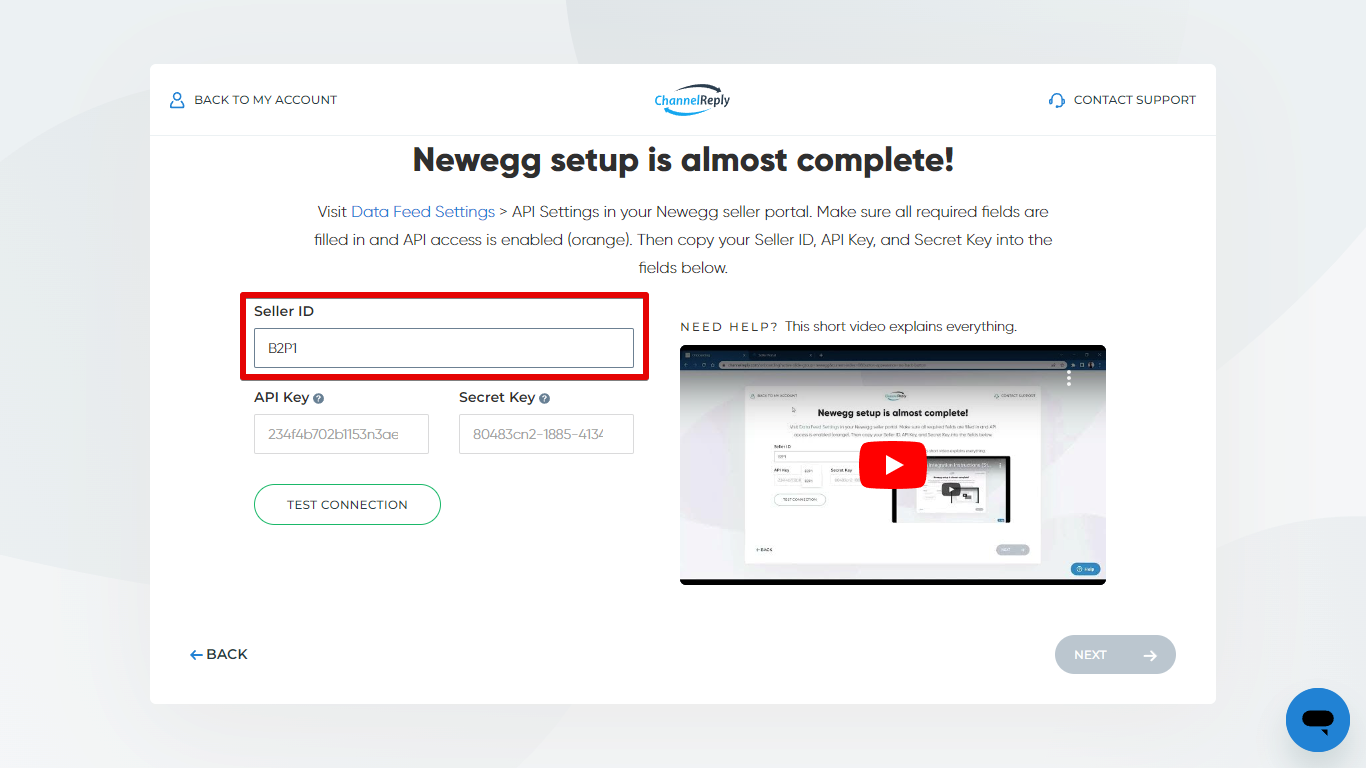
You’ll arrive at a screen like this one:
You can now either follow along with the video below and then skip to step 4, or keep reading these instructions below the video.
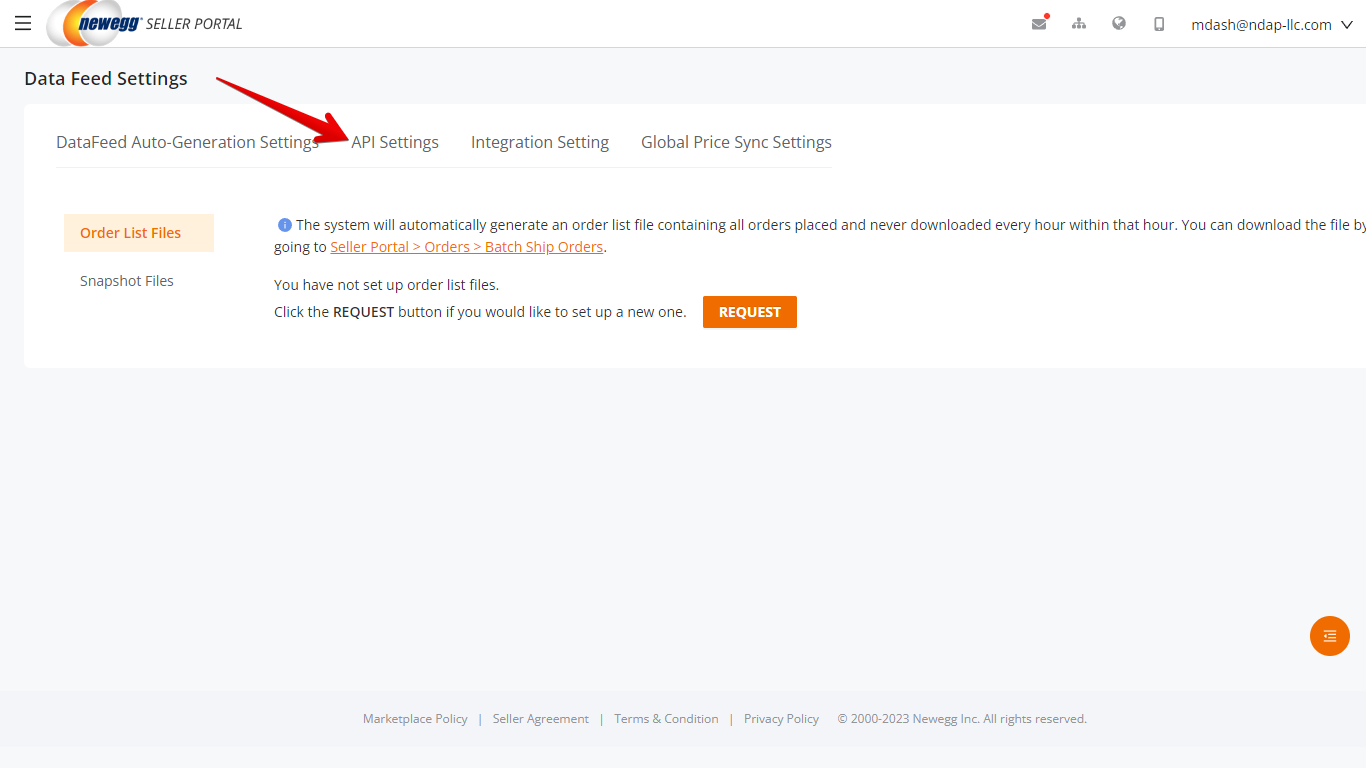
Open your Newegg Data Feed Settings page in a new tab. Sign in if prompted. Then select the "API Settings" tab in the top menu.
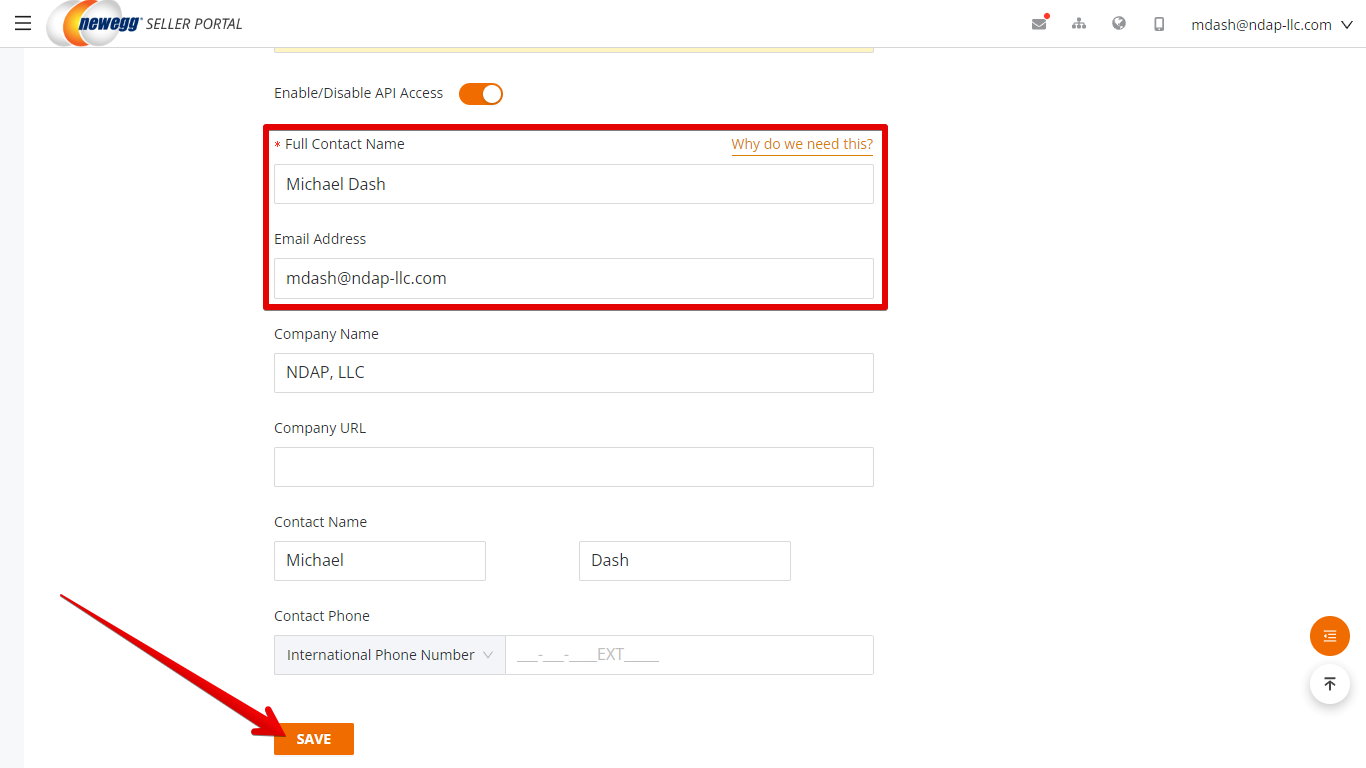
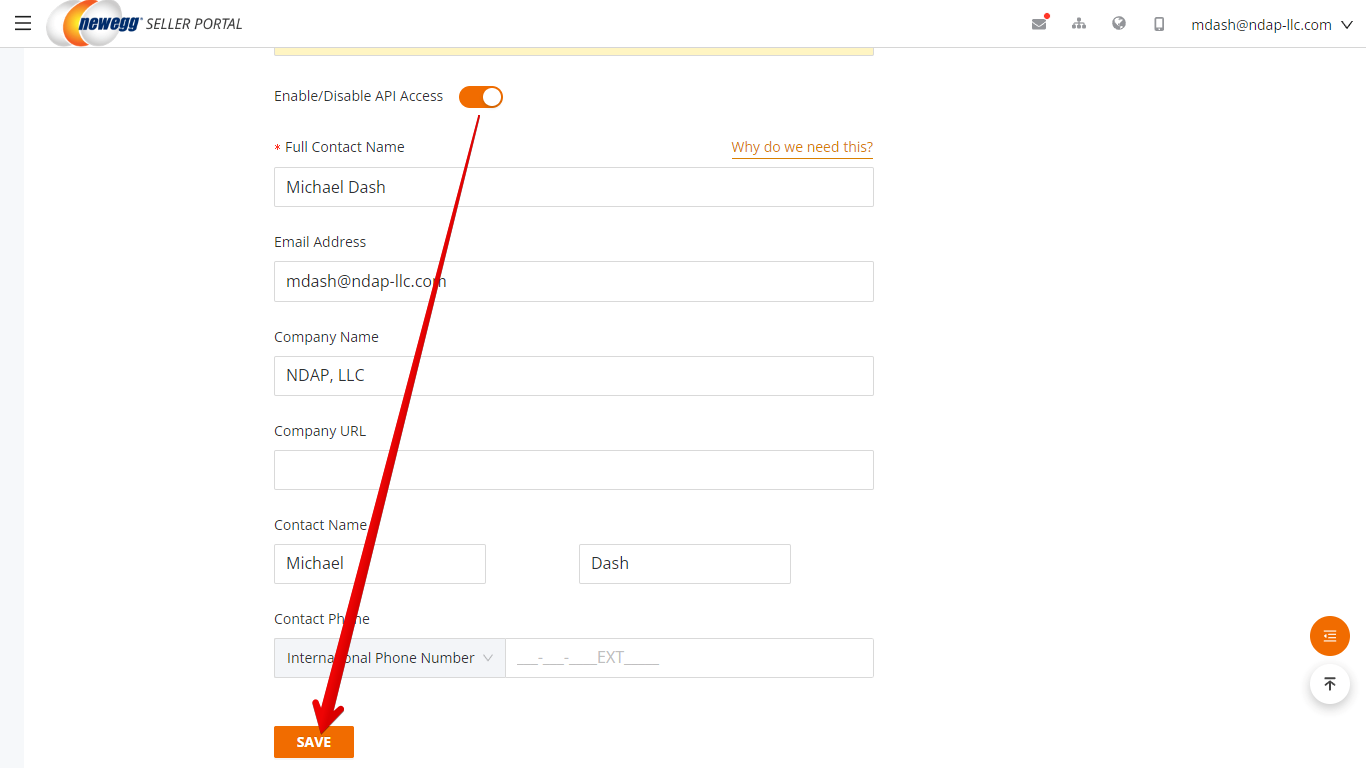
If you have not done so already, fill in the “Full Contact Name” and “Email Address” fields. Click “SAVE” if you make any changes.
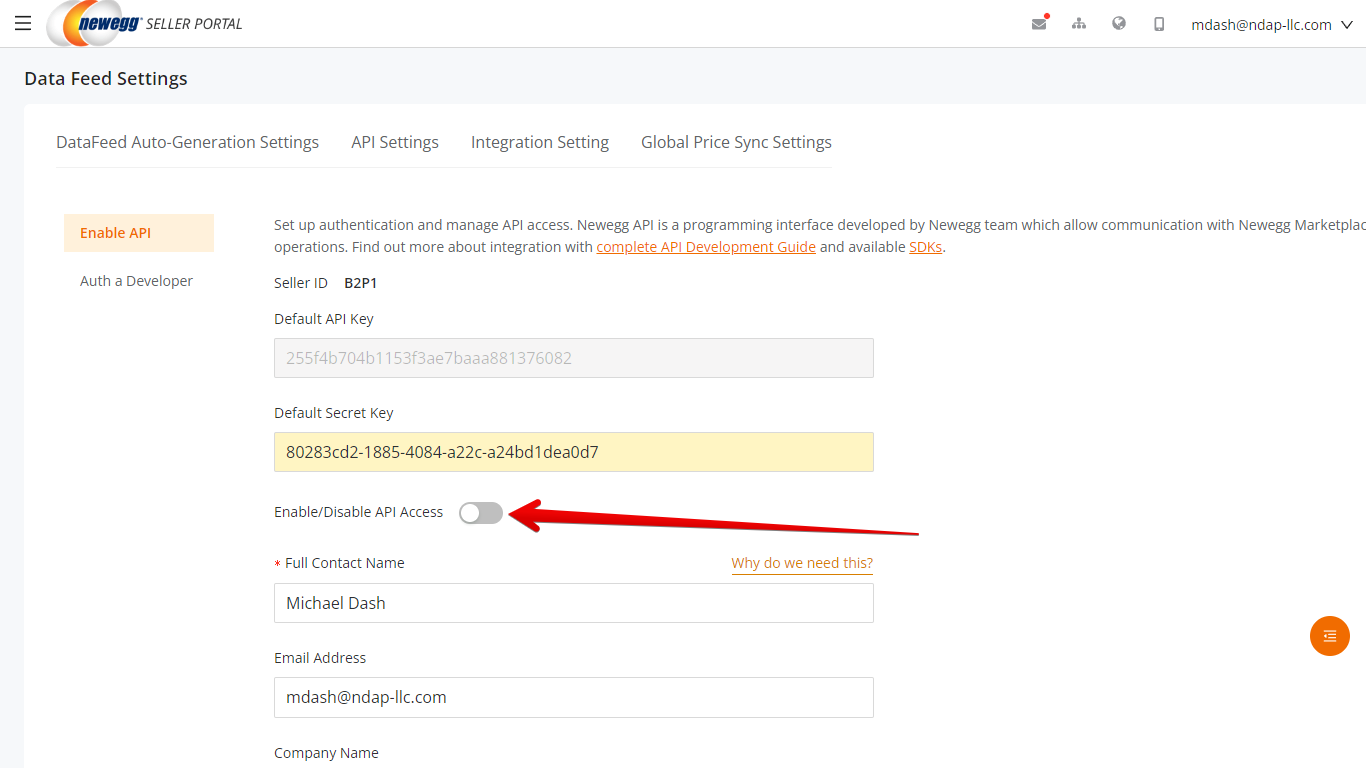
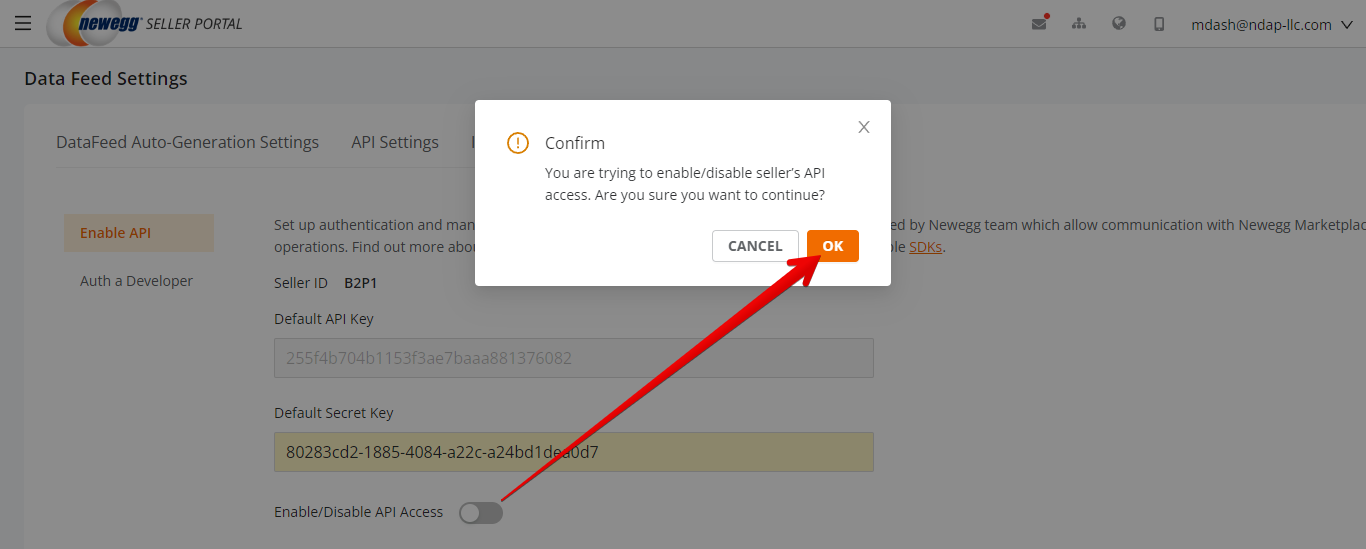
Make sure the “Enable/Disable API Access” slider is enabled (orange with the knob on the right). If it’s currently grey as shown below, click on it, then hit “OK” in the popover that appears.
Be sure to hit "SAVE" after enabling API access.
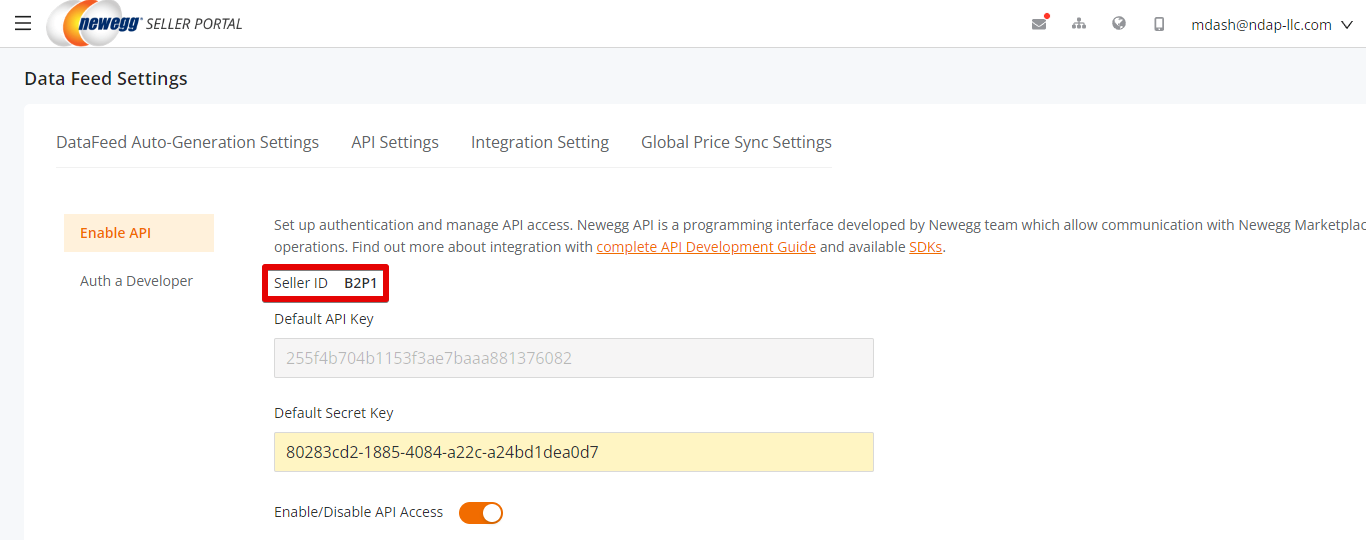
Seller ID
Copy your Seller ID at the top of the Data Feed Settings screen.
Paste it into the Seller ID field in ChannelReply.
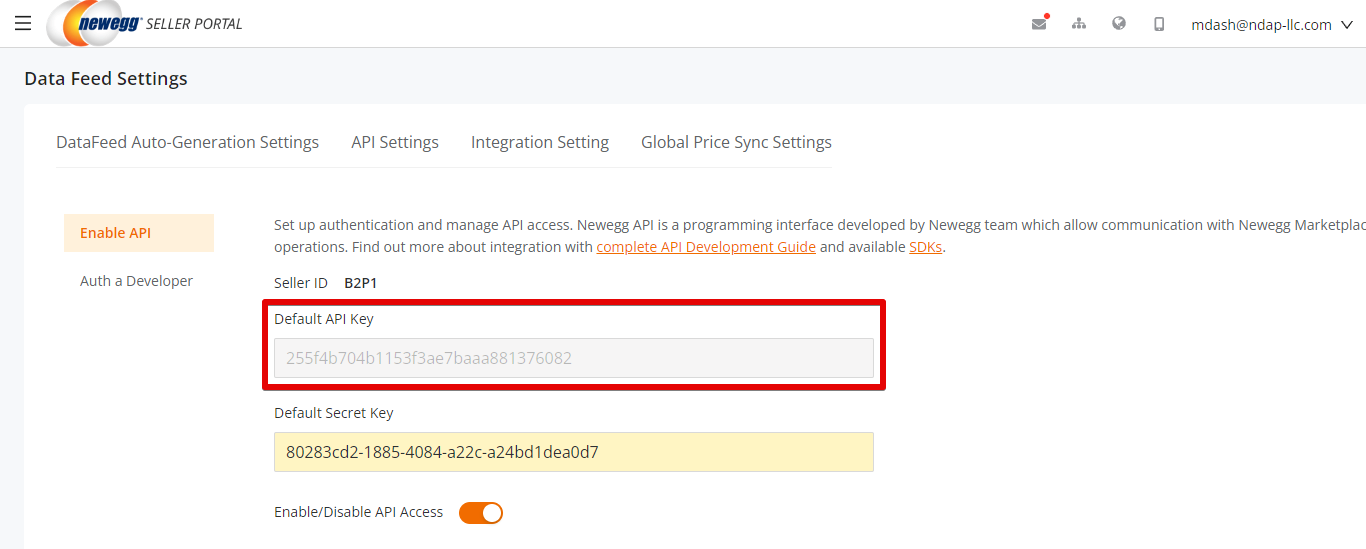
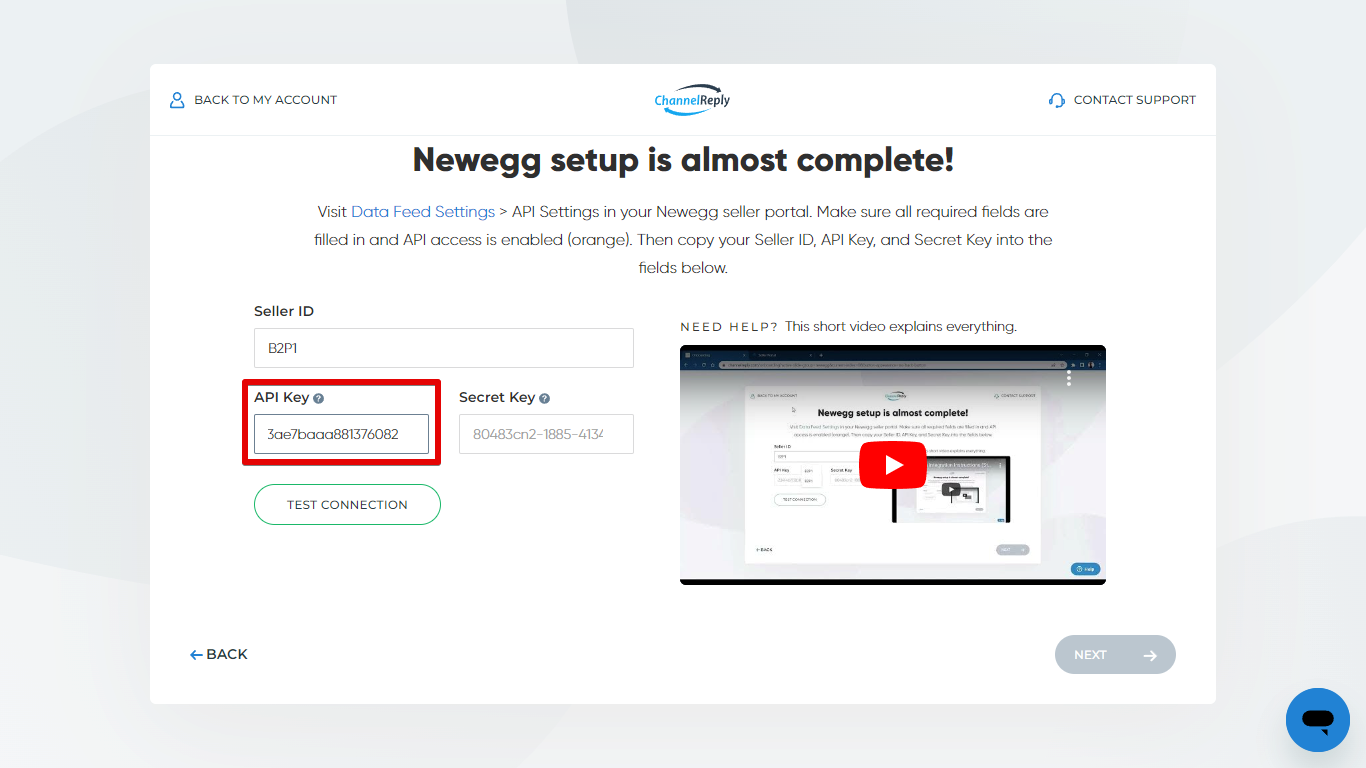
API Key
Copy over your Default API Key.
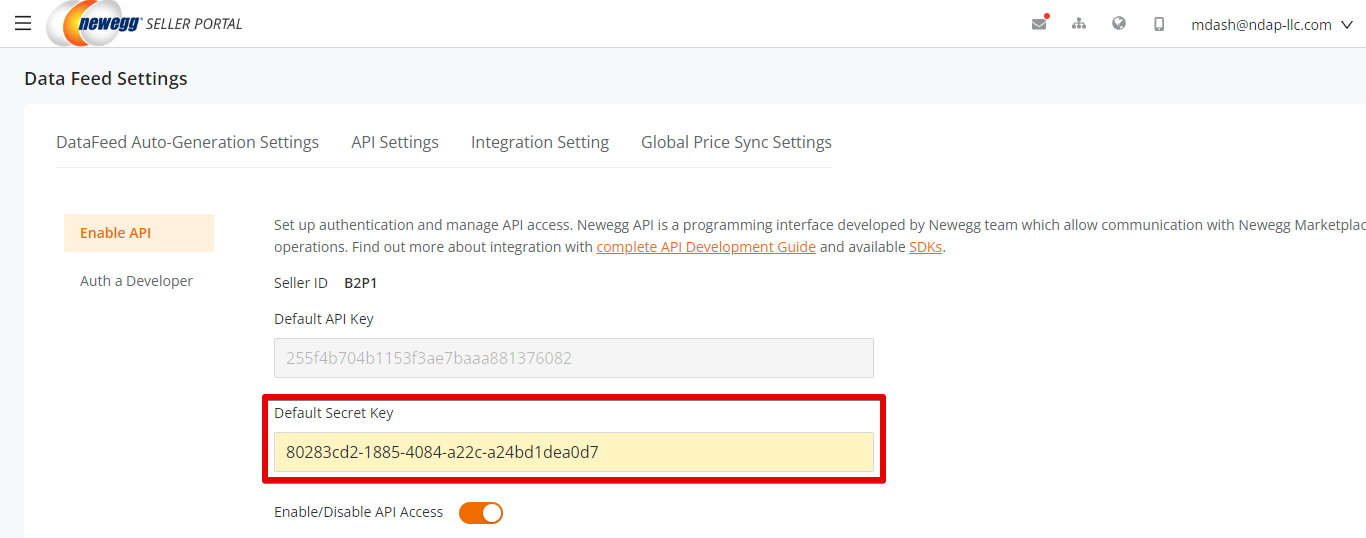
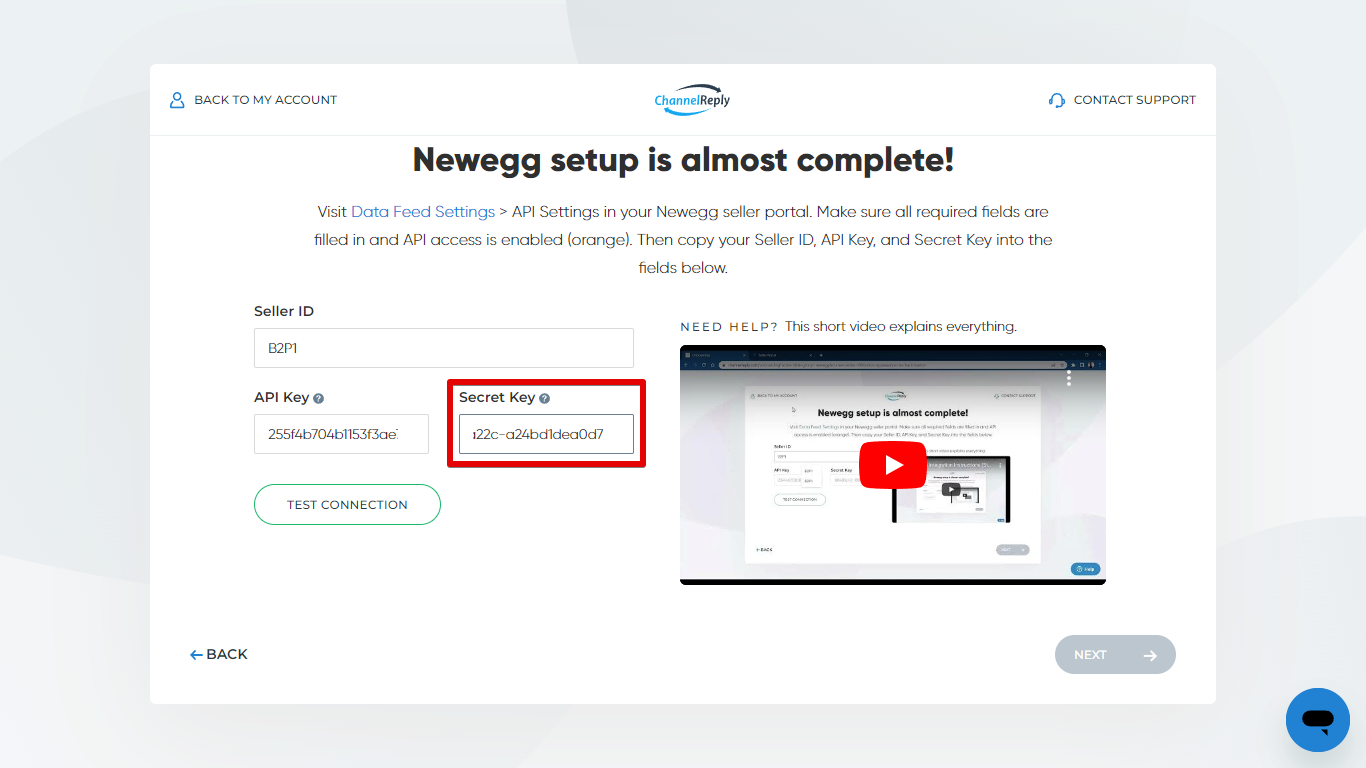
Secret Key
If you need a unique secret key for ChannelReply, please contact Newegg at datafeeds@newegg.com. Ask them to send your unique ChannelReply API credentials. When you receive the email, copy your unique Secret Key.
If you don't want to wait, you can just use your Default Secret Key from Data Feed Settings.
Either way, paste your Secret Key into the matching field in ChannelReply.
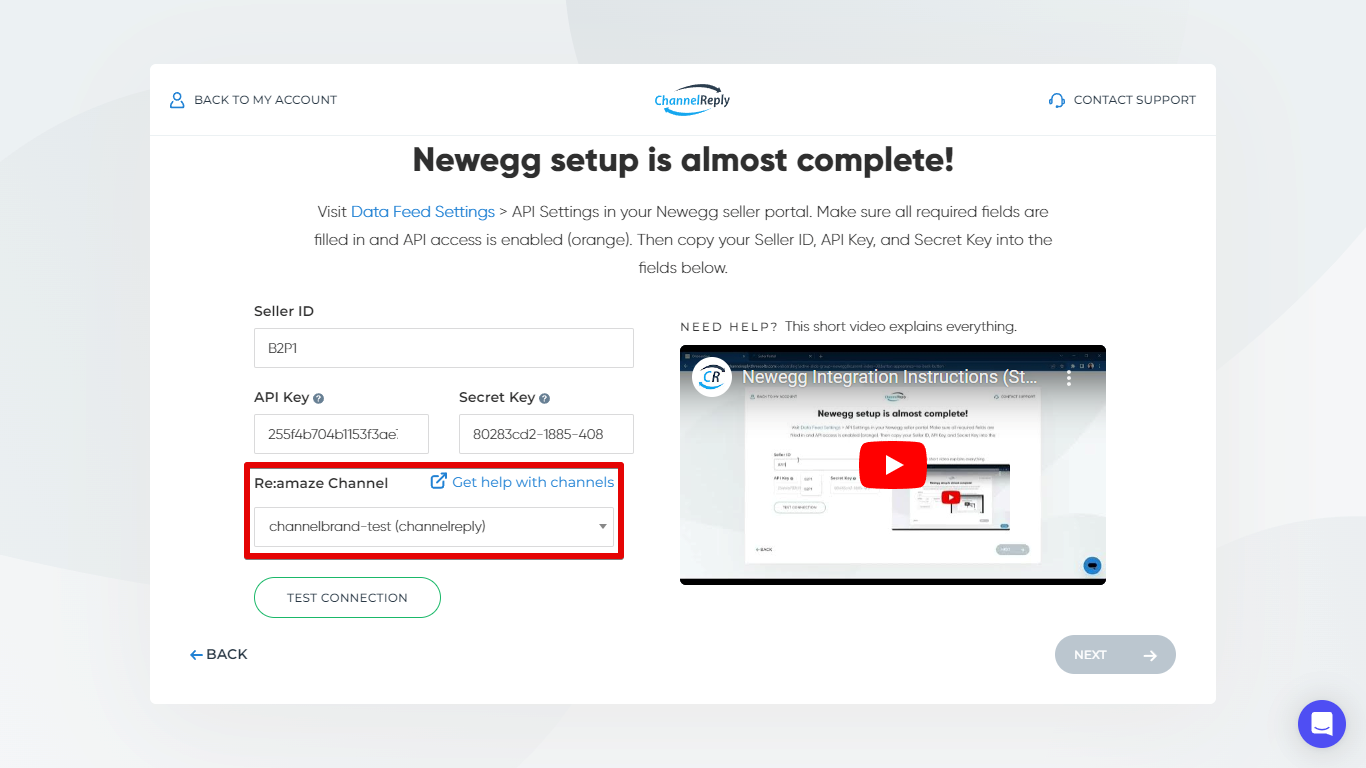
Re:amaze Channel (Re:amaze Users Only)
If you use Re:amaze, you’ll have one extra field: Re:amaze Channel. Simply select your preferred channel for this Newegg account from the dropdown menu. If you don’t see the one you want or if no options appear, see our guide to managing Re:amaze brands.
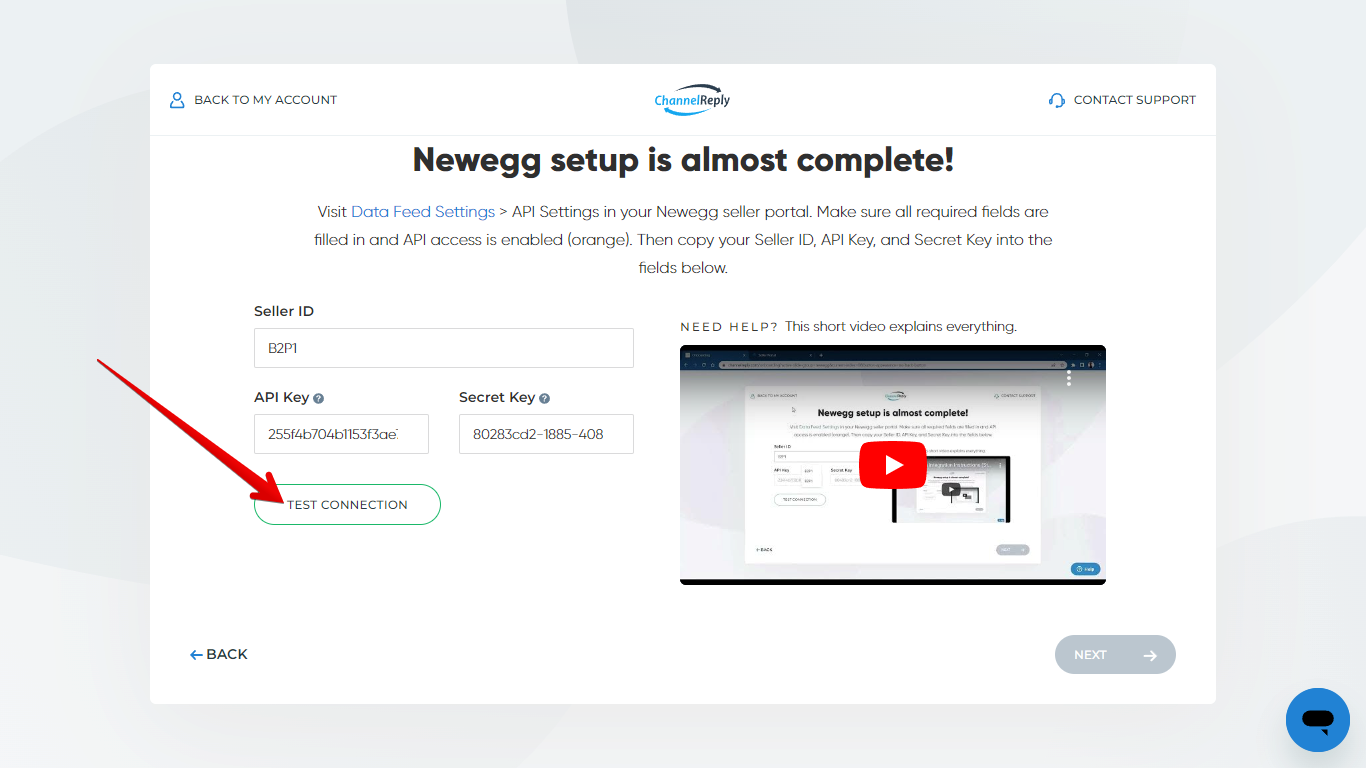
Test Connection
When all fields are filled in, click “TEST CONNECTION.”
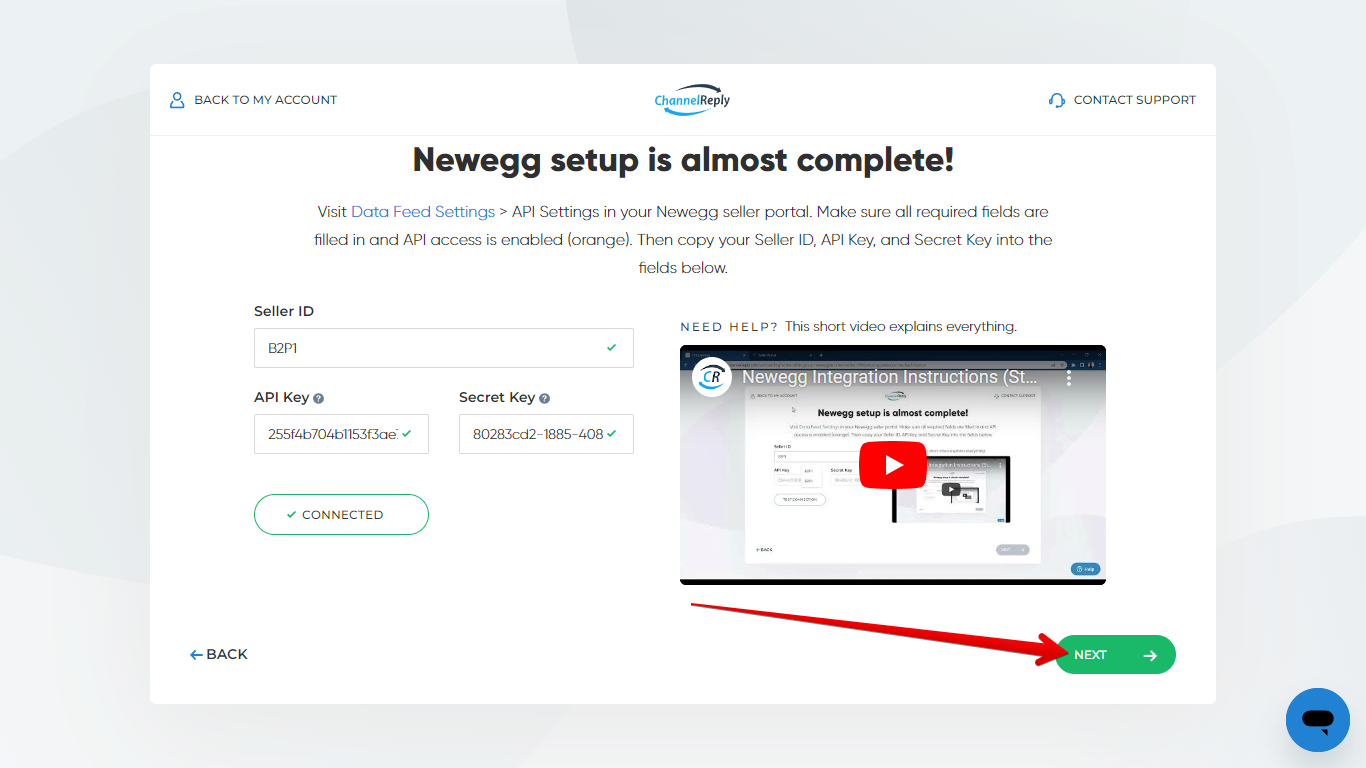
If the connection succeeds, green checkmarks will appear in each field, and “TEST CONNECTION” will change to “CONNECTED.” Click “NEXT” to continue.
4. Configure Your Email Settings
You can now either follow along with the video below and then skip to Advanced Settings, or keep reading these instructions below the video.
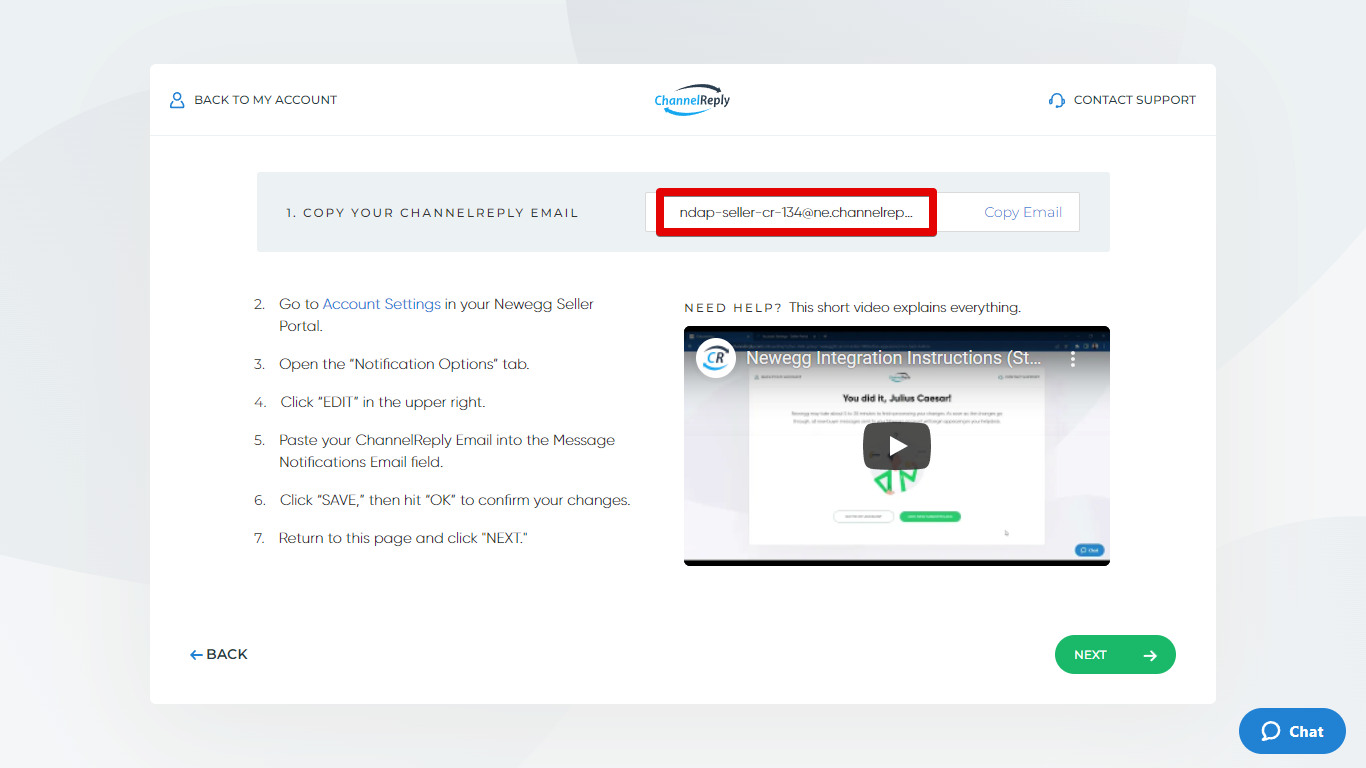
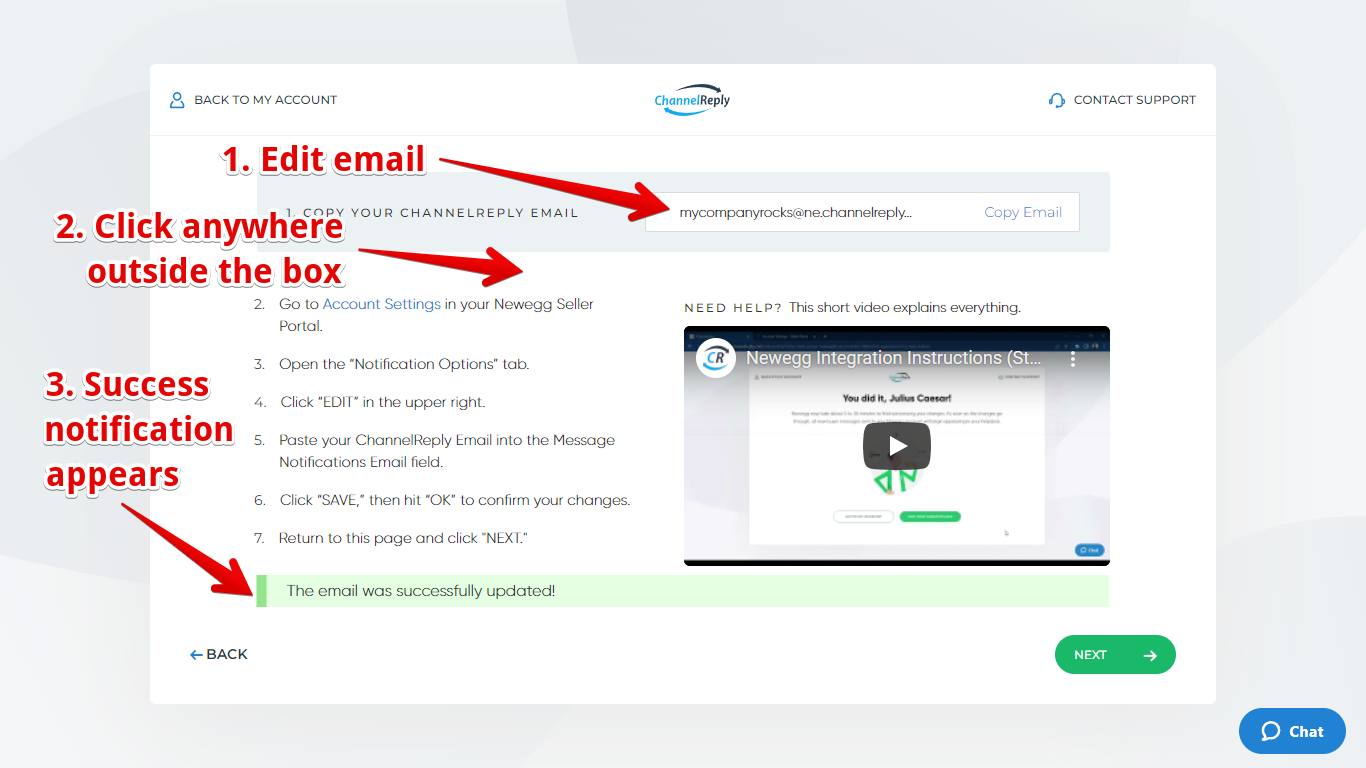
You’ll now see an automatically generated email address ending in @ne.channelreply.net. This is your default ChannelReply Email.
Your Newegg customers will not see this email address, so it's OK for it to be ugly! However, you can edit it now if you’d like—simply click inside the field and rewrite the username. Note that the address must end in @ne.channelreply.net and cannot be in use by any other ChannelReply user.
Once you’re finished with your edits, click anywhere outside the email field. The changes will save instantly, and a success notification will appear.
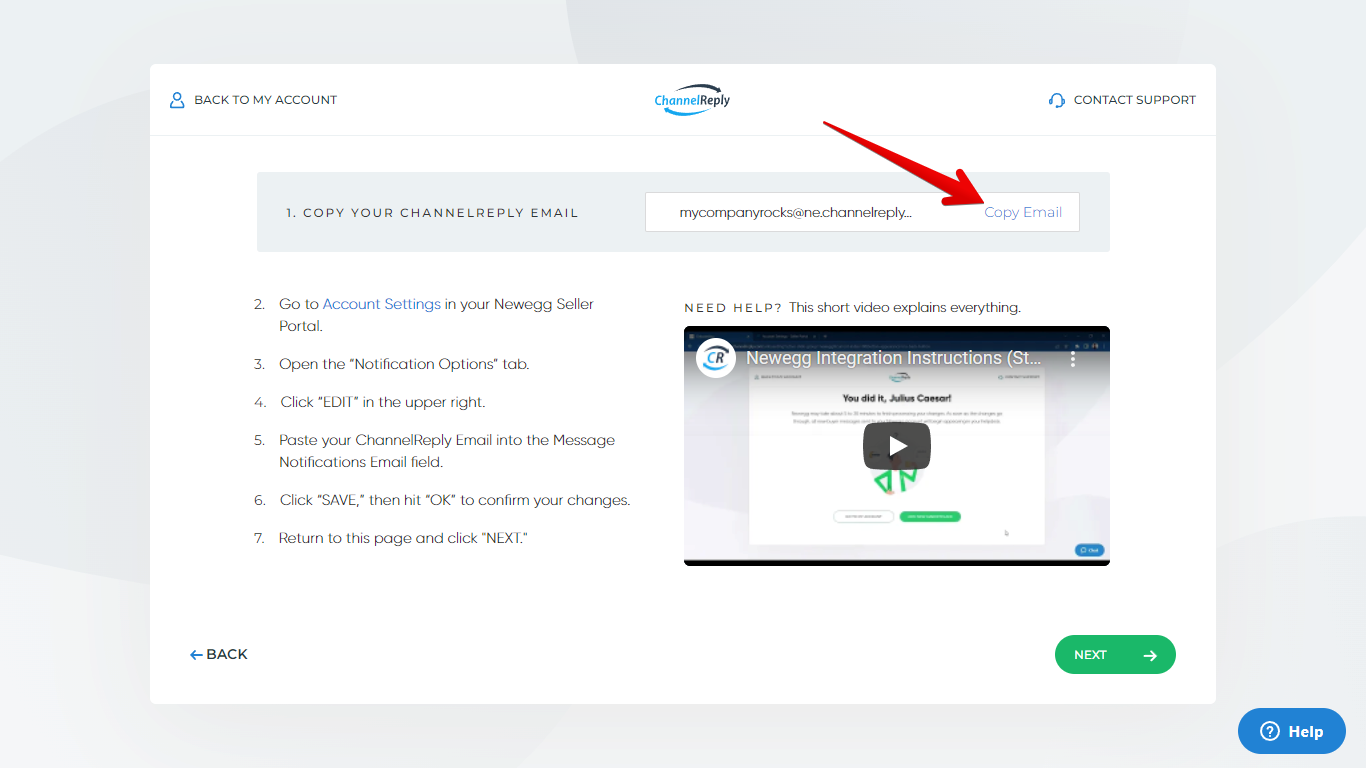
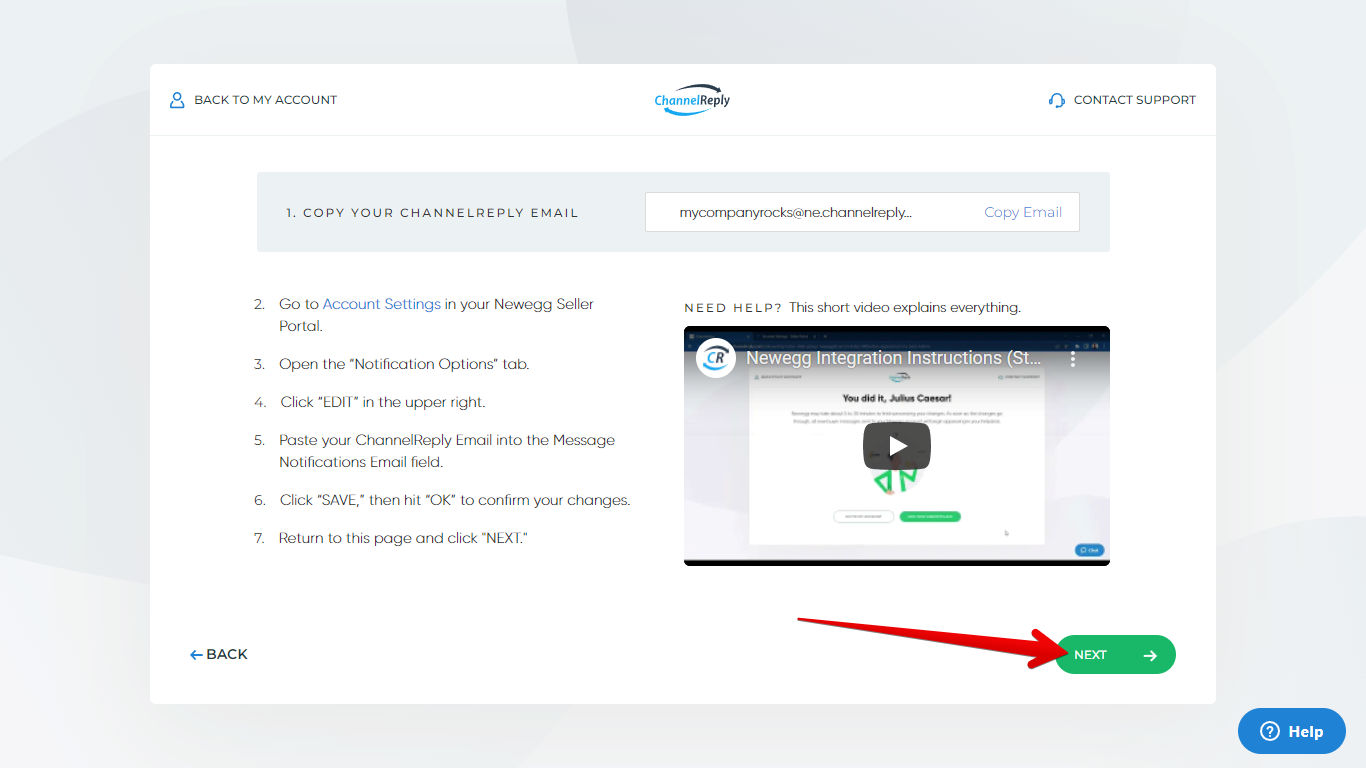
Once you’re happy with your ChannelReply Email, click “Copy Email.”
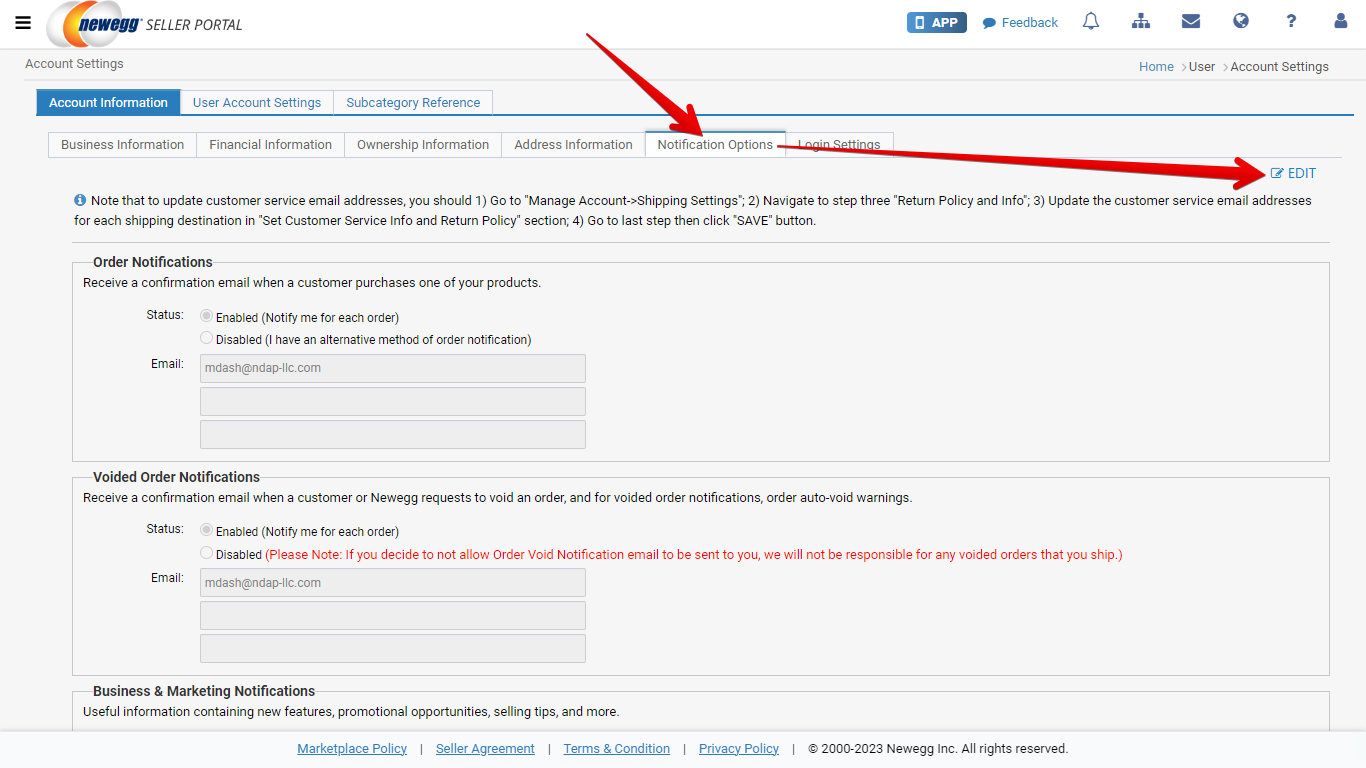
On Newegg, go to Account Settings. Select the "Notification Options" tab and click "EDIT" in the upper right.
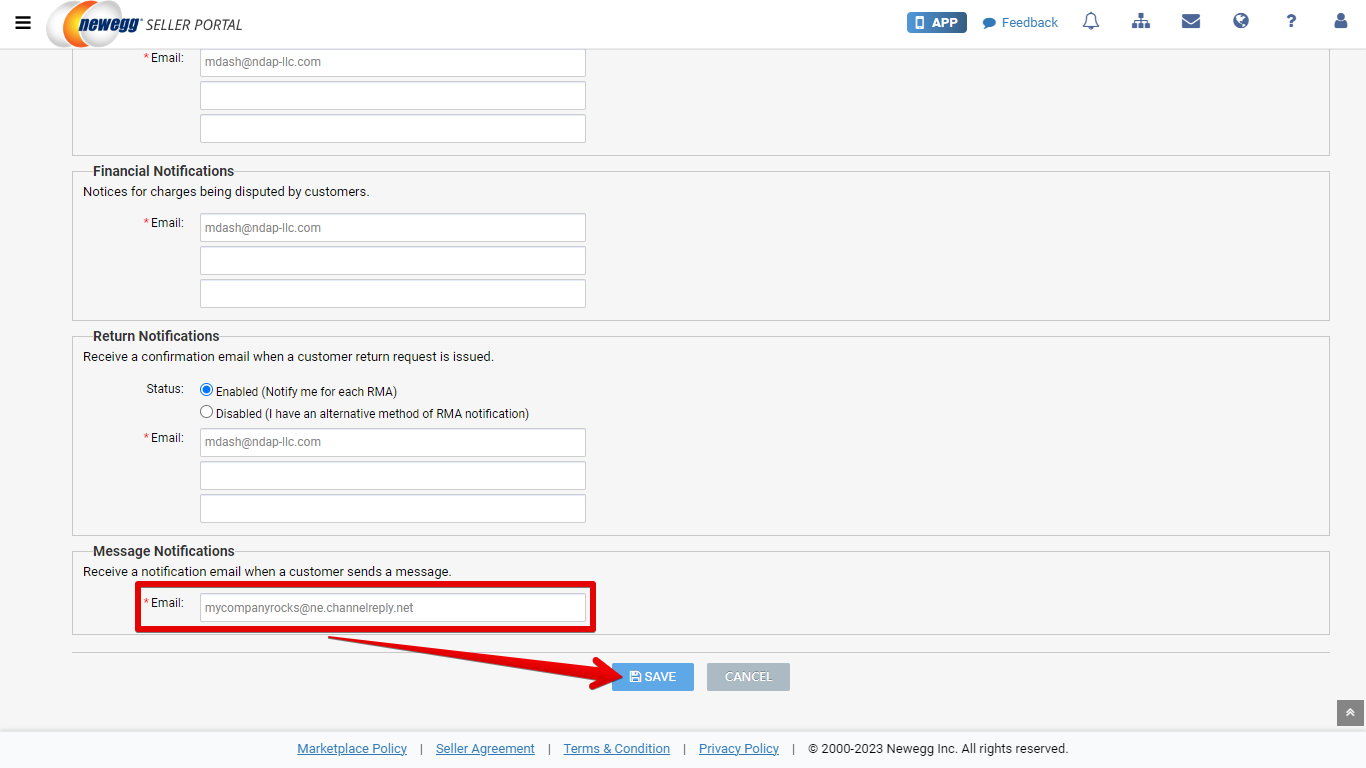
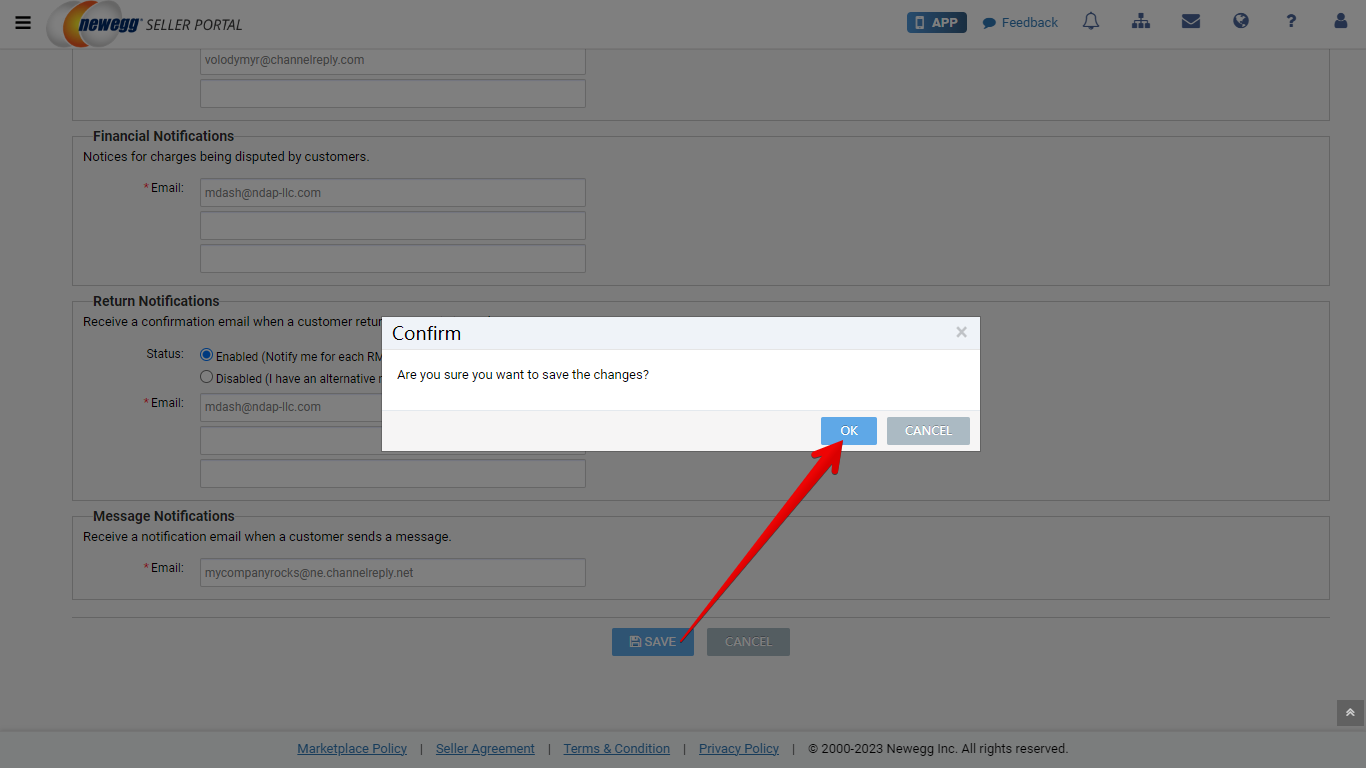
Scroll down to the bottom of the page and find "Message Notifications." Paste your ChannelReply Email into the Email field. Finally, click "SAVE."
Click “OK” on the confirmation message that appears.
A success notification will appear at the top of your screen.
ChannelReply and Newegg are now fully integrated!
Please note that it may take up to 30 minutes for Newegg to process your changes and start sending messages through ChannelReply. Be sure to continue checking your Newegg messages the old way for at least half an hour.
To exit setup, return to ChannelReply and click “NEXT.”
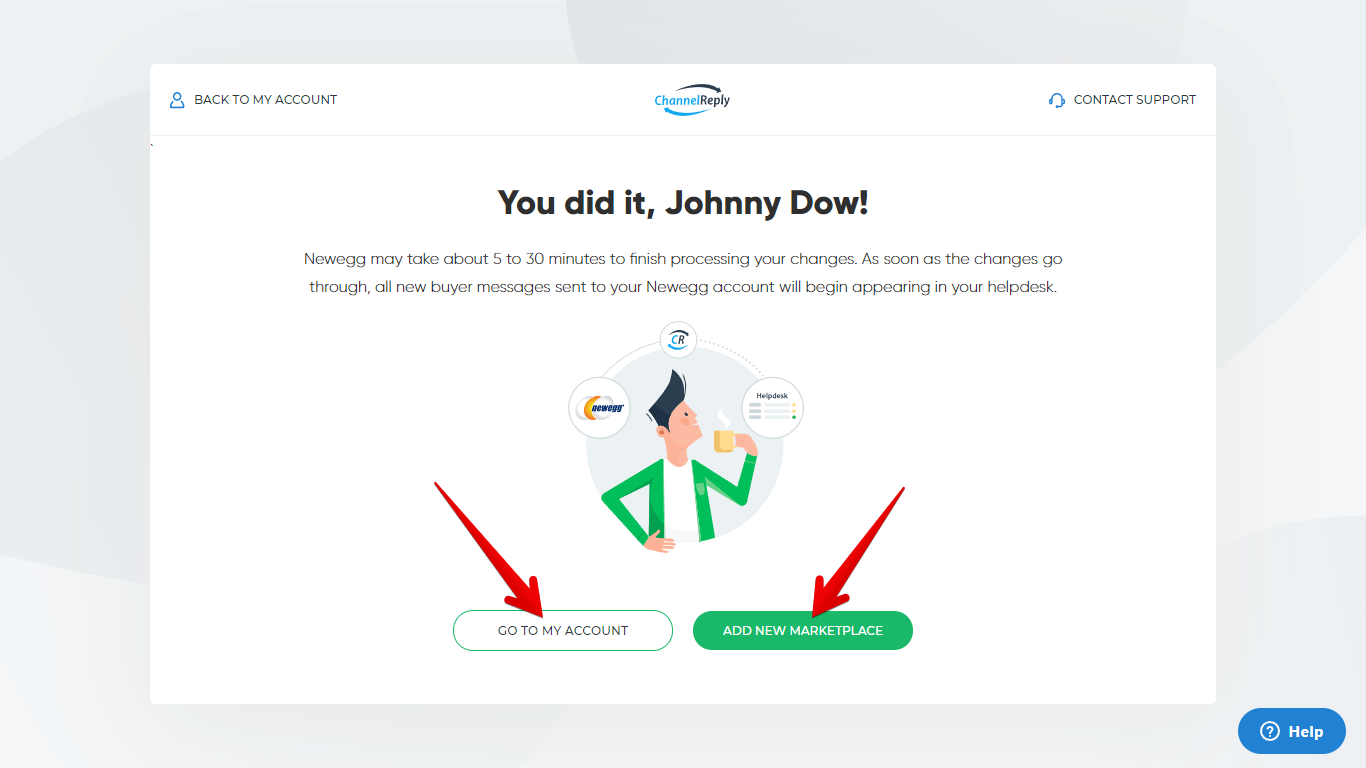
You’ll arrive at the success screen shown below. Clicking “GO TO MY ACCOUNT” will return you to your ChannelReply dashboard. Choose “ADD NEW MARKETPLACE” if you want to continue connecting your seller accounts instead.
Optional: Manage Advanced Settings
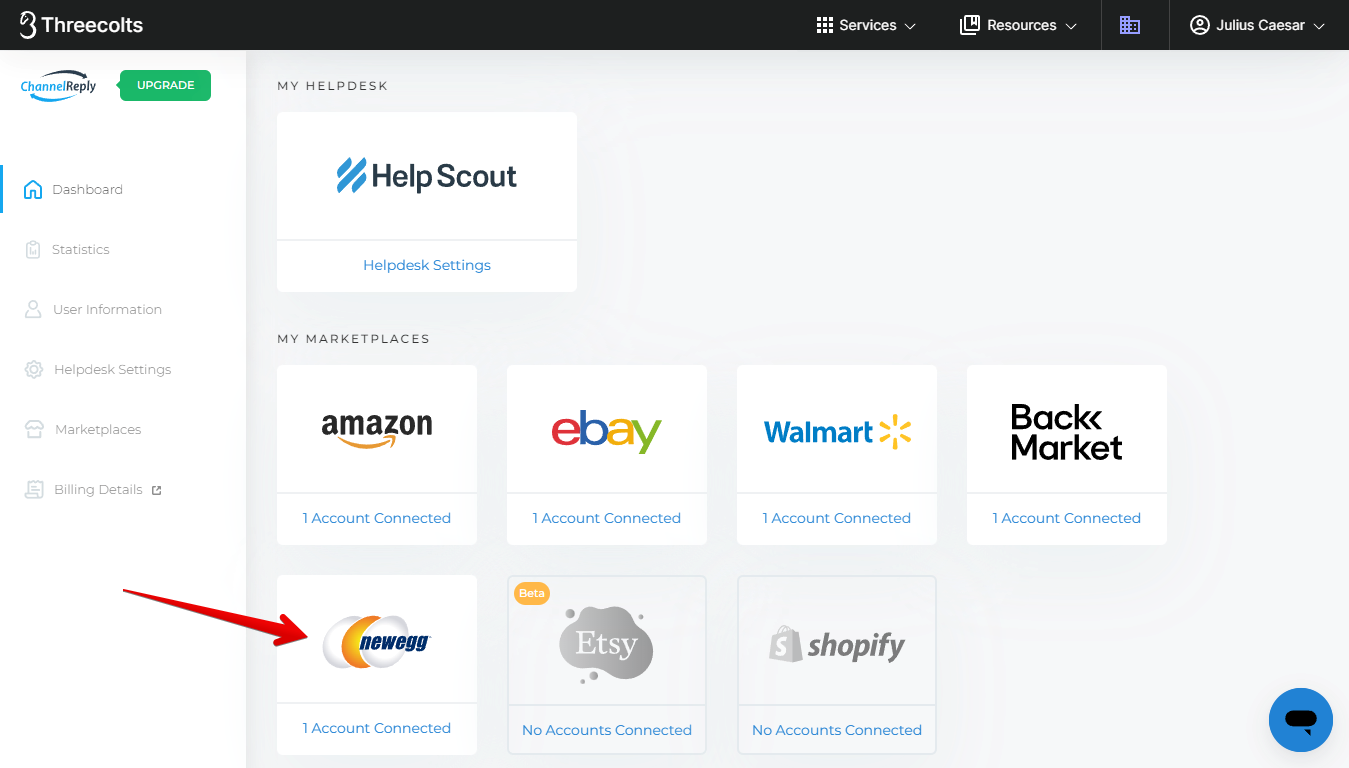
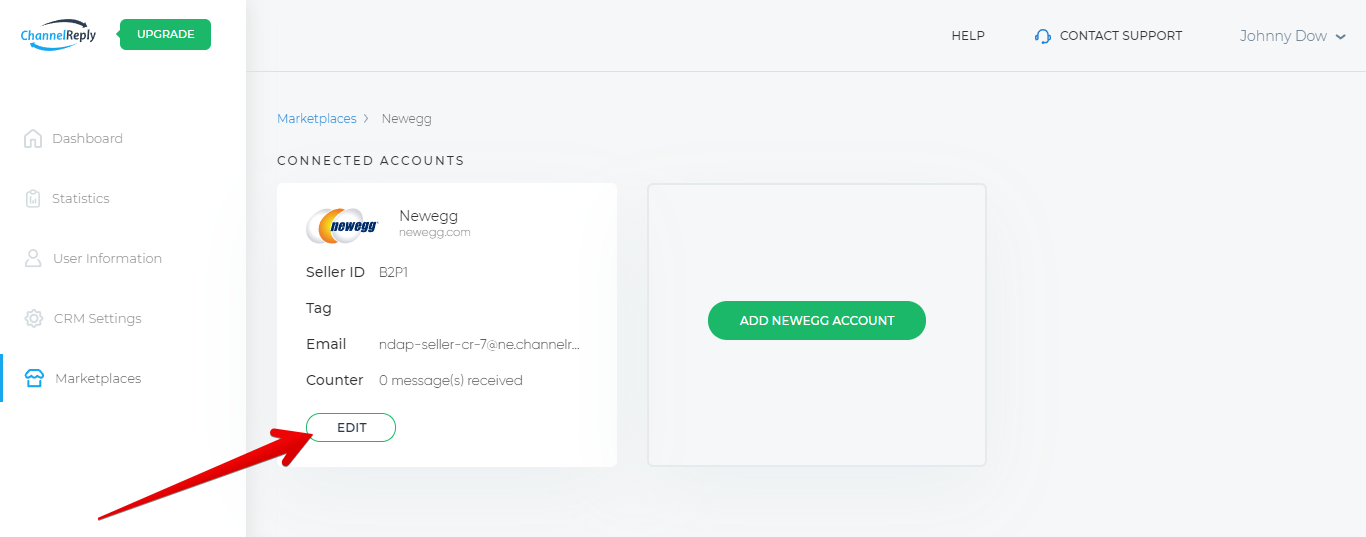
On your ChannelReply dashboard, click on the Newegg tile.
Click “EDIT” under any connected Newegg account.
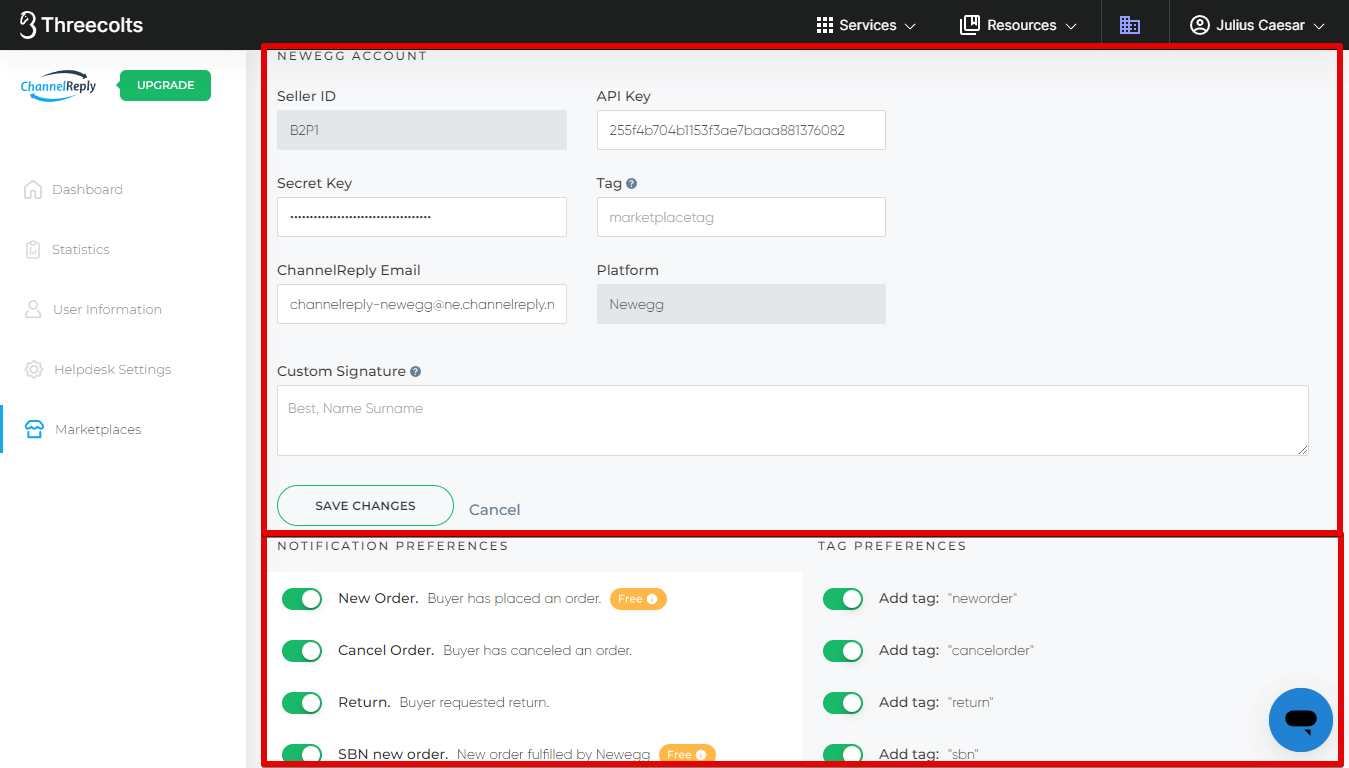
You will then see your Newegg account details and advanced settings. These are broken up into two sections: NEWEGG ACCOUNT and NOTIFICATION PREFERENCES.
Newegg Account Settings
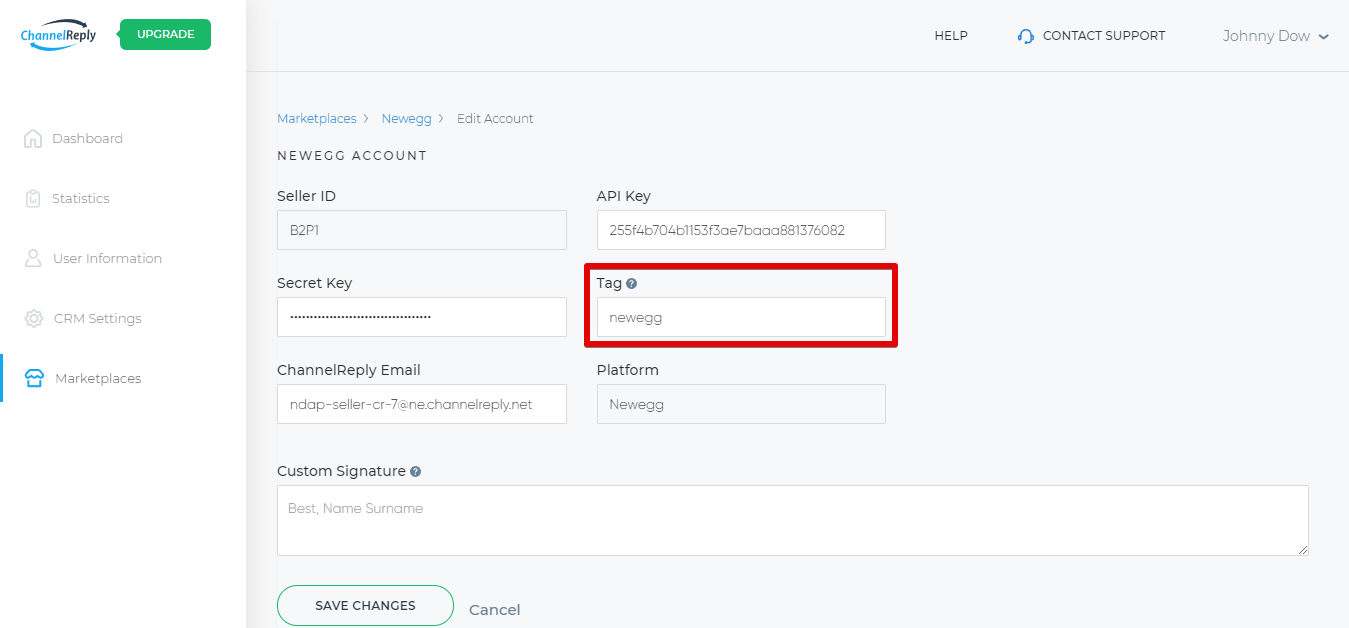
Tag
ChannelReply tags are incredibly useful. They can help you do things like sort tickets, create automations, and build reports in your helpdesk.
Simply enter the tag or tags of your choice in the Tag field.
Your tag will then appear on all new tickets from this Newegg account in your helpdesk. Something as simple as “newegg” is good if you only have one account.
If you want to include multiple words in one tag, we recommend separating words by underscores. For example, “newegg_canada.”
Words separated by spaces will appear as different tags. (“newegg canada” would appear as “newegg” and “canada” in your helpdesk.)
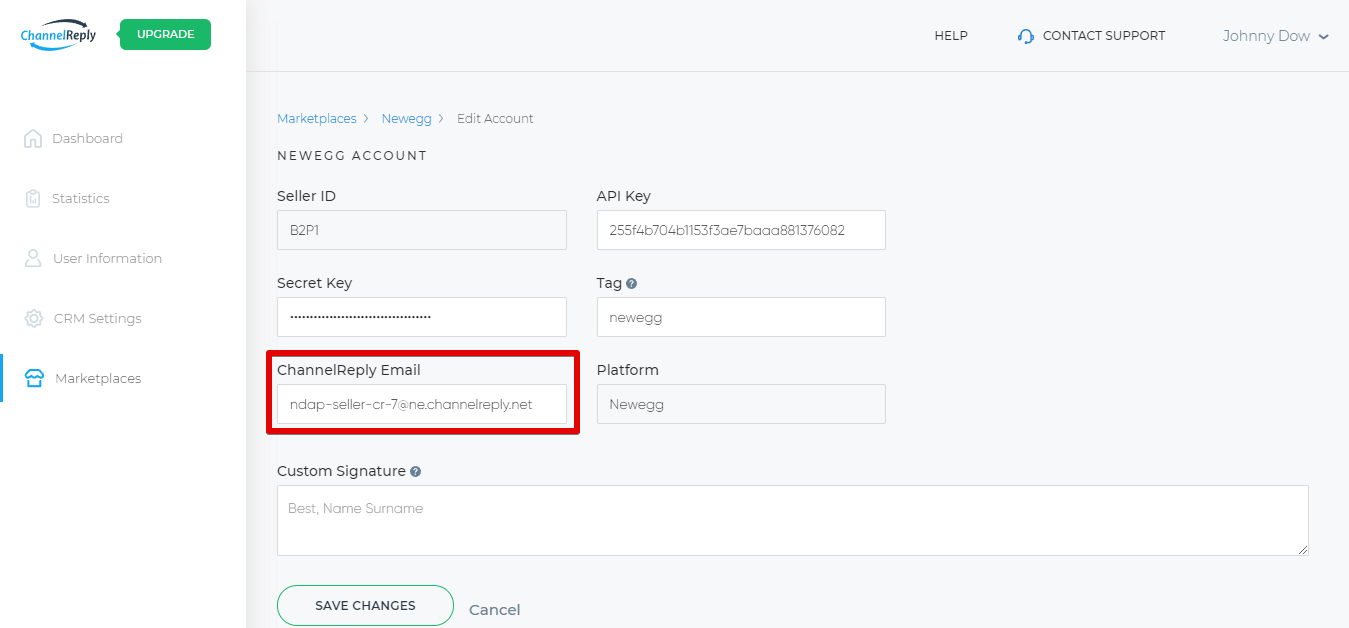
ChannelReply Email
If you change your ChannelReply Email, you will need to repeat step 4 for this Newegg account. Performing this change will create a brief period when your Newegg messages are not being delivered to your helpdesk. Be sure to check your messages manually on Newegg until you start receiving them in your helpdesk again.
You can change your ChannelReply Email at any time. Note that the new address must not be in use by any other ChannelReply user, and it must end in @ne.channelreply.net. You will not be able to save your changes if the email is invalid.
If you change your ChannelReply Email, be sure to click "SAVE CHANGES." You must save your changes before you enter your new email in your Newegg Notification Options. The new email address doesn't exist and won't work until it has been successfully saved.
Remember to repeat step 4 after changing your ChannelReply Email.
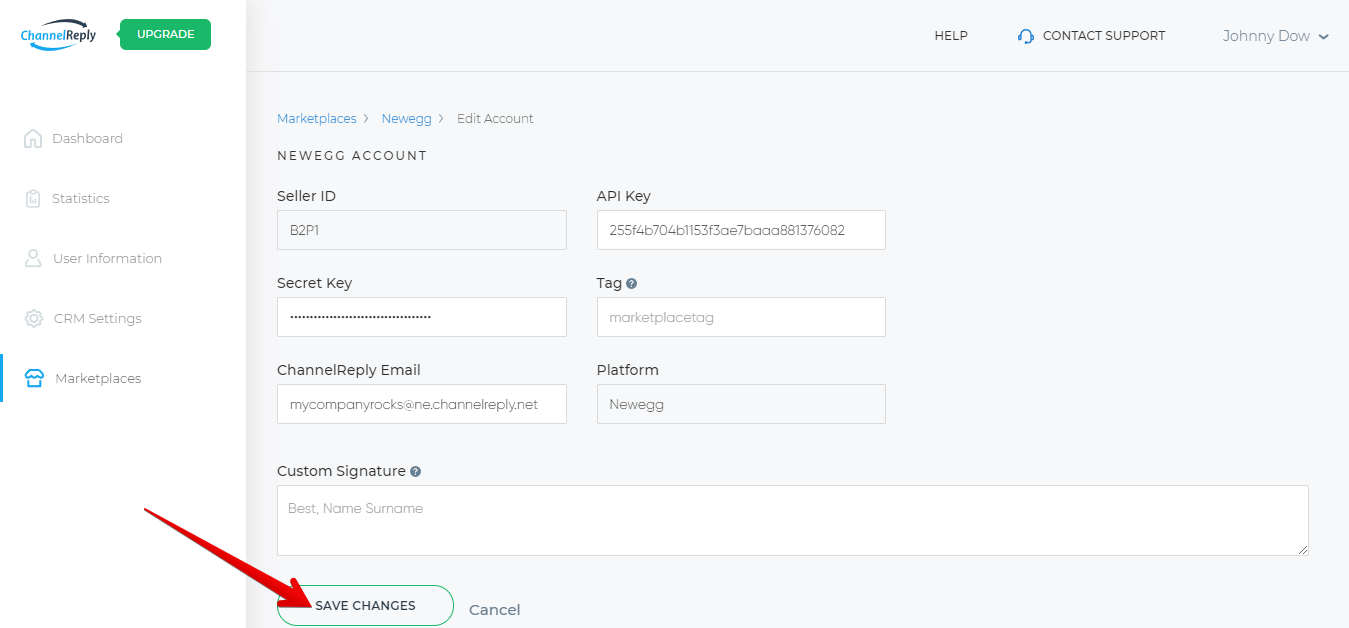
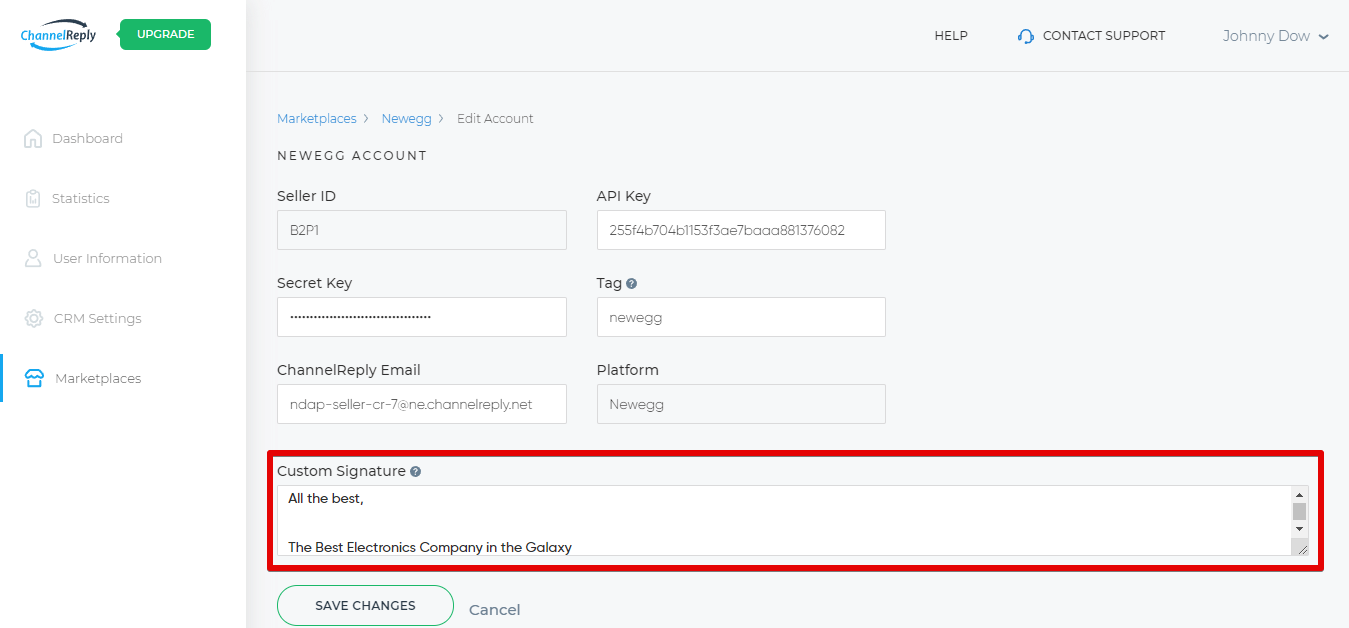
Custom Signature
You can add a custom signature here if desired. (Note that by clicking and dragging the lower-right corner, you can expand the field so it’s easier to edit.)
This signature will appear at the end of your replies to customers from this Newegg account.
If you have a signature in your helpdesk, your ChannelReply signature will appear after it. You can leave this field blank if you only want the signature from your helpdesk.
Want to remove your helpdesk signature or other text from replies to Newegg customers? You can! Check out our text remover instructions to learn more.
Help Scout Users Only: Help Scout Mailbox
If you use Help Scout, you'll have the option to select a Help Scout mailbox. This will determine which mailbox receives messages from this Newegg account.
Choosing a mailbox is critical for setting up advanced features like Help Scout Custom Fields. However, it is not a required step for messaging.
To choose a mailbox, simply click "Choose mailbox ..." and select one from the dropdown menu.
If you do not have a mailbox selected here, we will automatically select a mailbox to send your messages to. This will be the default mailbox you selected in CRM Settings if you have chosen one. Otherwise, they will default to the first mailbox listed in your Help Scout account.
Re:amaze Channel (Re:amaze Users Only)
Re:amaze users will have the Re:amaze Channel option. You can use this dropdown menu to change which channel/brand this Newegg account is associated with in Re:amaze. If you don’t see the brand you’re looking for, read “Managing Re:amaze Brands & Domains (Channels) in ChannelReply.”
Zoho Desk Departments (Zoho Desk Users Only)
Zoho Desk users will be able to choose a Zoho Desk department for each Newegg account they connect. Simply click the dropdown box and choose the department you'd like us to send your Newegg messages to.
Kustomer Channel (Kustomer Users Only)
Kustomer users will see the Kustomer Channel option. You can enter any specific "From" email address that you have available in your Kustomer account. That email address will then be the one that sends replies from Kustomer to Newegg.
This will not change the email address seen by your customers. The message will still be relayed through your ChannelReply Email, and Newegg will show a randomized email address as always.
However, this can be a critical setting if any of your "From" addresses are configured to use email templates in Kustomer. Email templates are not generally compatible with ChannelReply, so it's best to use a "From" address with no special template attached to it. This can resolve issues with messages from Kustomer not appearing in Newegg.
Note that email templates are different from Workspace Shortcuts (canned replies). You can safely use Kustomer Shortcuts with ChannelReply.
Saving Your Newegg Account Settings
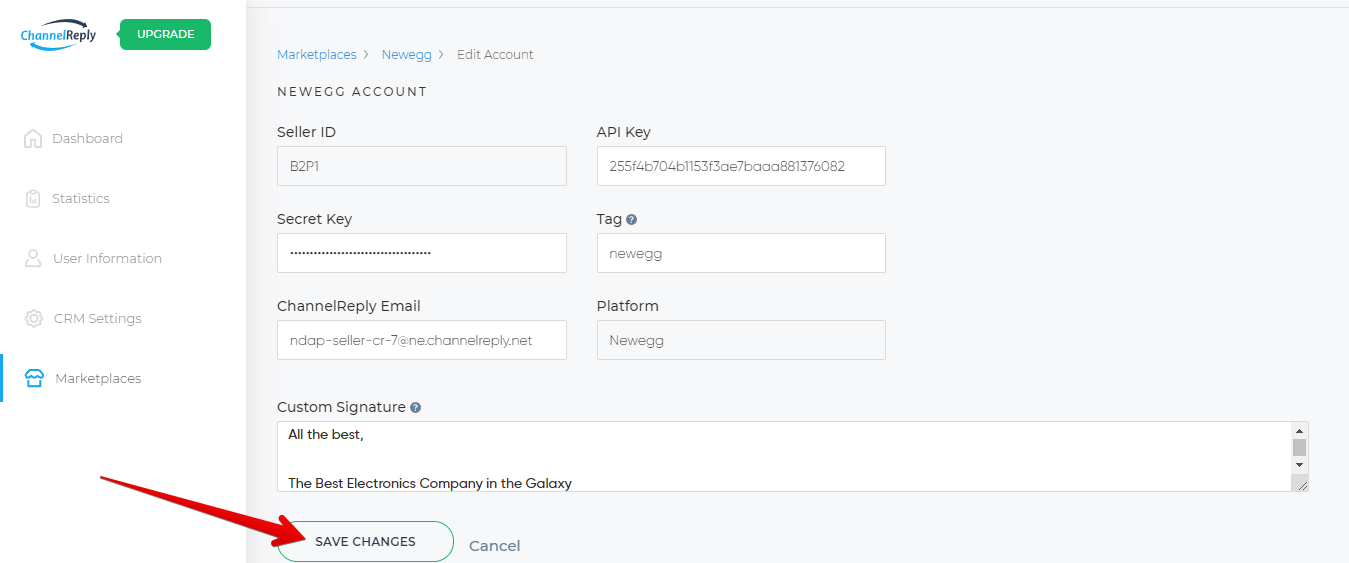
Once you’re happy with all the settings in the NEWEGG ACCOUNT section, click “SAVE CHANGES.”
Notification Preferences
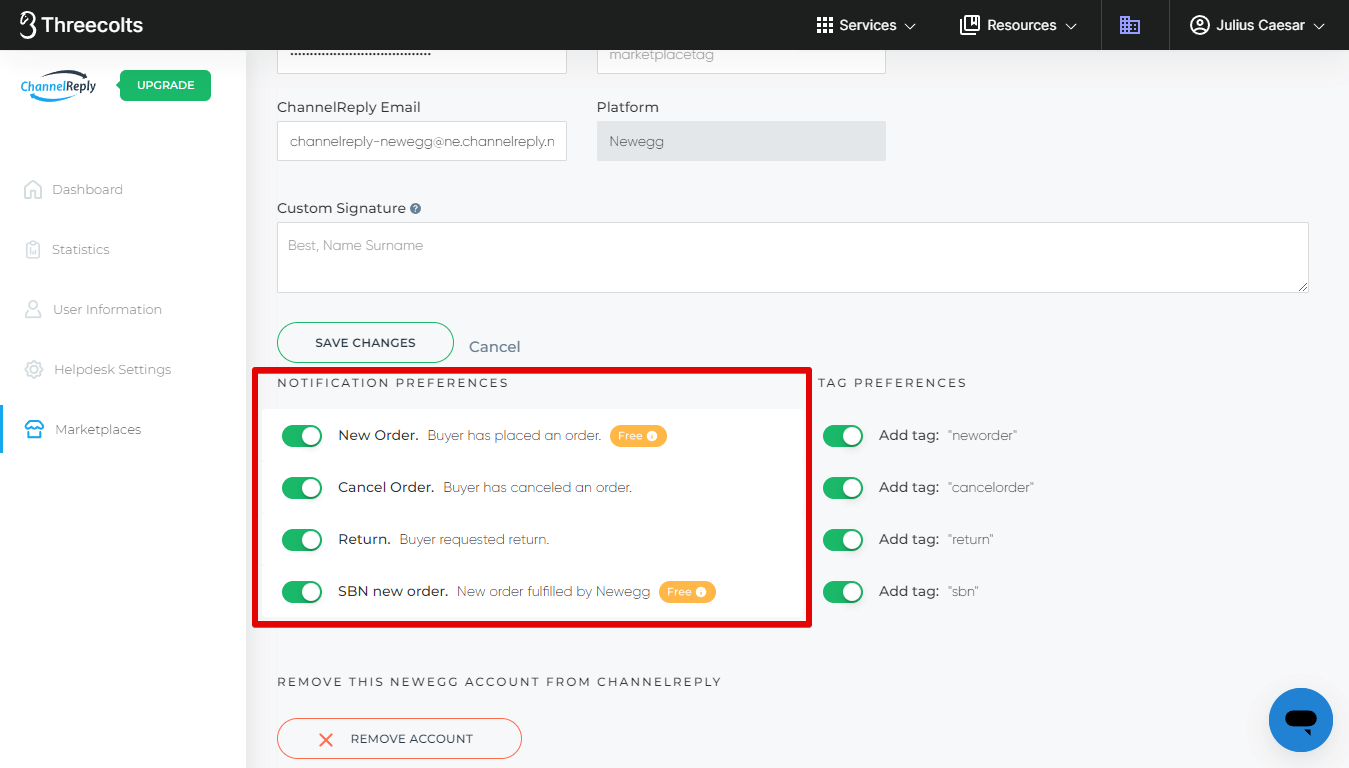
You can manage New Order, Cancel Order, and Return notifications under NOTIFICATION PREFERENCES. These are all enabled by default when you integrate your Newegg account.
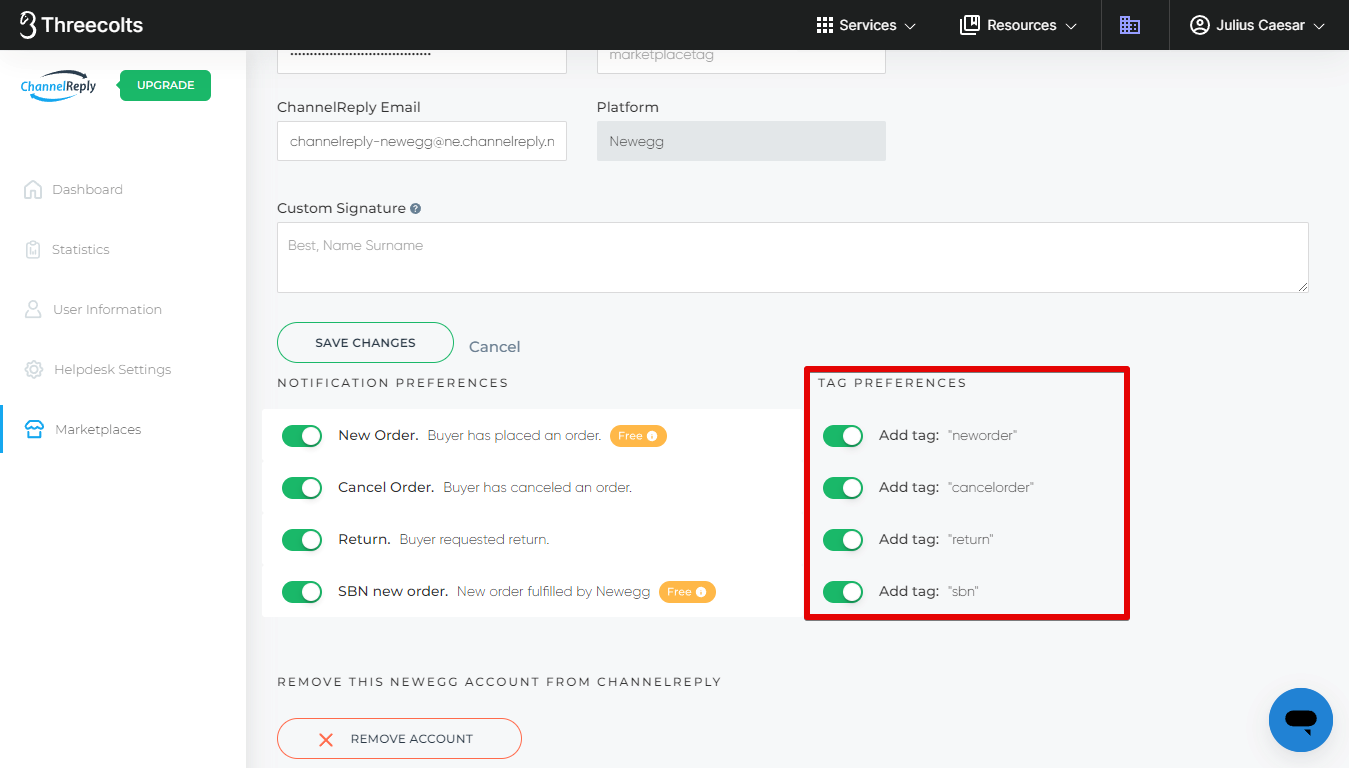
Each notification also has an optional tag enabled by default. These tags can help you better organize your tickets, such as by sorting New Order tickets into a different view than your buyer messages. You can use the TAG PREFERENCES column to disable these optional tags if you do not want them.
Note that a green slider with the knob on the right is enabled, and a grey slider with the knob on the left is disabled. You can disable or re-enable any setting by clicking the slider.
Your changes to these settings will save automatically. Just wait for the success notification to appear to confirm the save has gone through.
New Order
Generates a notification in your helpdesk anytime you receive a new order on Newegg. These notifications are free (they do not count toward your monthly message limit).
If you disable this setting, it blocks all Newegg New Order notifications, including SBN New Orders (discussed later on).
Optional tag: neworder
Cancel Order
This setting is applied to all Newegg messages where the customer chooses "Cancel an Order" as the reason for contacting you on Newegg. If you disable this setting, you will not receive your Newegg cancellation requests in your helpdesk.
Optional tag: cancelorder
Return
This setting is applied to all Newegg messages where the customer chooses any of the following reasons for contacting you:
- Return/Refund/Replacement
- Return/RMA not processed
If you disable this setting, you will not receive your Newegg return, refund, or replacement requests in your helpdesk.
Optional tag: return
SBN New Order
This setting decides whether or not you receive New Order notifications about Shipped By Newegg (SBN) orders.
If New Order is enabled and SBN New Order is enabled, then you will receive all Newegg New Order notifications.
If New Order is enabled and SBN New Order is disabled, then you will only receive New Order notifications about non-SBN orders.
Optional tag: sbn
Remove Account
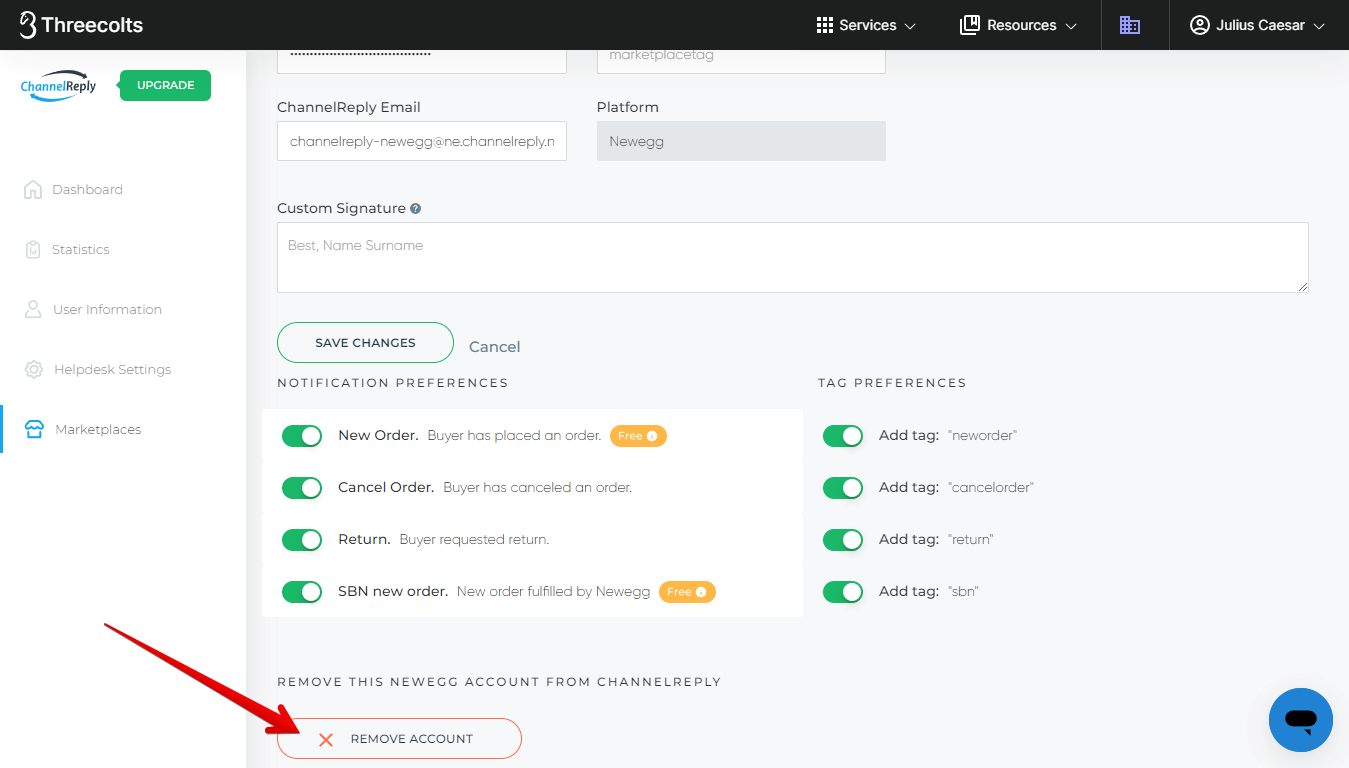
If you ever want to disconnect your Newegg account from ChannelReply, just scroll to the bottom of the page and click “REMOVE ACCOUNT.”
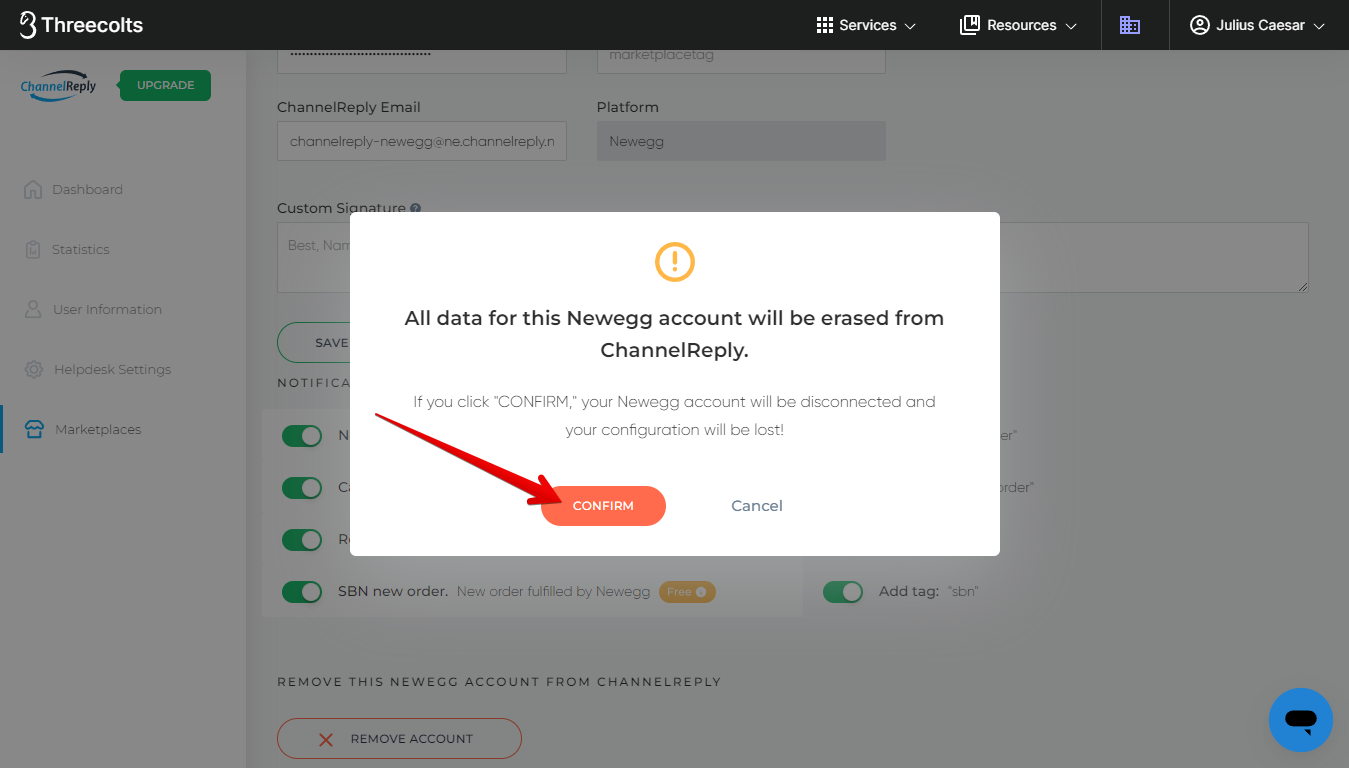
A confirmation message will appear. Click “CONFIRM” if you’re sure you want to remove it.
How Do I Add More than One Newegg Account to ChannelReply?
Simply return to your dashboard and follow these instructions from the beginning. You can add unlimited Newegg accounts.
Need help with your Newegg integration for Zendesk, Freshdesk, Help Scout, Gorgias, Re:amaze, Zoho Desk, Kustomer or Onsite? Contact us anytime. We’ll be happy to assist you!


