Want to use ChannelReply for Walmart messaging, but don't want your customers to see an @channelreply.net address? Email forwarding with custom SMTP is the solution. It can also solve the same problem for some advanced Shopify sellers.
Walmart email forwarding with custom SMTP is currently in open beta. If you use this setup for Walmart, we recommend carefully monitoring your messages to ensure delivery for the first day or two. Please contact us if you would like help with monitoring or if you have any questions.
Should I Use This Setup for Walmart?
If you have a custom branded email that you want to use for Walmart support, we recommend using email forwarding with custom SMTP.
Should I Use This Setup for Shopify?
For most users, our normal Shopify integration instructions are perfect. The default setup lets you use your favorite email address for Shopify support. It also gives you all your Shopify messages and data in Zendesk, Freshdesk, Help Scout, Re:amaze, Zoho Desk, Kustomer or Onsite Support.
There are only two reasons why you might want to set up custom SMTP for Shopify:
- You want to use a custom email address for Shopify support and want to disable our default setting "Process external messages." (Normally, you must leave "Process external messages" turned on or use your @channelreply.net address for Shopify support.)
- You use Kustomer as your helpdesk and want to set a specific Kustomer Channel for Shopify and want to use a custom email address for Shopify support. (Normally, you have to use an @channelreply.net address for Shopify support if you want Kustomer Channel to work.)
If one of the reasons above is true for you, here’s how to use email forwarding with custom SMTP.
Overview
The exact steps for email forwarding will depend on the marketplace and the email service you use, but they're usually very similar. The following instructions cover both Walmart and Shopify for Gmail and iCloud Mail.
- Choose or create a unique, branded email address that you will use only for supporting this one Walmart or Shopify account.
- If you have not done so already, integrate your Walmart (US) (CA) or Shopify account with ChannelReply. You can exit setup as soon as you reach step 3 of our Walmart instructions (either US or CA) or step 4 of our Shopify instructions.
- Enter your branded email address as your customer service email in Walmart or Shopify.
- Walmart US: Enter it as your only Customer Service Contact.
- Walmart CA: Enter it as your Customer Service Email and Customer Service Escalation Email.
- Shopify: Enter it as your Sender Email. Be sure to authenticate your domain if you have not done so already.
- Open your ChannelReply account. Click Walmart or Shopify on the dashboard, then EDIT under the specific account you're working with. Copy the ChannelReply Email.
- In another browser tab, sign in to your branded email address. Go to the email forwarding settings. Enter the unique ChannelReply Email for this Walmart or Shopify account as a forwarding address.
- Additional step for Gmail users: A verification email with instructions will be sent to the helpdesk you've connected to ChannelReply. Follow the instructions. Then return to Gmail, enable forwarding, and set your forwarding preferences.
- Confirm that you have two-step verification enabled in your Google Account (for Gmail) or Apple ID (for iCloud Mail).
- Create an app password for ChannelReply in your Google or Apple account. When a password appears, keep the screen open, as you won't be able to see it again after you close it.
- In ChannelReply, click Walmart or Shopify on your dashboard, then click “EDIT” under your connected account.
- Find the CUSTOM SMTP section and paste your app password into the Password field.
- Enter your branded email address under Username and Customer Service Email Address.
- Enter 587 as the Port, and for Encryption, choose TLS.
- In SMTP server, enter smtp.gmail.com for Gmail or smtp.mail.me.com for iCloud Mail.
- Click "SAVE CHANGES."
- Click "Verify email settings."
Once it finishes verifying, you're done! Customers will only see your branded email address. At the same time, all ChannelReply features will work for your Walmart/Shopify account.
We'll go into this process in great detail below. Please note that the numbers of the steps below do not match the numbers of the overview list above.
1. Select a Dedicated Email for Walmart or Shopify Support
If you want to use this setup, please note that it's best to have a dedicated email address just for this one specific Walmart or Shopify account. Otherwise, you may end up forwarding a large number of unwanted emails to your helpdesk (and paying us to do it!). Using a dedicated support email address for each account will help you keep clutter and costs low.
If you already have a dedicated email address set up to receive and answer your Walmart or Shopify messages, you can skip to step 3.
2. Enter Your Dedicated Email in Walmart or Shopify
If you have created or chosen a new email address just for your Walmart or Shopify account, then you'll need to enter it in your support settings now. Read on for Walmart US instructions or skip ahead to the Shopify instructions.
2A. Entering a New Dedicated Email Address in Walmart US
If you haven’t already started connecting your Walmart account, follow the first two steps of our Walmart US integration guide. Once you reach "3. Update Your Walmart Email Settings," exit setup and come back here.
If you've already integrated your Walmart US account with ChannelReply, simply continue reading.
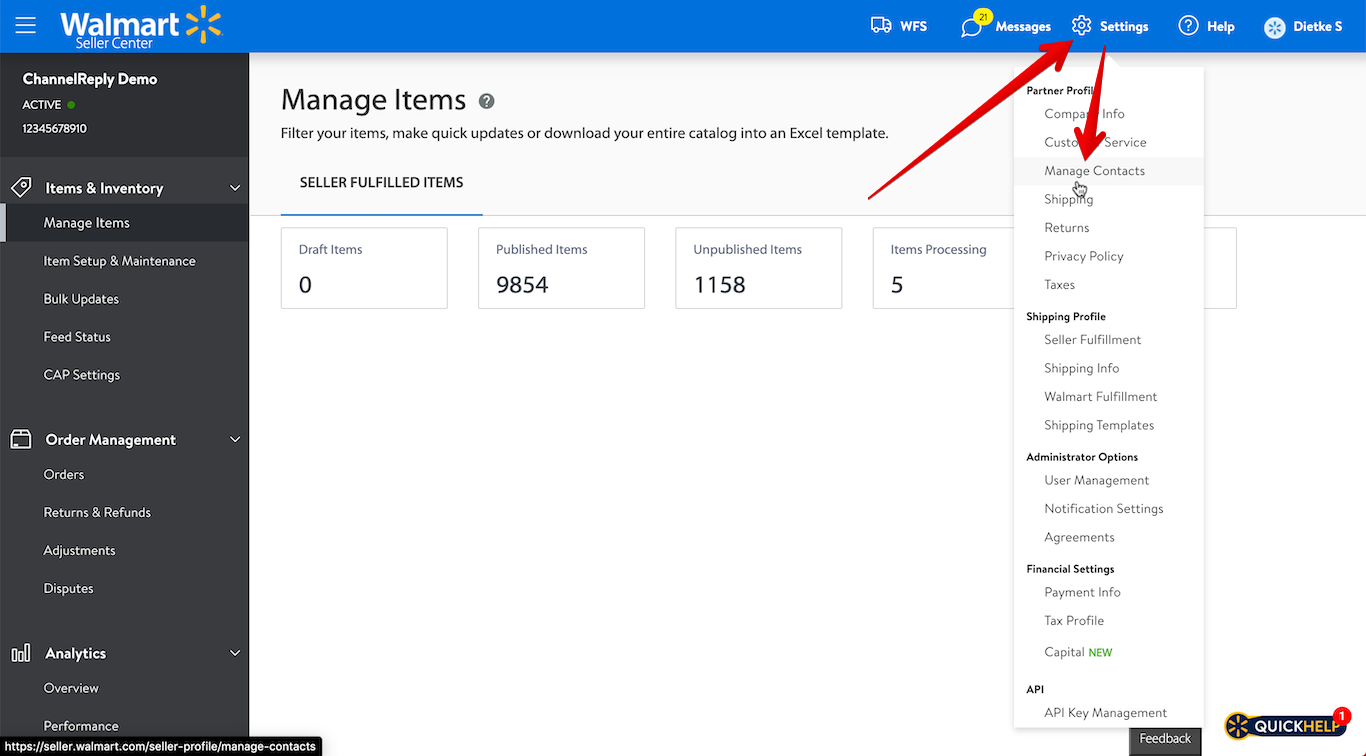
Sign in to your Walmart Seller Center account. Then click “Settings” and choose “Manage Contacts.”
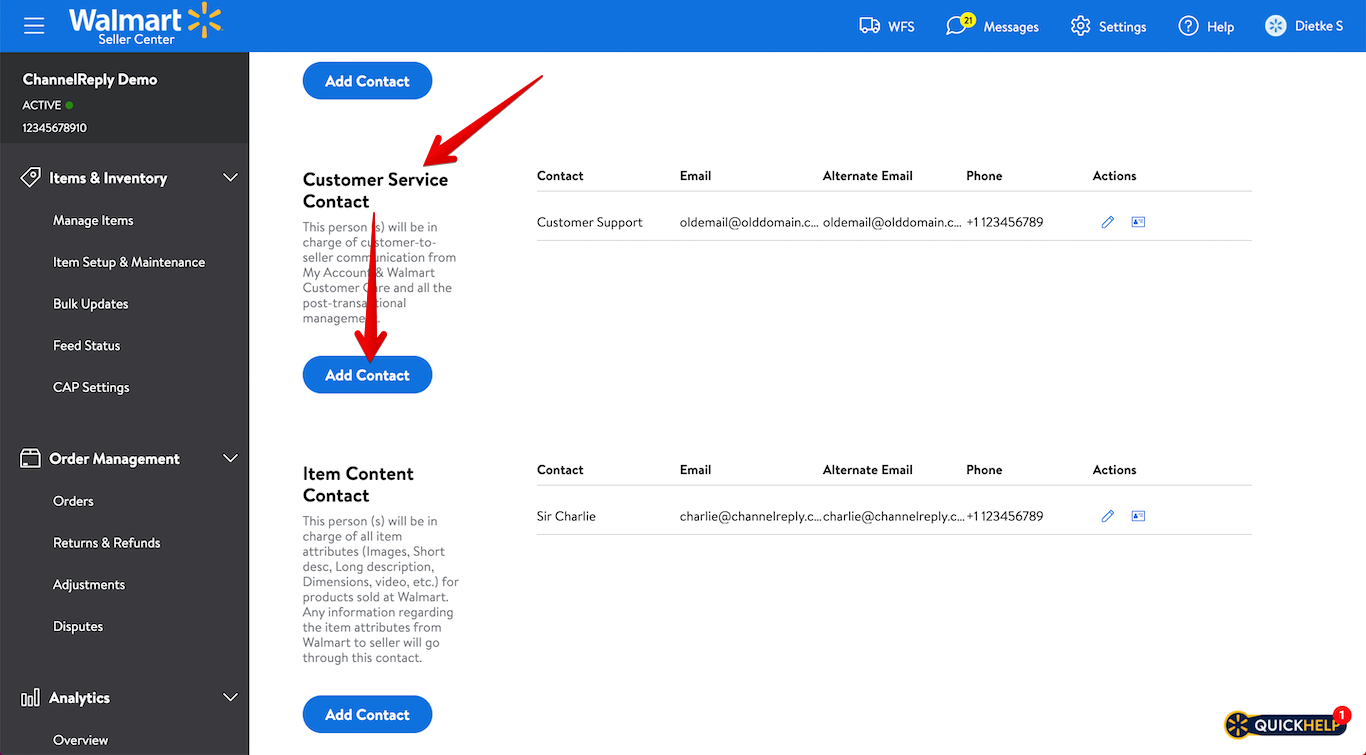
Scroll down to “Customer Service Contact” and click “Add Contact.”
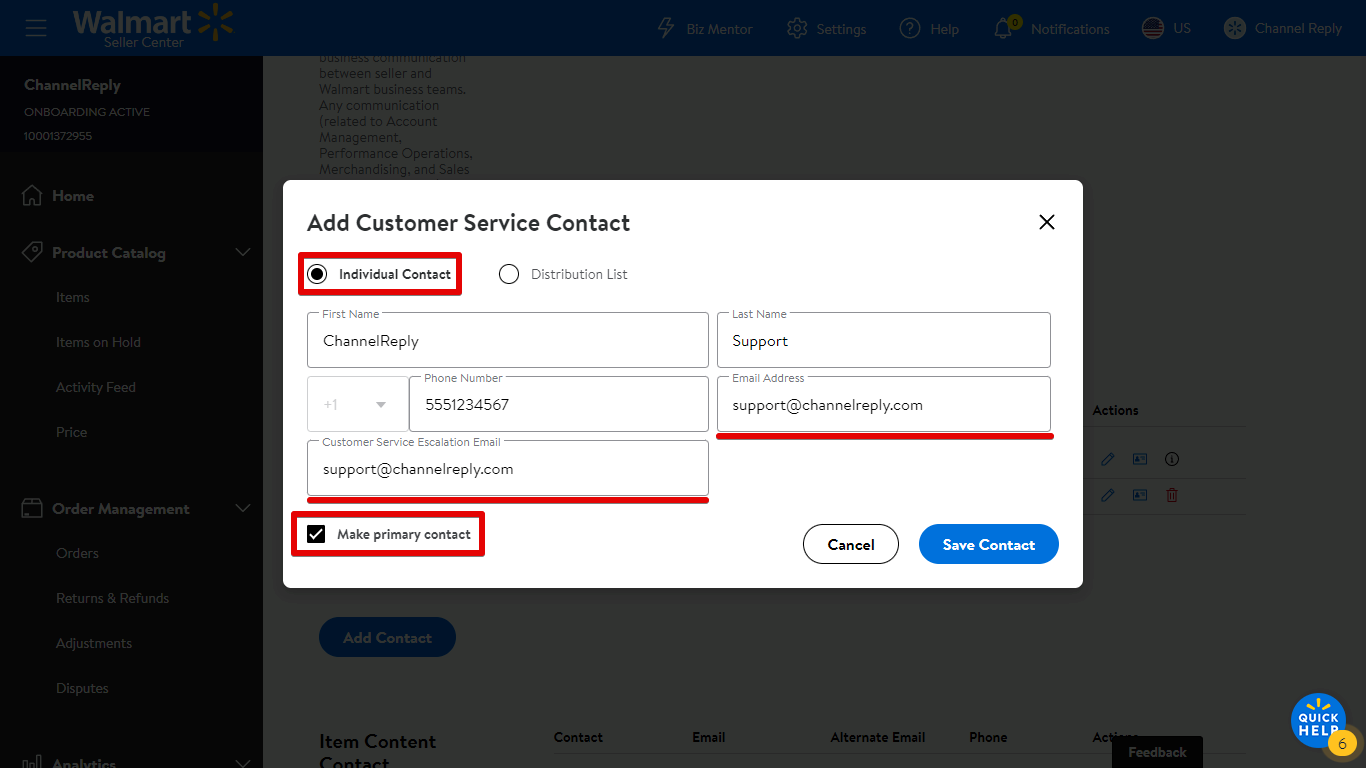
Make sure “Individual Contact” is selected. (“Distribution List” does not work with ChannelReply.) Check the "Make primary contact" box. Then paste your dedicated email address into the “Email Address” and “Customer Service Escalation Email” fields.
Fill in the remaining fields with your main customer service contact info. This should be your only customer service contact for Walmart, and at the very least will be your primary contact. So, make sure you enter your best phone number!
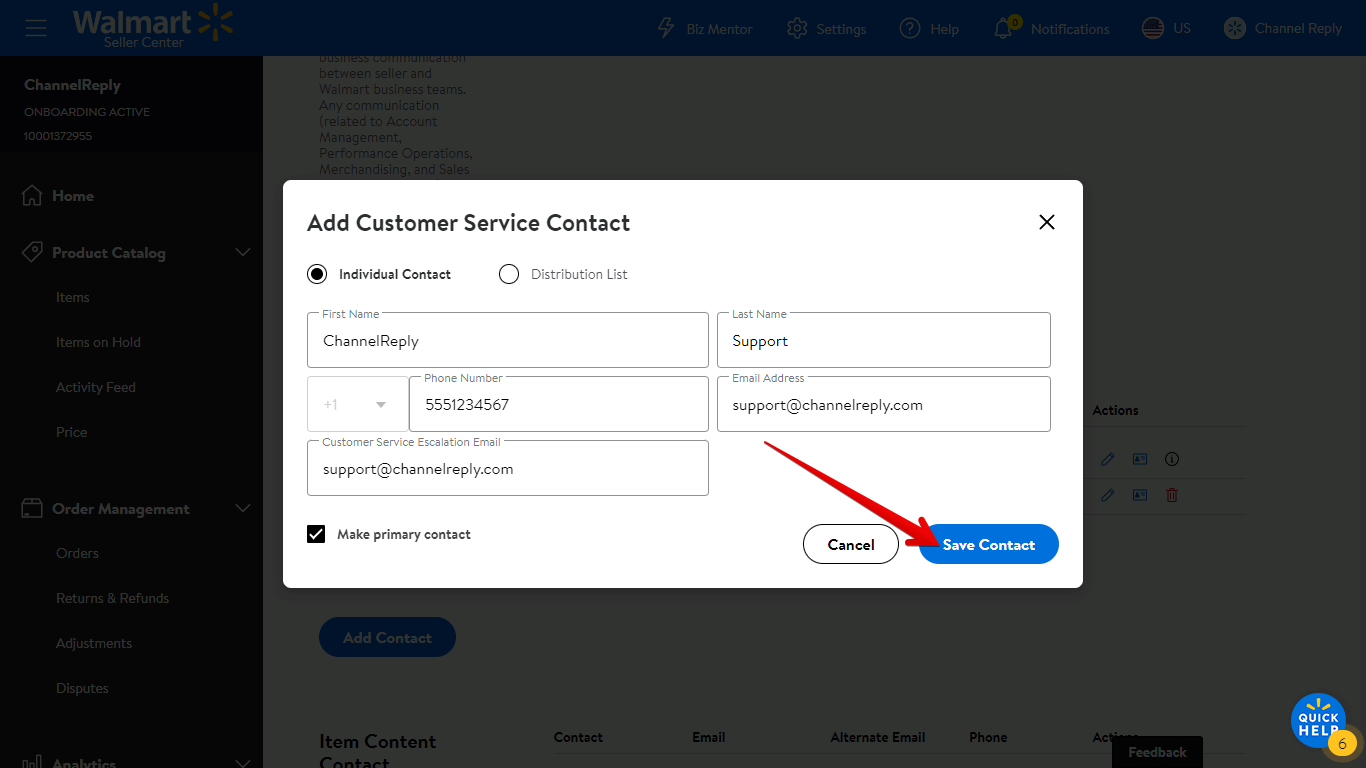
Once done, click “Save Contact.”
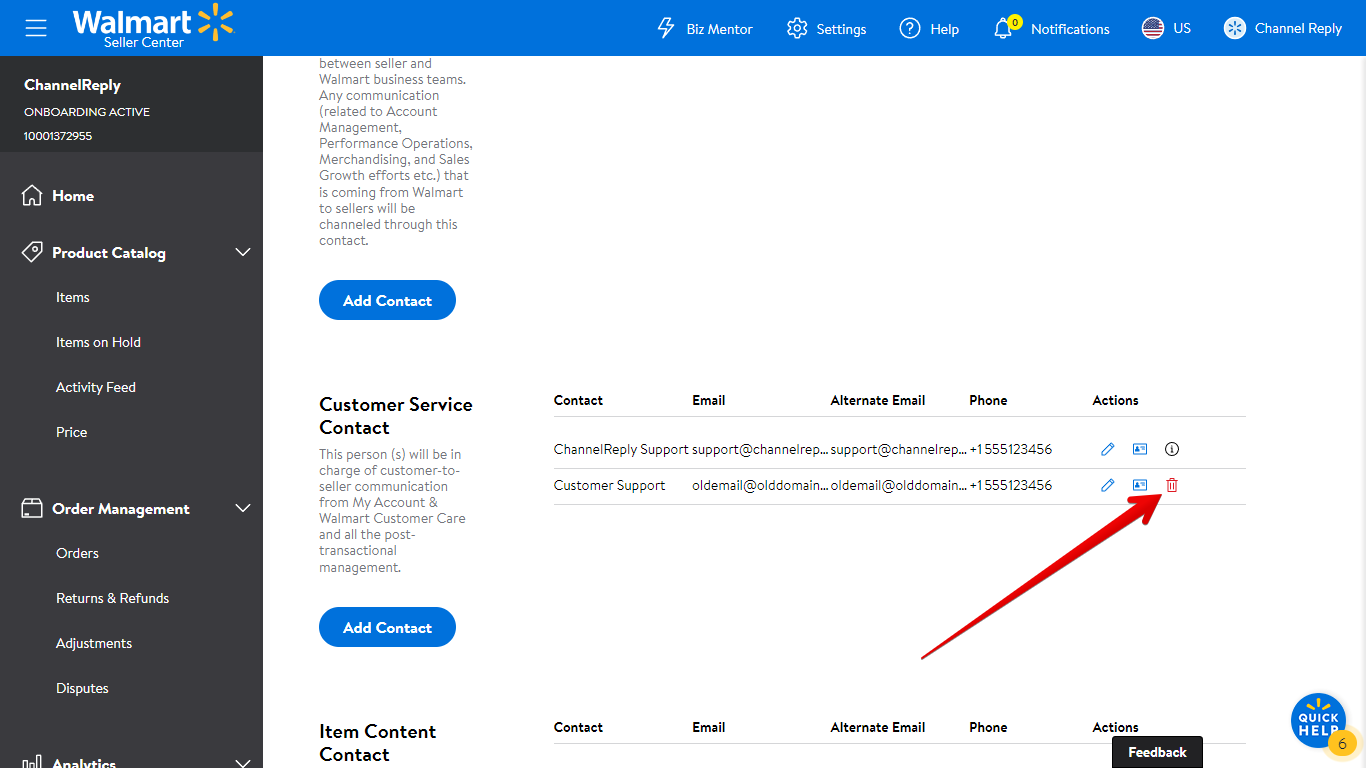
Next, we recommend deleting all your other customer service contacts. This will ensure data and messages are delivered reliably. To delete a contact, click the trash can on the right.
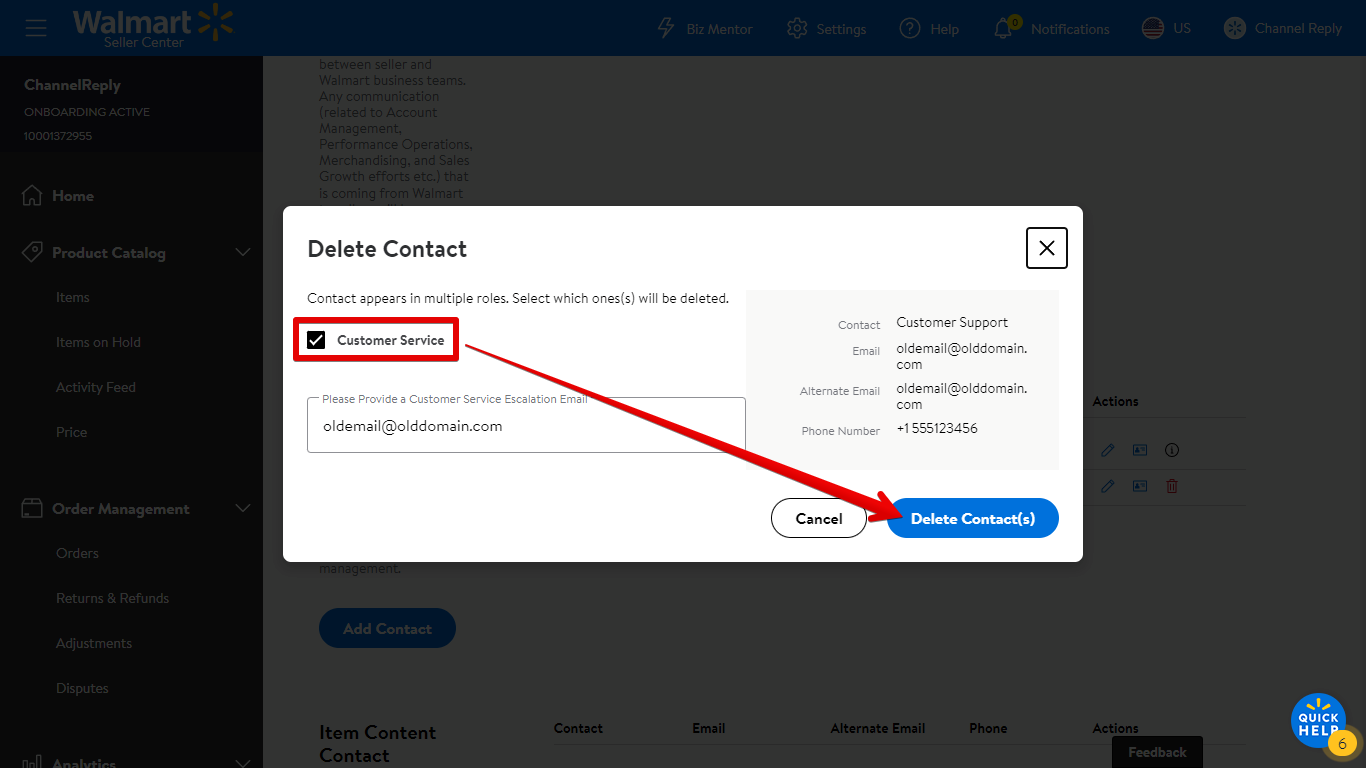
On the confirmation screen, make sure “Customer Service” is checked, then click “Delete Contact(s).”
You can now skip to step 3.
2B. Entering a New Dedicated Email Address in Shopify
If you haven’t already connected your Shopify account, follow the first three steps of our Shopify integration guide. Once you reach "4. Email Configuration," exit setup and come back here.
If you've already integrated your Shopify account with ChannelReply, simply continue reading.
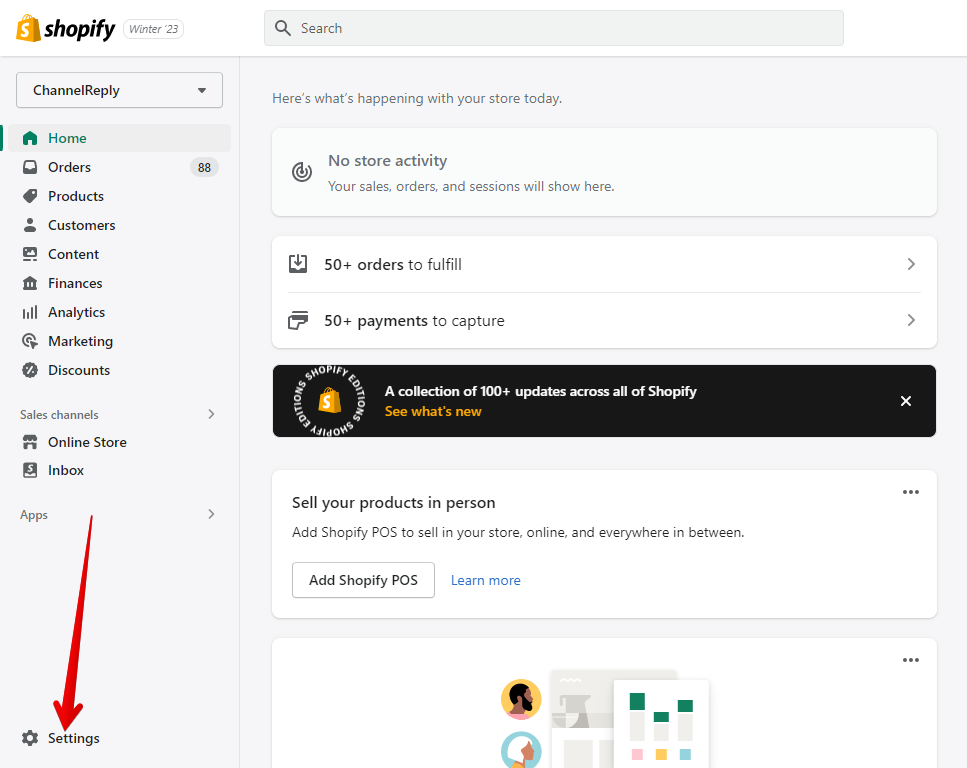
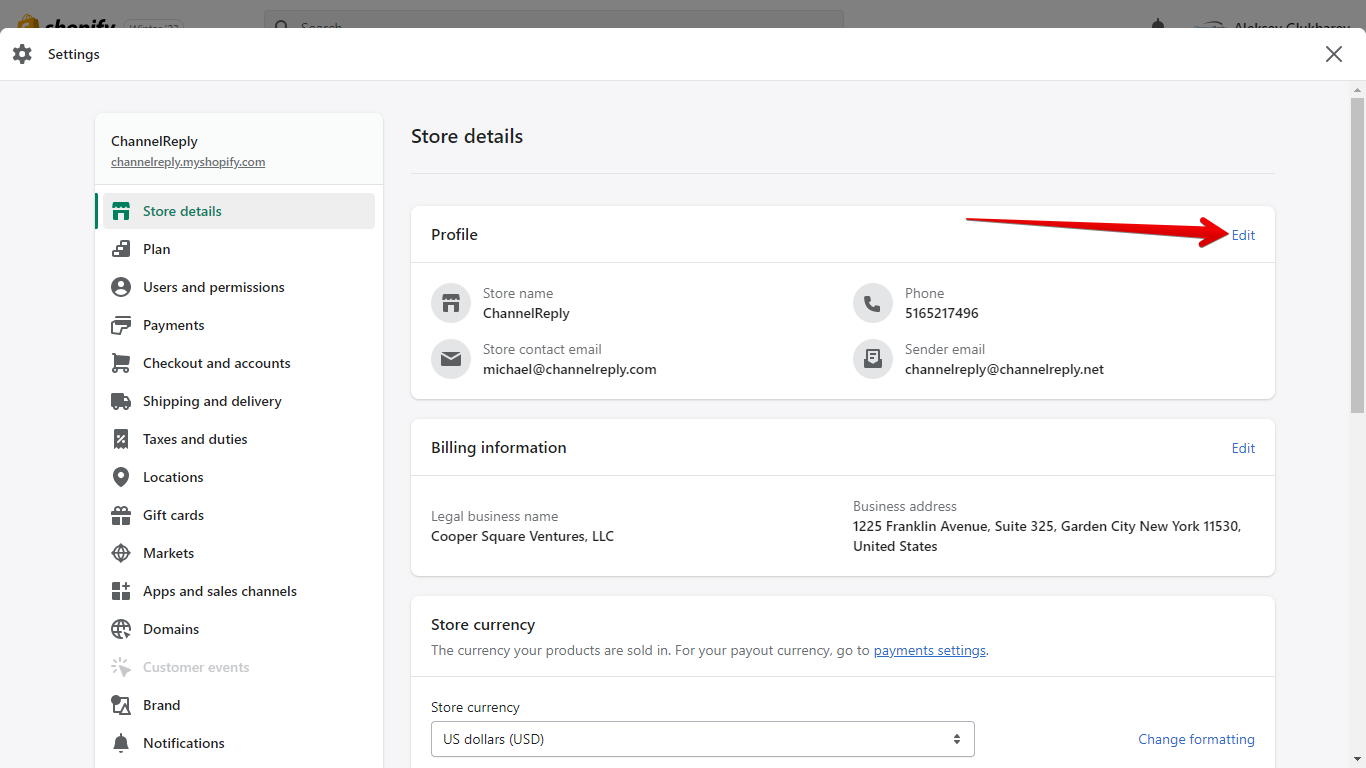
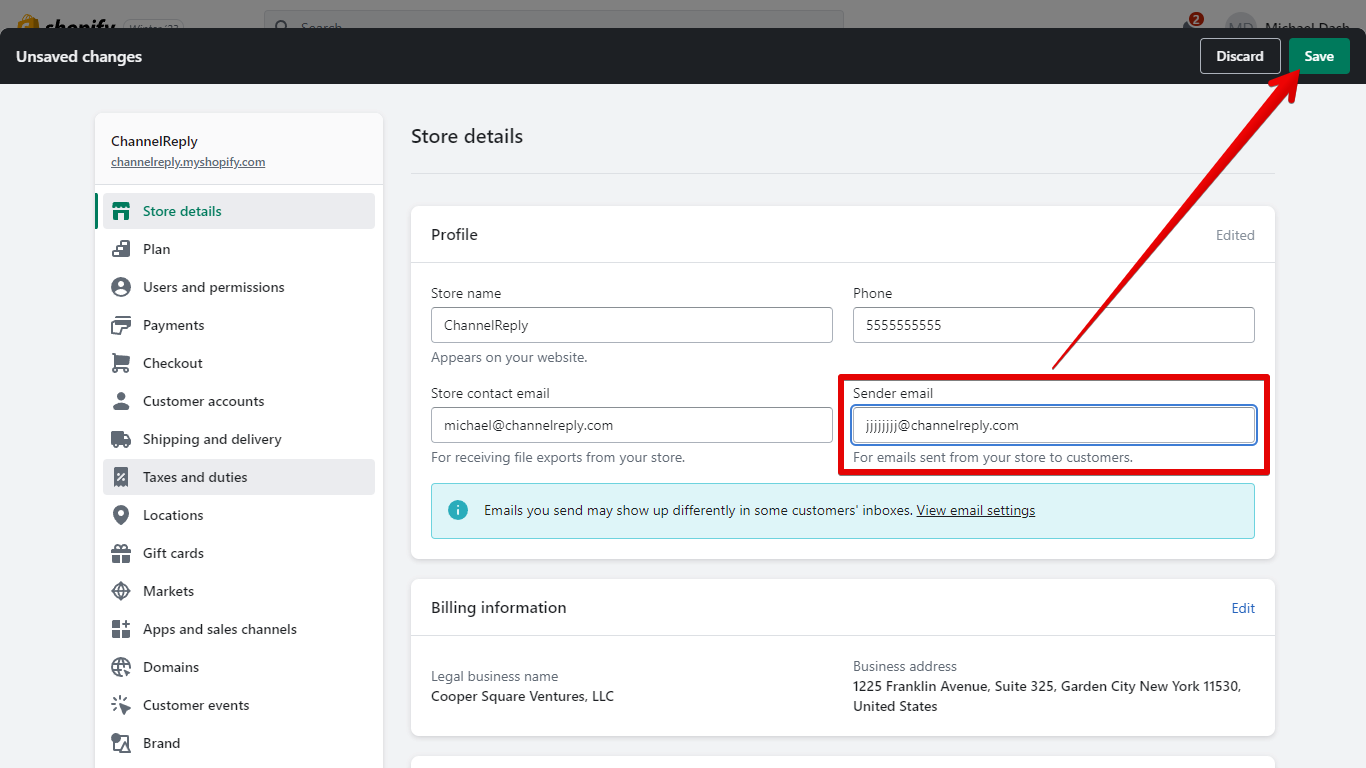
The first thing you'll need to do is enter your new dedicated email address as your "Sender email" in Shopify. You can change your sender email by going to "Settings," then clicking "Edit" next to "Profile." Remember to hit “Save” after changing it.
Then, follow Shopify's prompts to authenticate your domain if you have not already done so. Note that you can only authenticate a domain that you own. (If you don't own the domain you're using, you can just verify your email address, but your emails may appear as coming from "via shopifyemail.com.")
3. Collect Your ChannelReply Email
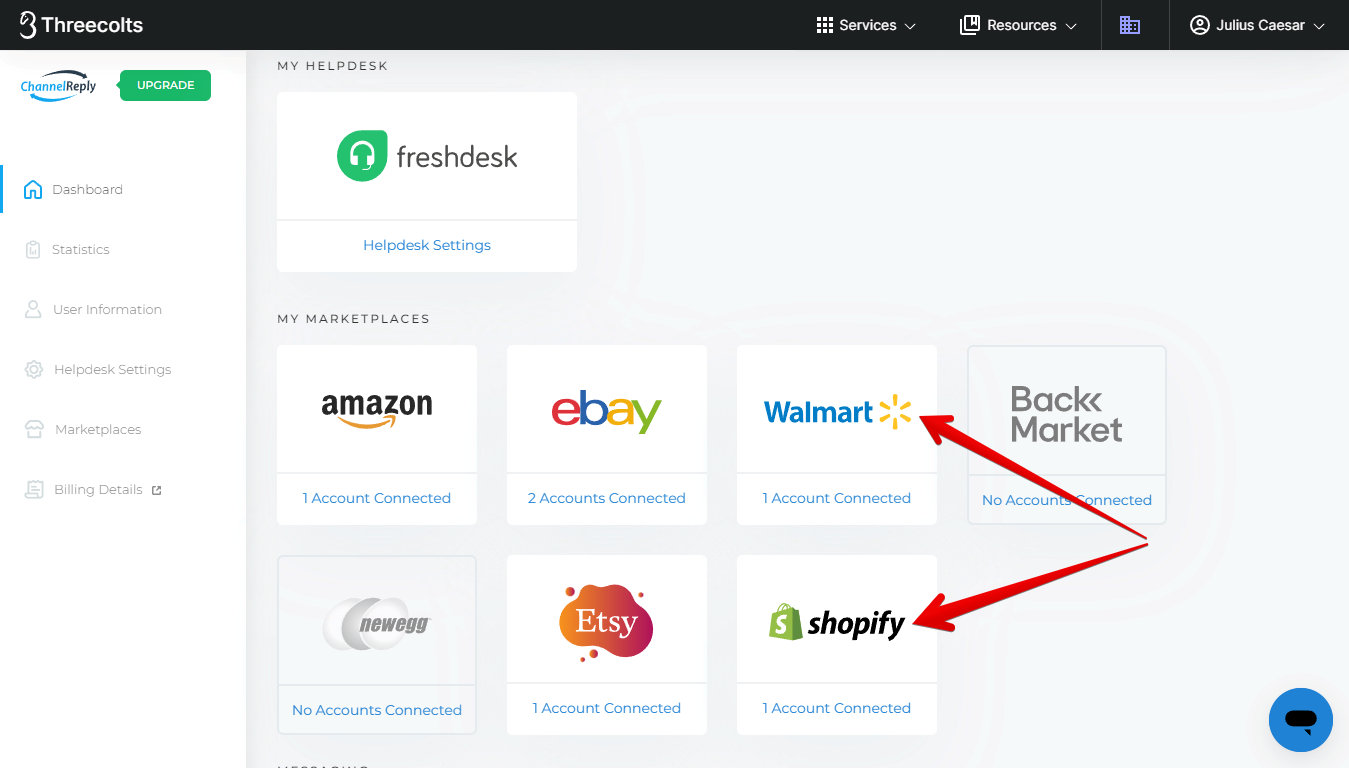
Go to your ChannelReply dashboard. Click on the Walmart or Shopify tile. (Note that you may need to scroll down to see them.)
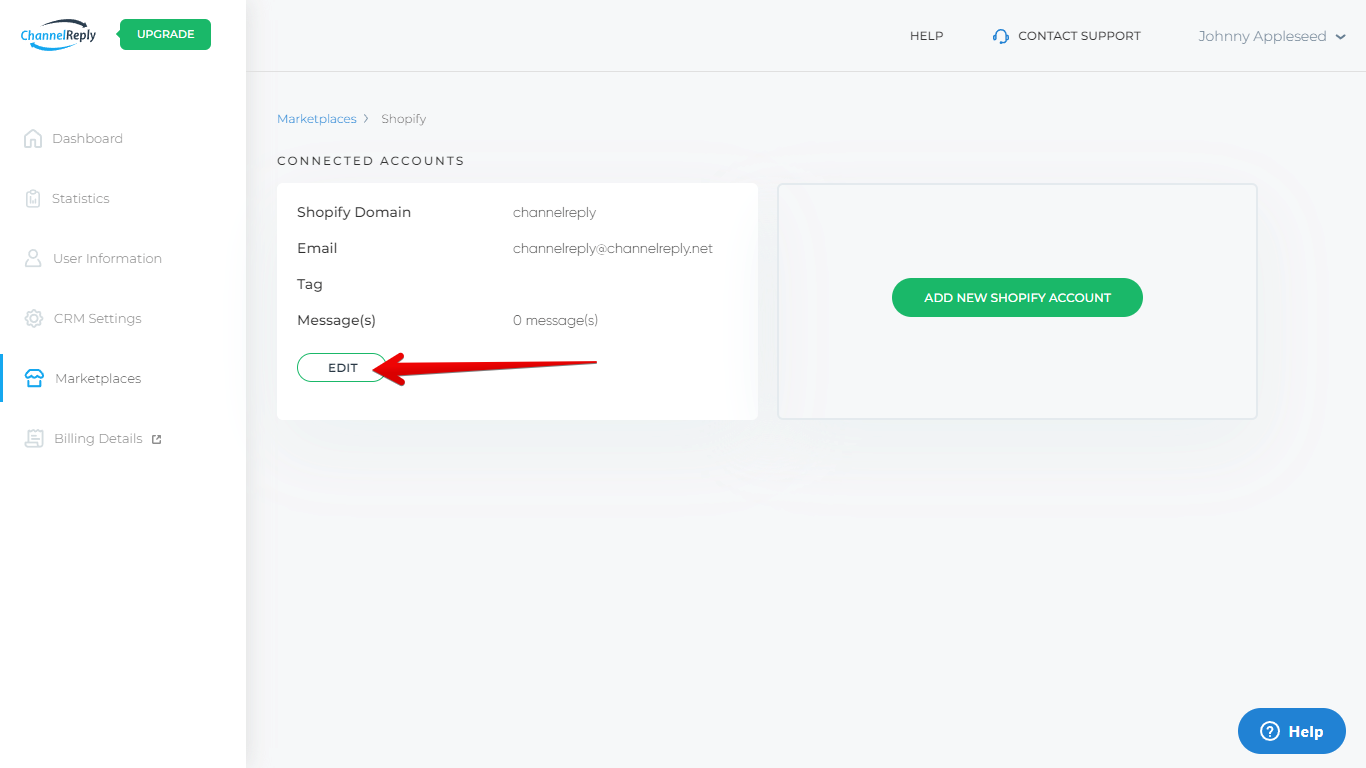
Click “EDIT” under your connected Walmart or Shopify account.
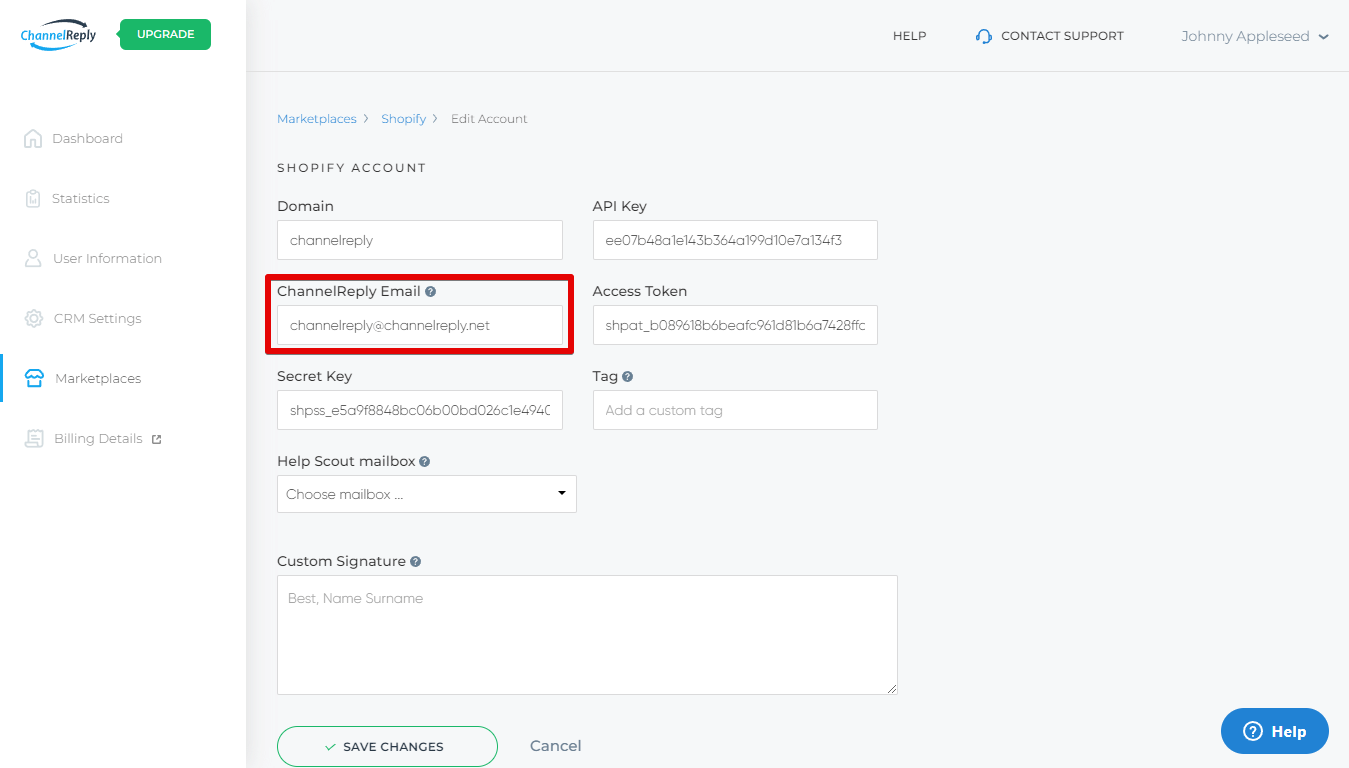
Copy your ChannelReply Email. This will be available near the top of the screen whether you're working with Walmart or Shopify.
4. Set Up Forwarding
Continue reading for Gmail instructions, or skip down to the iCloud setup guide.
Gmail instructions are numbered GM-1, GM-2 etc., while iCloud instructions are labeled IC-1, IC-2 etc.
Gmail Setup Guide
GM-1. Enter Your ChannelReply Email as a Forwarding Address
Sign in to the Gmail account you use for Walmart or Shopify support. (Remember, this should be the unique branded email address that you will use only to support this one Walmart or Shopify account.)
You'll need to be careful to use the same address for all steps involved in this process. If you have multiple Google accounts, Google is very likely to switch you back to your default address more than once during later steps. Be certain to keep an eye on which address you're working with at all times.
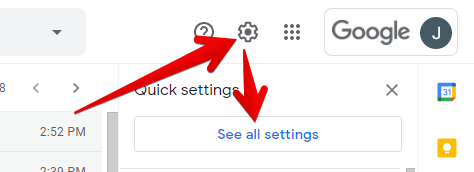
Click “Settings” (the gear icon in the upper right), then “See all settings.”
Select the “Forwarding and POP/IMAP” tab, then click “Add a forwarding address.” Paste in your ChannelReply Email and click "Next."
Click through all the OK buttons that appear in Gmail.
GM-2. Verify Ownership of Your ChannelReply Email
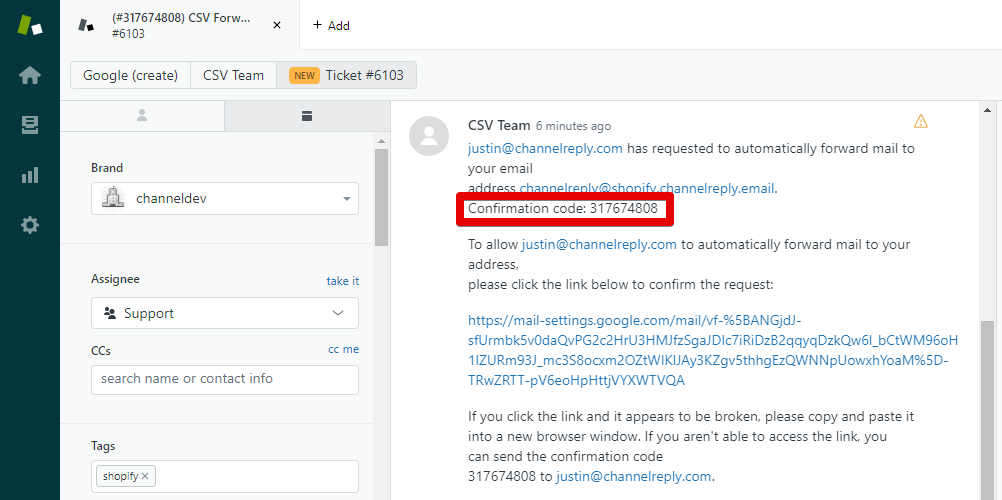
Check your helpdesk account for the verification email. ChannelReply will have turned it into a ticket.
Copy the confirmation code.
Return to Gmail. Paste the code into the “confirmation code” field and click “Verify.”
GM-3. Enable Forwarding and Configure Settings
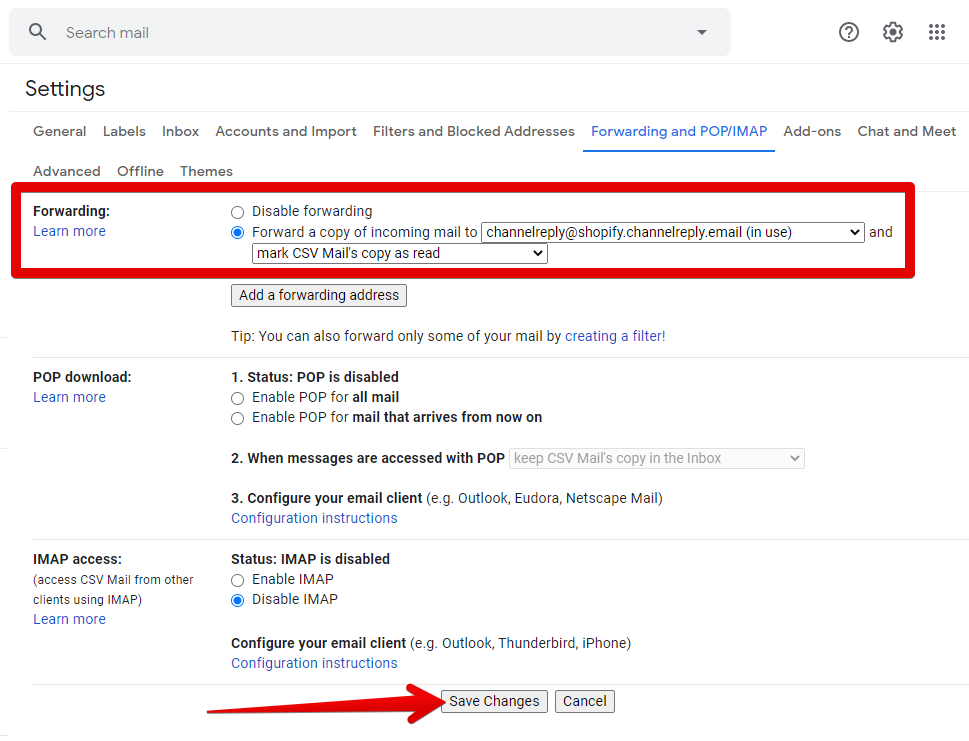
Next, enable forwarding. We recommend using the settings “Forward a copy of incoming mail” and “mark (your company's name)’s copy as read.” Once everything is configured, click “Save Changes.”
GM-4. Confirm 2-Step Verification Is Enabled
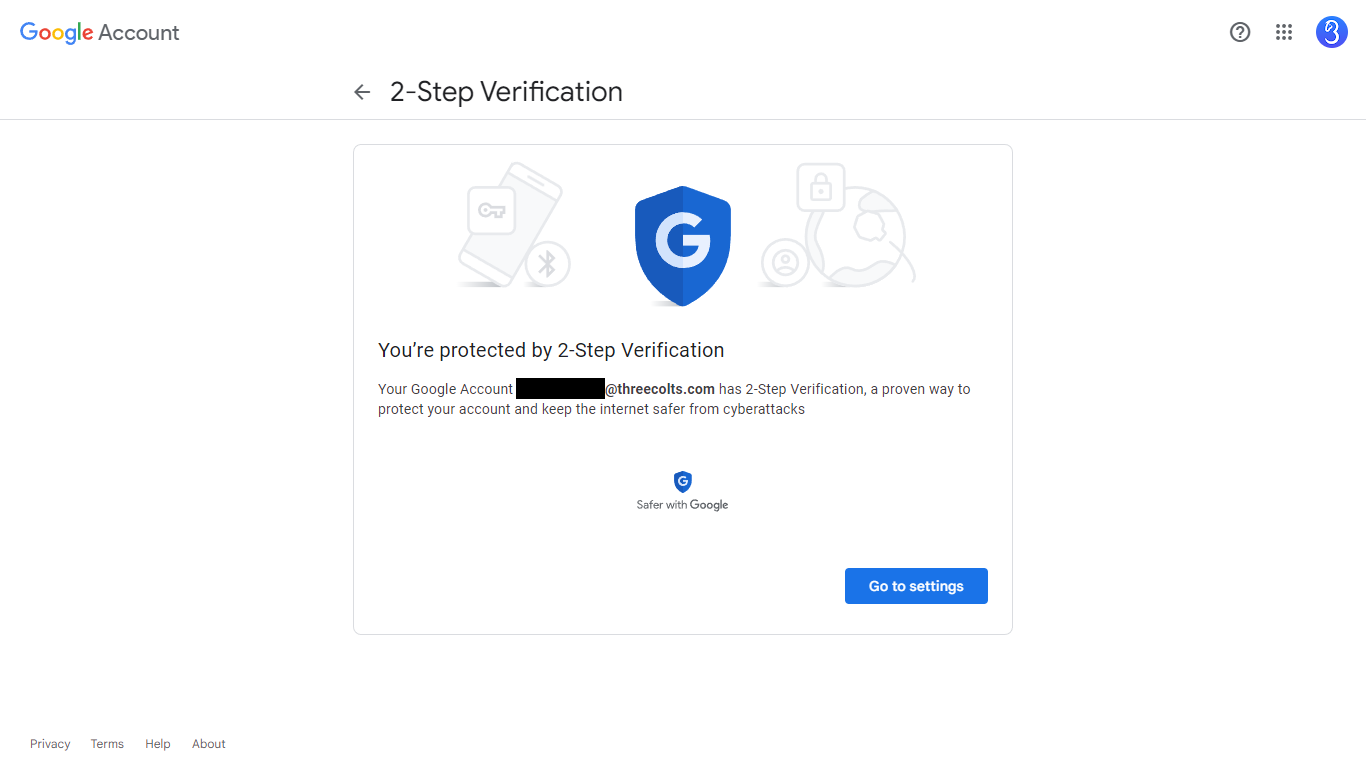
Visit Google Account's 2-Step Verification page.
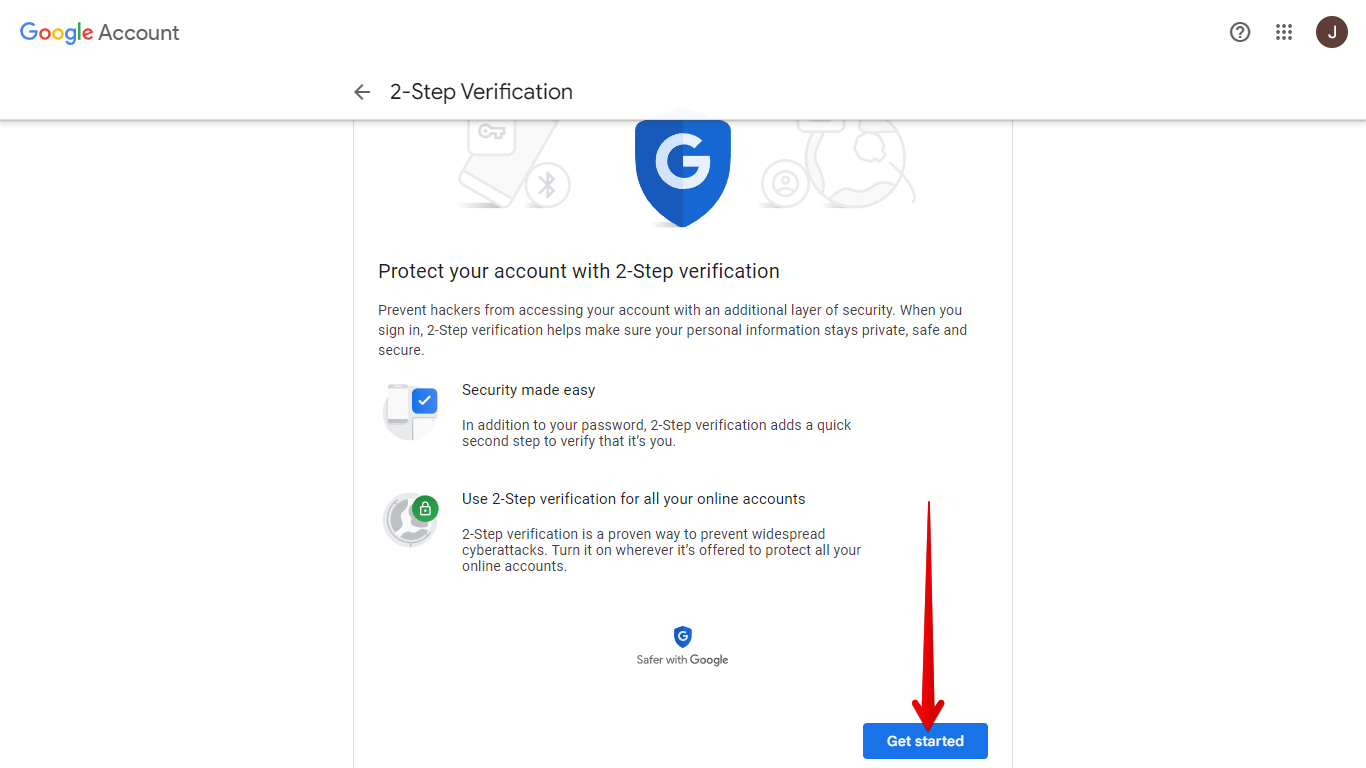
If 2-Step Verification has not been enabled, you'll see "Protect your account with 2-Step verification." Click "Get started" in the bottom right. Follow Google's instructions to enable 2-Step Verification for your account.
If you have already enabled 2-Step Verification, you'll see "You're protected by 2-Step Verification," as shown below. If you see this message, no action is needed here.
GM-5. Set Up an App Password
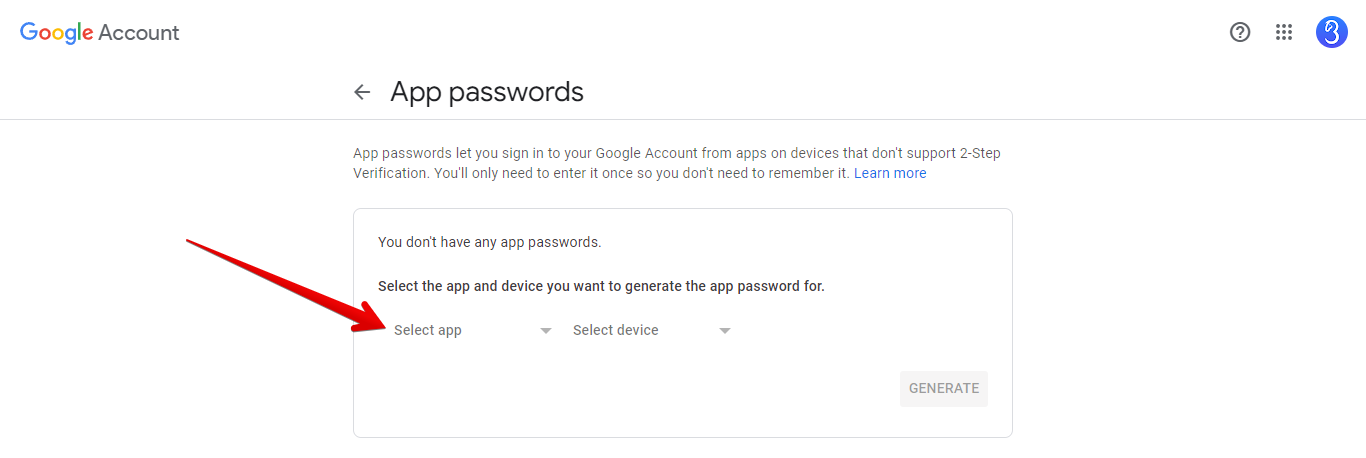
Visit "App passwords" in Google Account. Enter your password again when prompted (and make sure the correct Google account is selected at the same time).
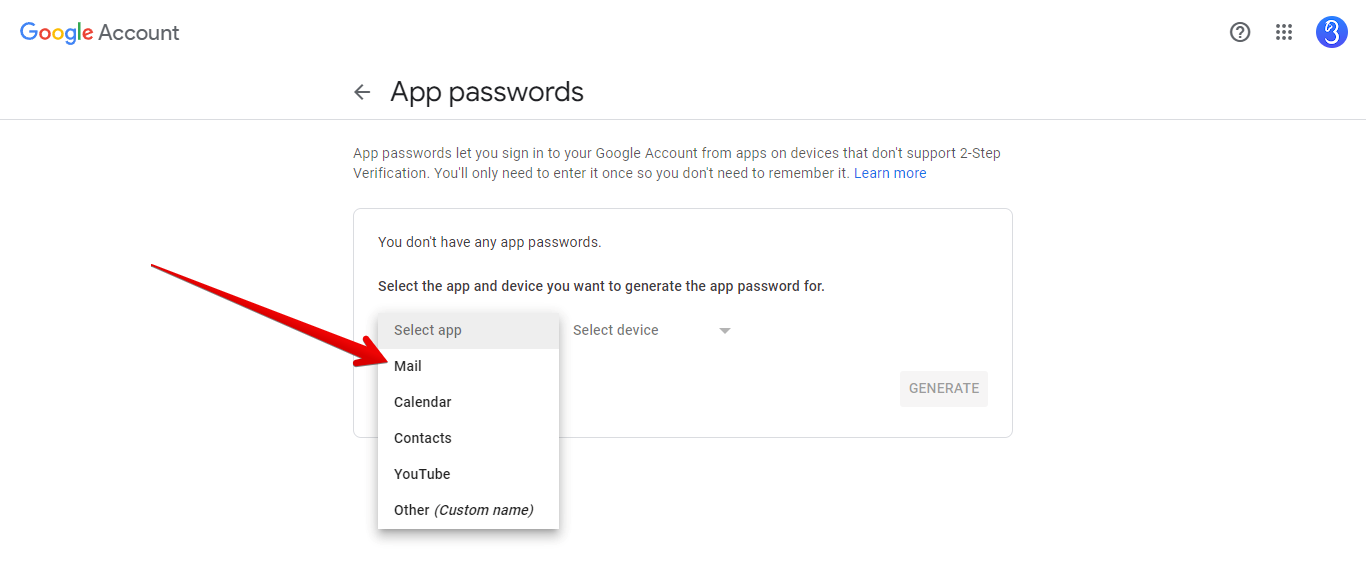
You will arrive on a screen like the one shown below. Click "Select app" and choose "Mail."
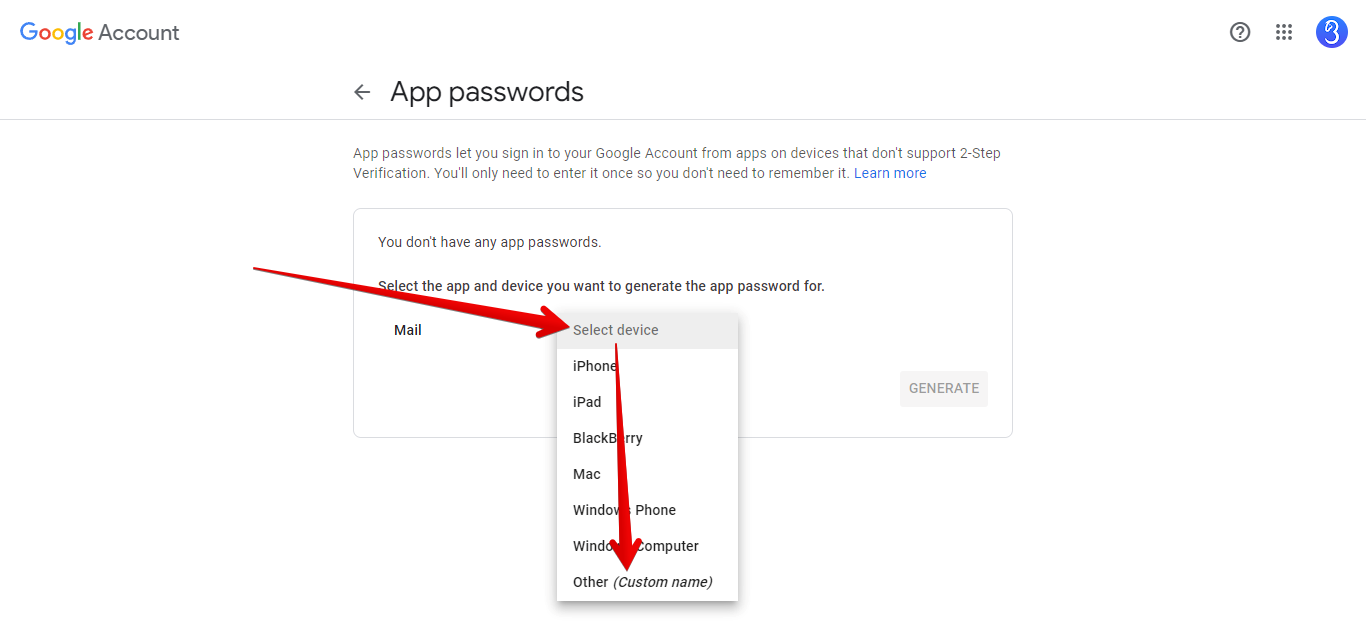
Next, click "Select Device" and choose "Other (Custom name)."
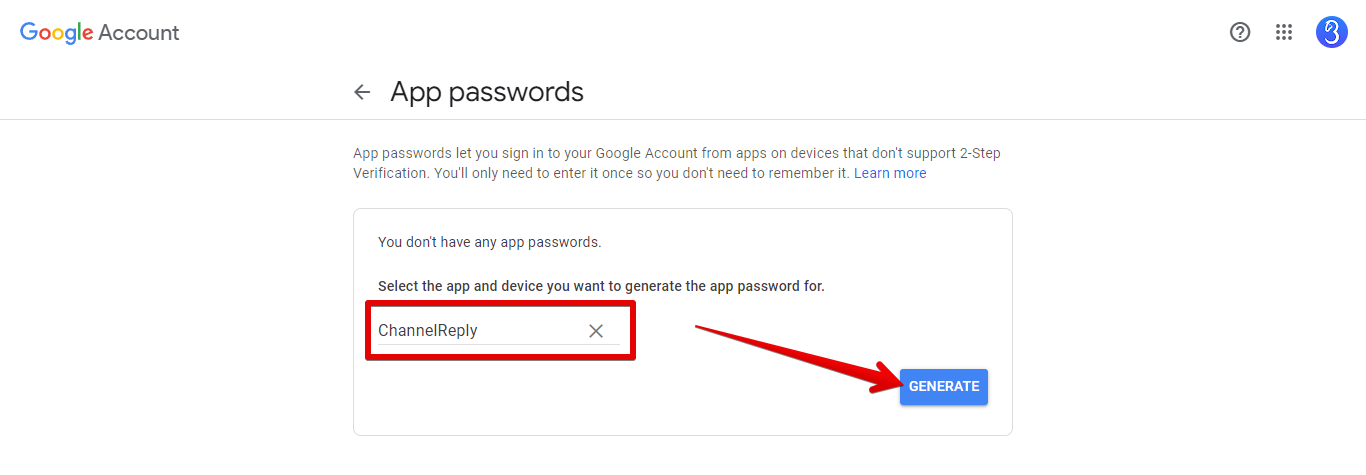
Enter "ChannelReply" as the custom name. Then click "Generate."
A 16-character password will appear. Keep this screen open, as you'll need to enter this password in ChannelReply, and you'll never be able to view it again once it's closed.
GM-6. Fill in SMTP Details in ChannelReply
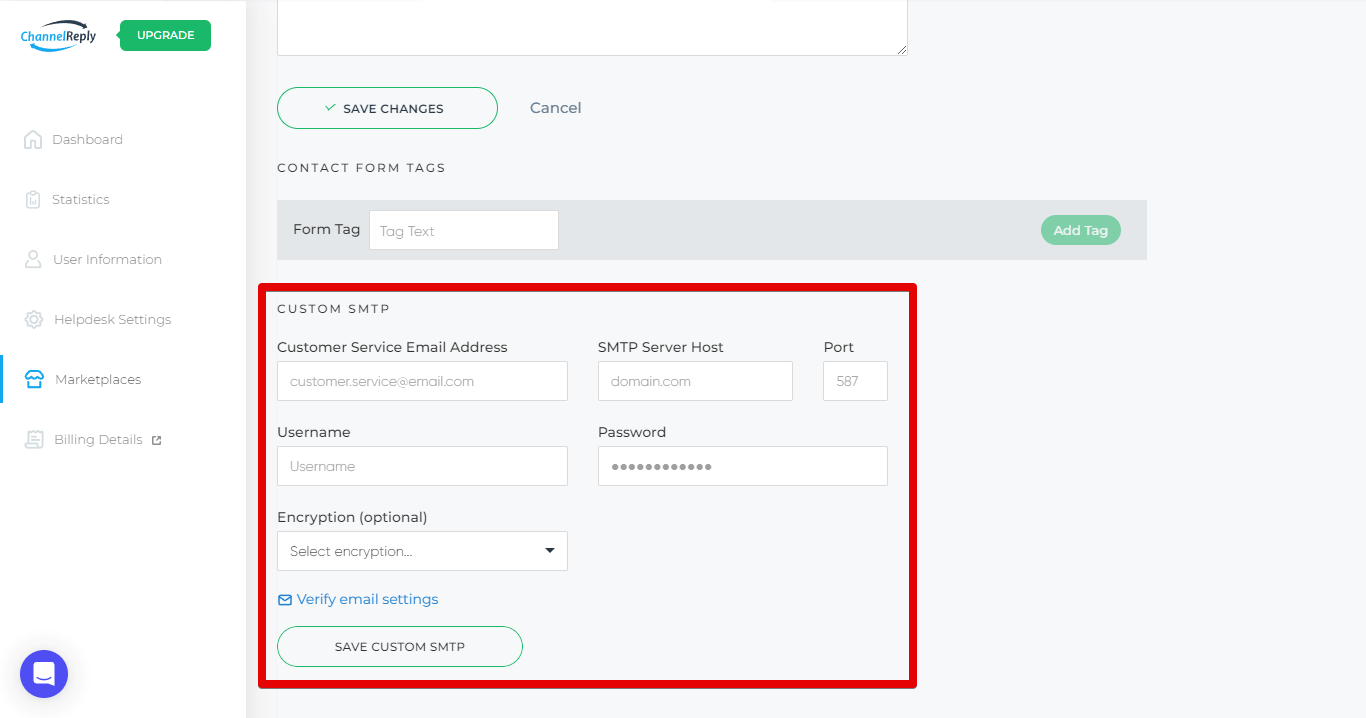
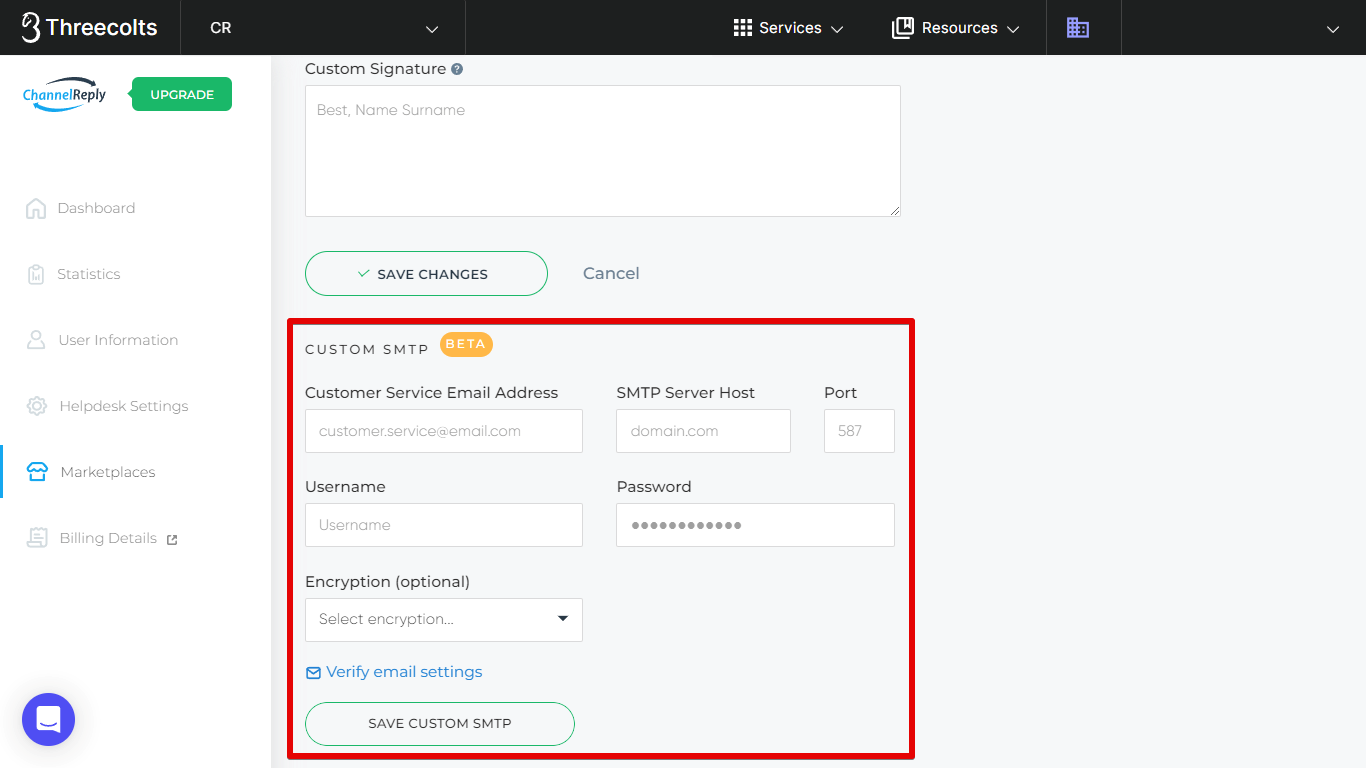
Back in ChannelReply, scroll down and you will see a “CUSTOM SMTP” section. This section is the same for both Walmart and Shopify.
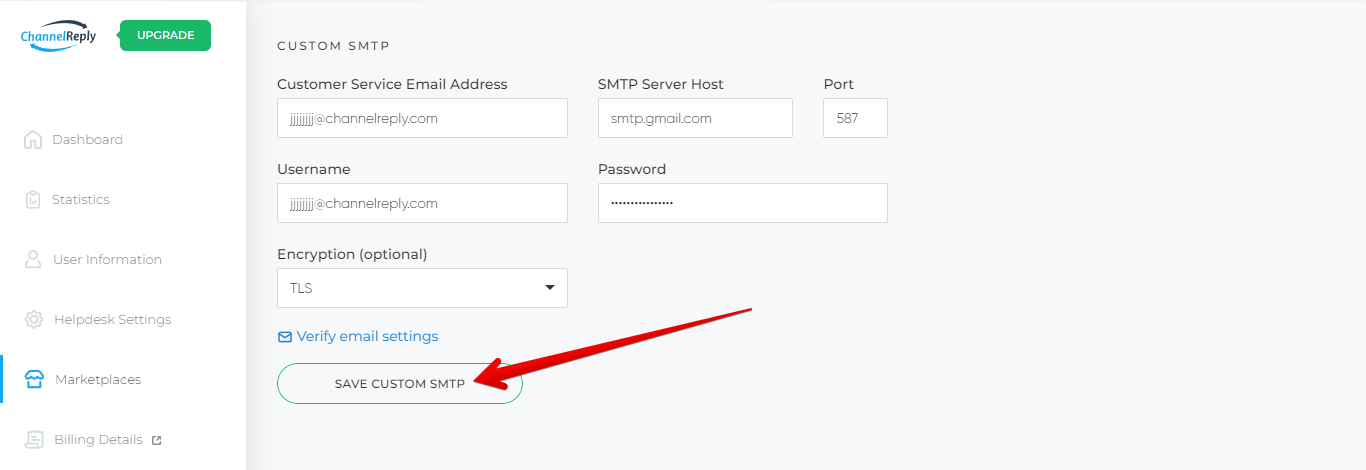
In the “Customer Service Email Address” and "Username" fields, enter your branded email address. This is the same address you entered in Walmart or Shopify in step 2.
In the Password field, enter the app password that you just created in step GM-5 above.
In the SMTP Server Host field, enter smtp.gmail.com
Next, select TLS as the encryption type. Both TLS and SSL are available for Gmail, but we recommend TLS as it's more secure.
Finally, enter the port number that corresponds to the encryption type you selected. This is 587 for TLS or 465 for SSL.
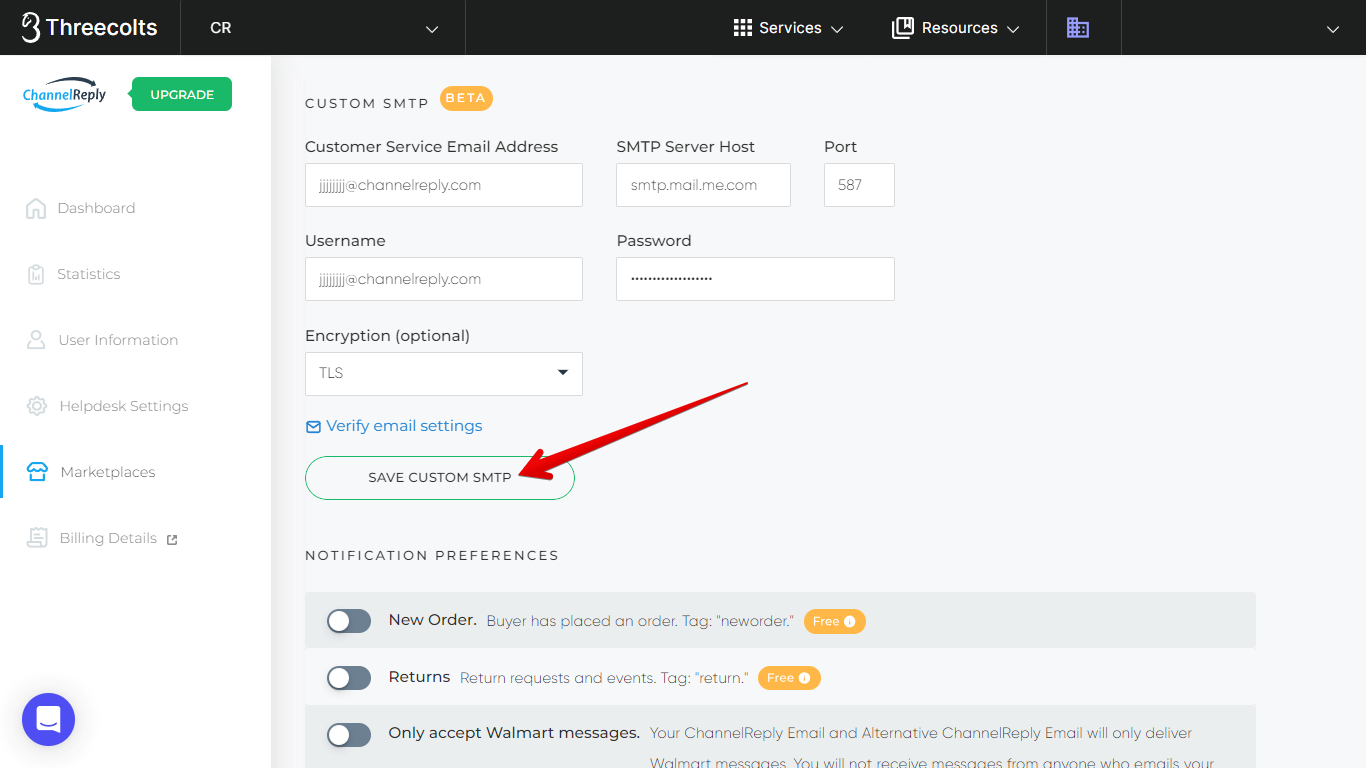
Click “SAVE CUSTOM SMTP” once everything is set.
GM-7. Verify Your Email
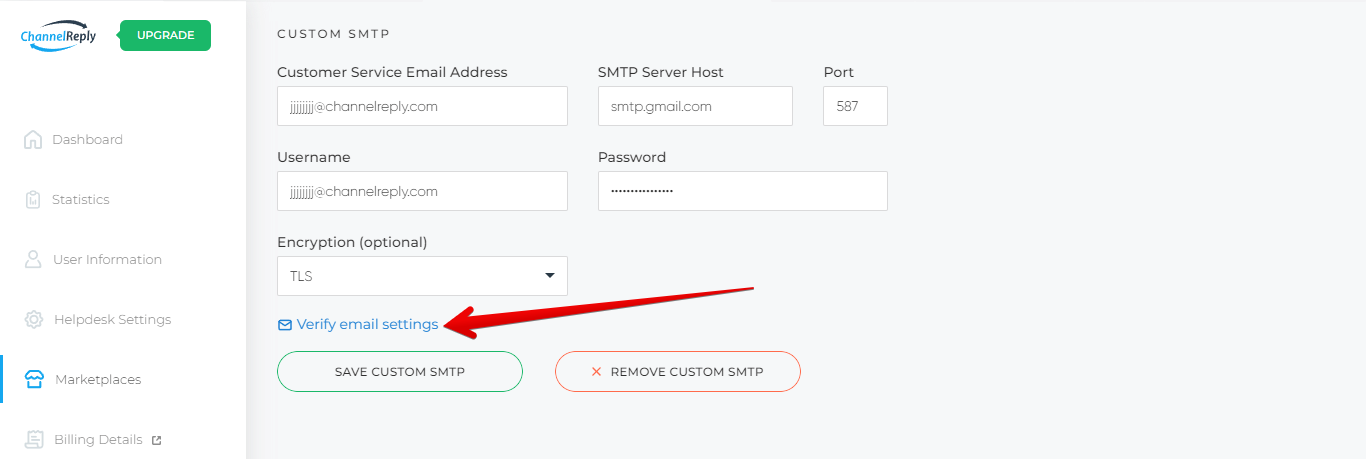
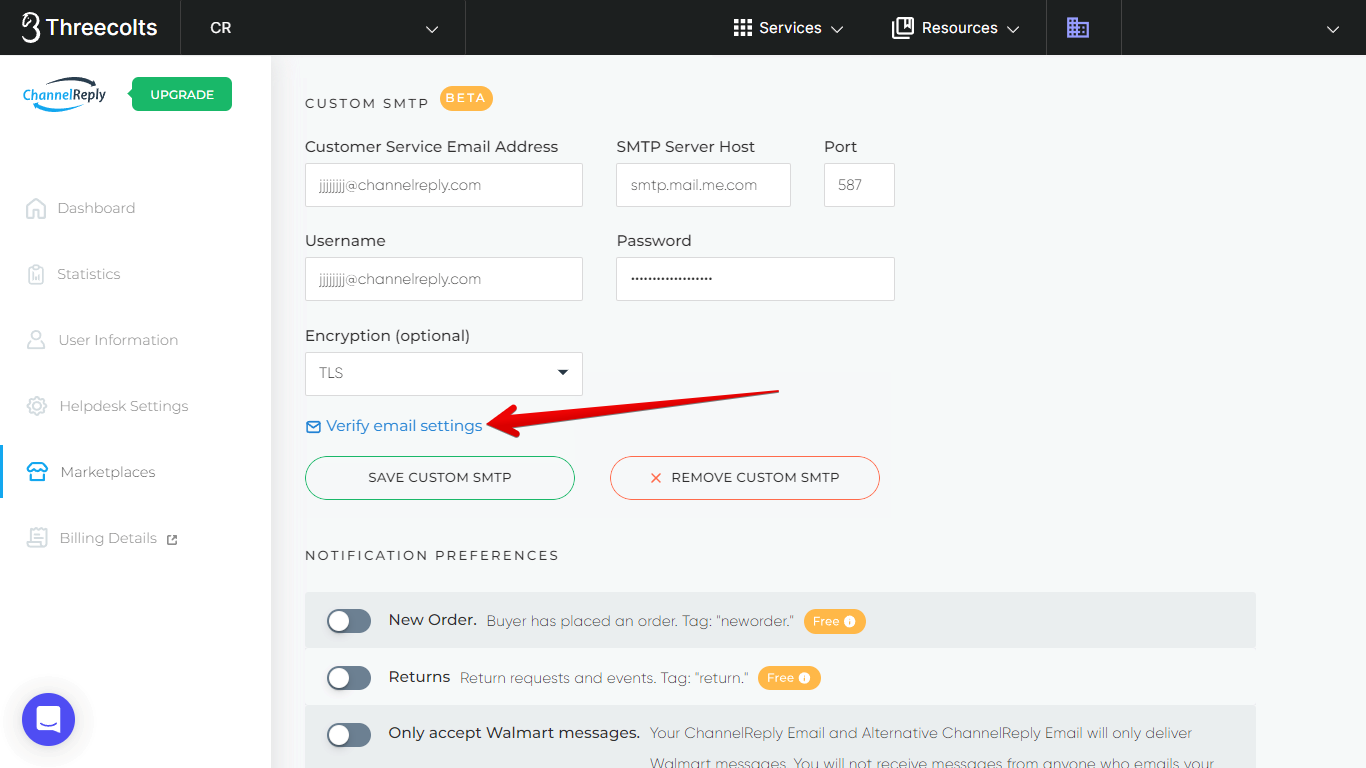
Click the blue “Verify email settings” text.
“Verify email settings” will change to “Resend verification email.” The account will be automatically verified, and then “Resend verification email” will change to “Verified. Check email settings again.”
You will also see updates in the upper-right corner of your screen as ChannelReply goes through the verification process.
Please note that the verification is an automated process; you don't need to interact with this verification email. (It may appear in your Sent folder.) Please also be aware that it may take several minutes.
If the text does not change after you have waited several minutes, contact us for assistance.
You can click "Check email settings again” anytime to test whether your custom SMTP setup is working. If the test fails, you will be given the option to send a new verification email.
Once you see "Verified. Check email settings again," then at last, setup is finished! ChannelReply will deliver emails from this Walmart/Shopify account and show data with these messages. It will also deliver replies to your customer as your branded email address. Your customers will never see an @channelreply email!
If you just completed this process for Shopify, you can now disable "Process external messages" and/or enter a Kustomer Channel for this store.
iCloud Setup Guide
IC-1. Enter Your ChannelReply Email as a Forwarding Address
Sign in to iCloud Mail as the email address you use for Walmart or Shopify support. (Remember, this should be the unique branded email address that you will use only to support this one Walmart or Shopify account.)
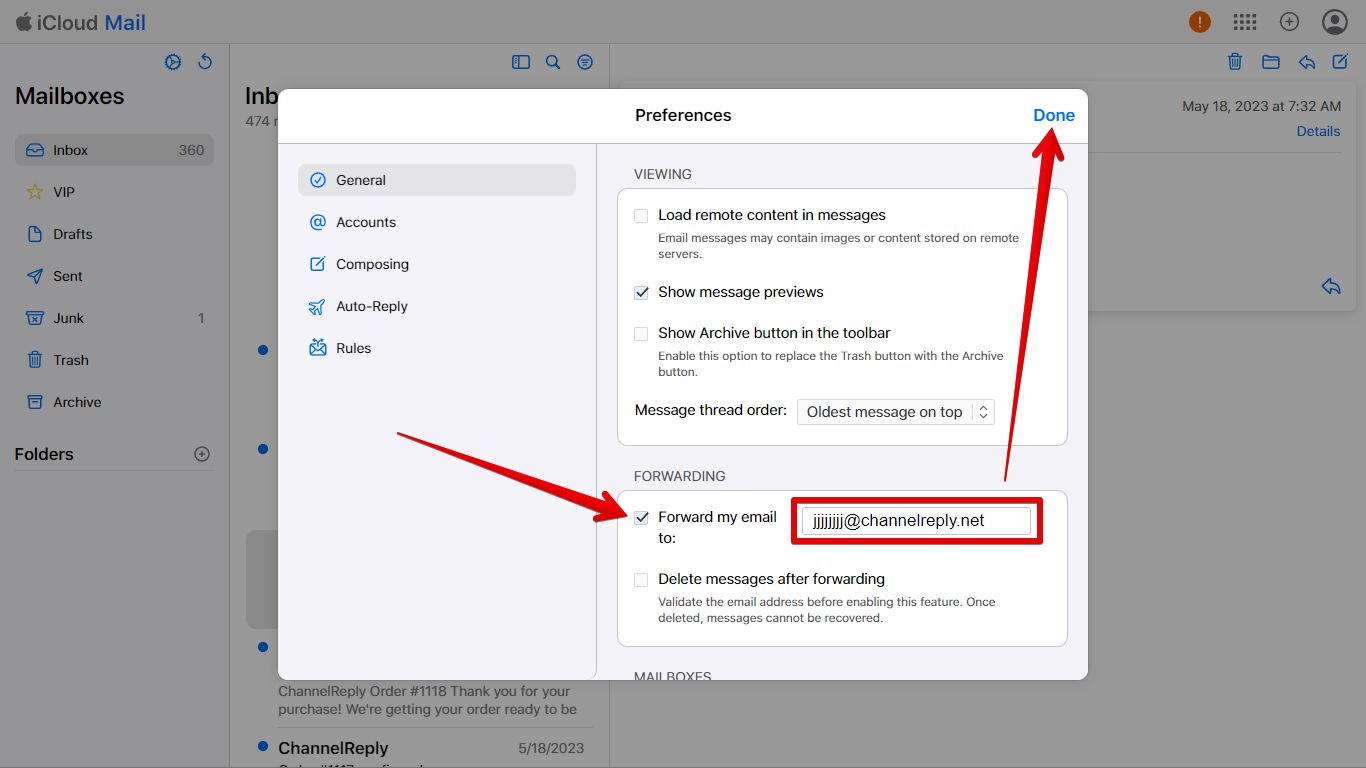
Click the gear icon above “Mailboxes” and choose “Preferences.”
Under “Forwarding,” check “Forward my email to:” and paste in your ChannelReply Email. Then click “Done.”
IC-2. Confirm Two-Factor Authentication Is Enabled
Sign in to Apple ID as the same email address. If you are prompted to upgrade your account security, agree to do so and follow the prompts that appear.
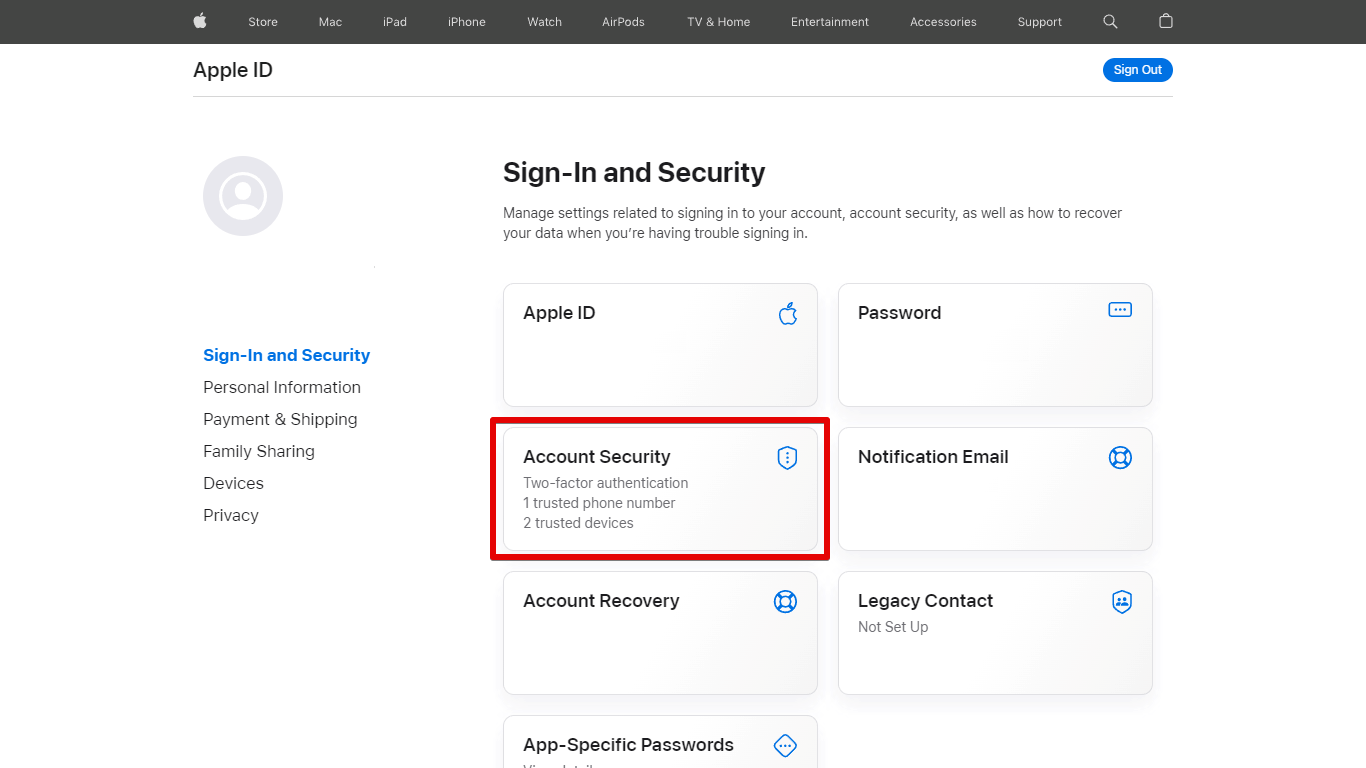
Once you have successfully signed in, check “Account Security” and make sure that it shows two-factor authentication as set up. (If you had to use another device like your phone to confirm you were authorized to sign in, then don't worry, you definitely have it set up!)
Above: An example of an iCloud account with two-factor authentication enabled.
IC-3. Generate an App-Specific Password
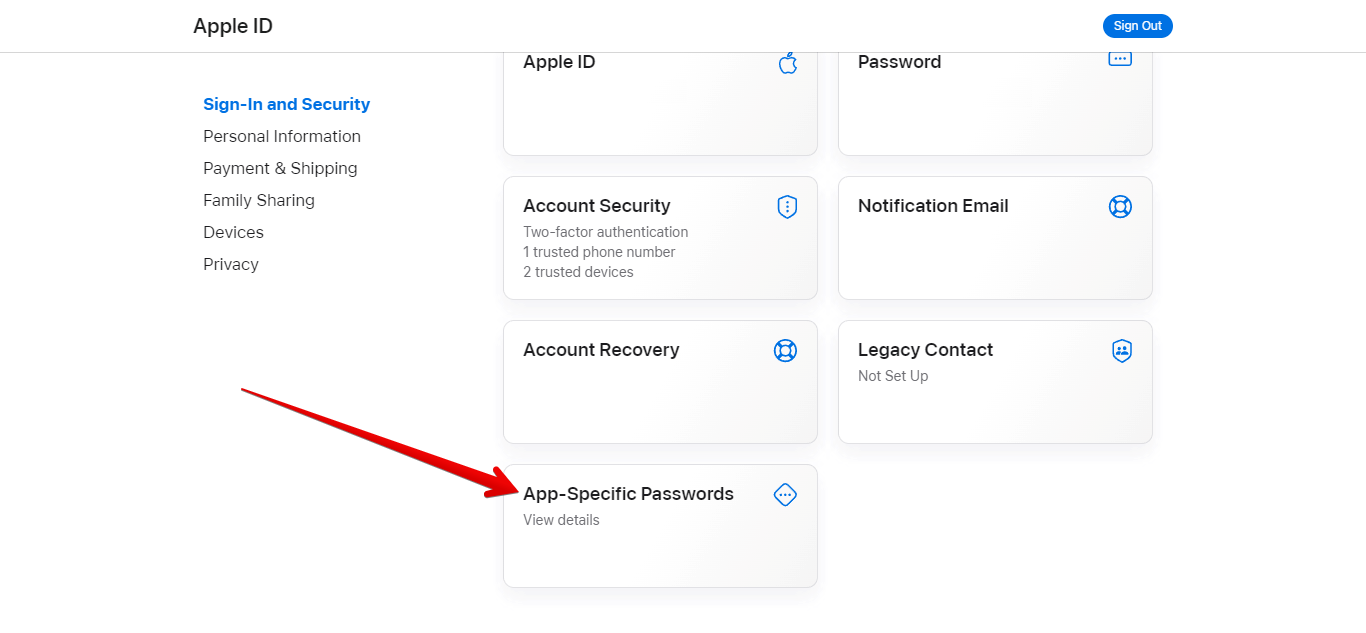
On your Apple ID screen, click “App-Specific Passwords.”
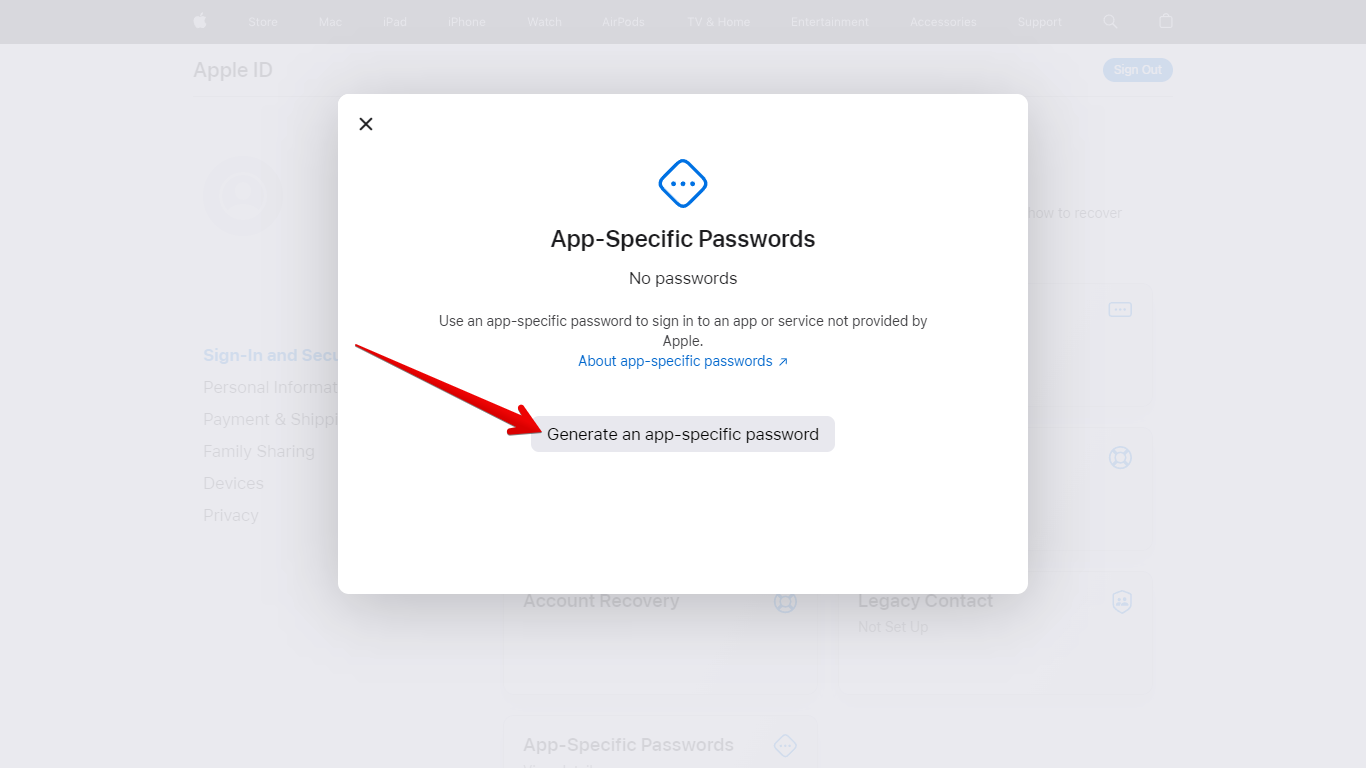
Hit “Generate an app-specific password.”
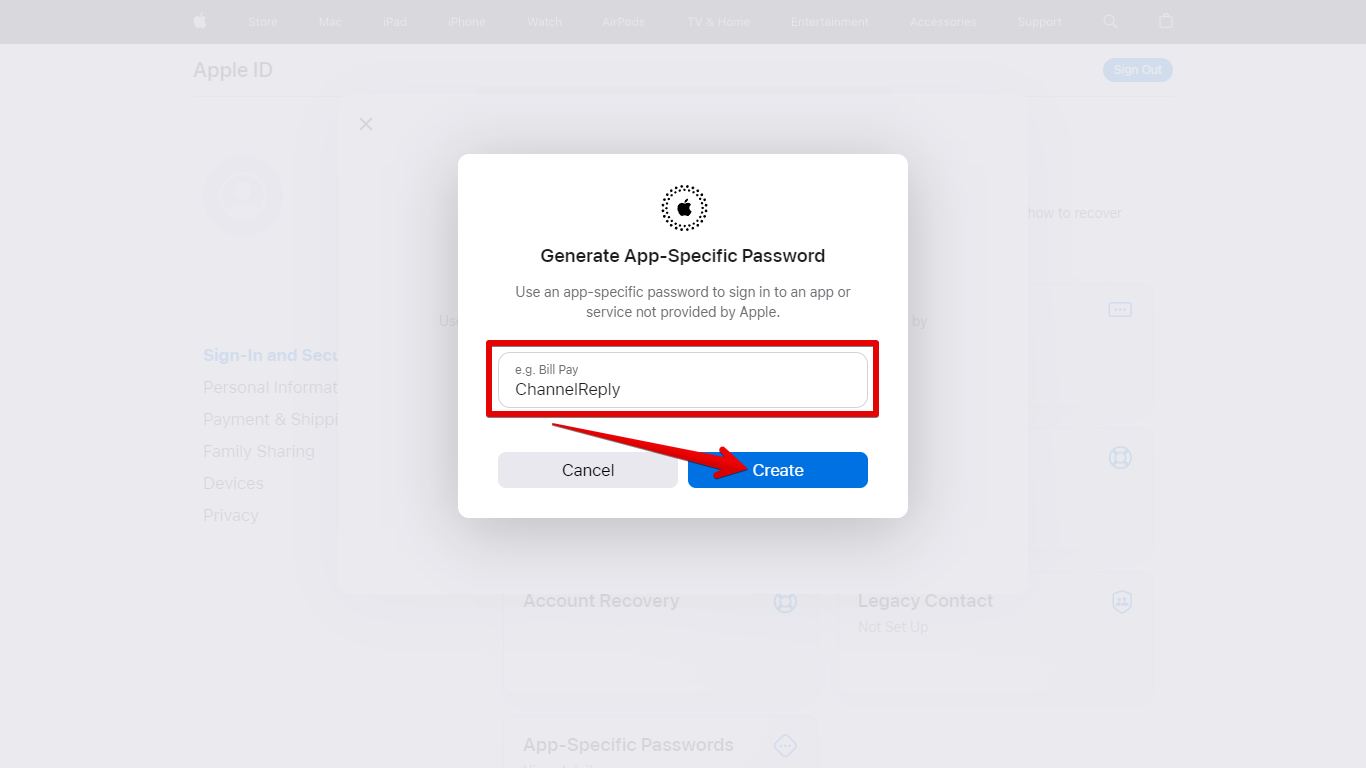
Enter “ChannelReply” as the app’s name and hit “Create.”
If prompted again, enter your password, then hit “Continue.”
Finally, an automatically generated password will appear. Keep this screen open—once you close it, you'll never be able to see this password again!
IC-4. Fill in SMTP Details in ChannelReply
Back in ChannelReply, scroll down and you will see a “CUSTOM SMTP” section. This section is the same for both Walmart and Shopify.
In the “Customer Service Email Address” and "Username" fields, enter your branded email address. This is the same address you entered in Walmart or Shopify in step 2.
In the Password field, enter the app password that you just created in step IC-3 above.
In the SMTP Server Host field, enter smtp.mail.me.com
Next, select TLS as the encryption type.
Finally, enter 587 as the port number.
Click “SAVE CUSTOM SMTP” once everything is set.
IC-5. Verify Your Email
Click the blue “Verify email settings” text.
“Verify email settings” will change to “Resend verification email.” The account will be automatically verified, and then “Resend verification email” will change to “Verified. Check email settings again.”
You will also see updates in the upper-right corner of your screen as ChannelReply goes through the verification process.
Please note that the verification is an automated process; you don't need to interact with this verification email. (It may appear in your Sent folder.) Please also be aware that it may take several minutes.
If the text does not change after you have waited several minutes, contact us for assistance.
You can click "Check email settings again" anytime to test whether your custom SMTP setup is working. If the test fails, you will be given the option to send a new verification email.
Once you see "Verified. Check email settings again," then at last, setup is finished! ChannelReply will deliver emails from this Walmart/Shopify account and show data with these messages. It will also deliver replies to your customer as your branded email address. Your customers will never see an @channelreply email!
If you just completed this process for Shopify, you can now disable "Process external messages" and/or enter a Kustomer Channel for this store.


