Salesforce is one of the most popular CRM tools used by sales and marketing departments to store and manage billing information about customers and engagement history with them.

Integration with Salesforce allows the support team to view Salesforce account details, create new leads, contacts, and cases right inside the UseResponse agent interface.
To get it to work, you need to build a new application in the Salesforce account and connect it with UseResponse.
Build a Connected App
To build a new application that can be connected to UseResponse, please log in your Salesforce administrator account and perform the next instructions:
- Navigate to Setup » Platform Tools » Apps » App Manager and click New Connected App button:
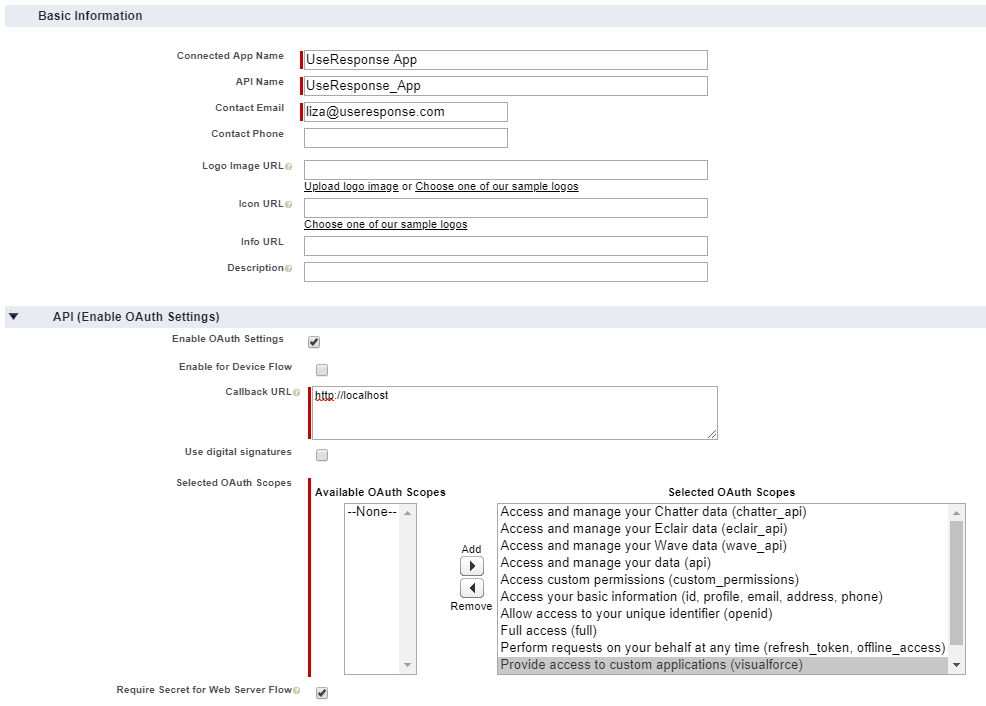
- Enter Connected App Name (API Name can be the same) and Contact Email in Basic Information section;
- Check Enable OAuth Settings in the API section. Fill out Callback URL with any valid domain (e.g. http://localhost) as it's not important for app setup and select all OAuth Scopes by moving them into the right side (see below);
- Hit Save and Continue.

- Go to Platform Tools » Apps » Connected Apps » Manage Connected Apps and click Edit next to the newly created application:
- Set Permitted Users to "All users may self-authorize" and IP Relaxation to "Relax IP restrictions" (see below);
- Hit Save to submit the changes.

Now your app is ready to be connected to UseResponse.
Connect App with UseResponse
First, you need to enable Salesforce in Administration » Applications and click Settings.
- Enter your Salesforce domain name;
- Enter Consumer Key and Consumer Secret that can be taken by clicking View under options next to the connected application in Platform Tools » Apps » App Manager;
- Fill out the account username and password. Username should be taken from Profile Settings » Personal Information » Username;
- Then click Submit. You can always test the connection to your Salesforce host endpoint with saved settings.
Integration Features
Integration with Salesforce is available for Feedback and Help Desk+Live Chat solutions in UseResponse. It works in the following ways:
- Display Account Details for contacts associated with the account - to view account details click Salesforce icon at the top right and account information will be displayed at the right panel;

- Create Lead/Contact - to create a new lead or a contact from UseResponse requester account, click plus icon on ticket, topic or chat page and select Salesforce Lead (Salesforce contact) from the options list, fill out the form and a new lead/contact will be created on Salesforce side;
- Create Cases - new cases can be created from UseResponse tickets and topics. On ticket/topic page choose Move to Salesforce Case under Options at the top right and a new case will be connected to Salesforce contact. All further comments from the linked ticket/topic will be moved to Salesforce case automatically;
- Reporting - you can build a separate queue to manage requests moved to Salesforce cases or create a report to get the list of requests which authors were moved to a lead or a contact in SF. Just add corresponding conditions while building such a queue.
As a result support agents don't need to switch between help desk and CRM tools and can save their time and efforts by getting required sales info about the ticket requester right in UseResponse.


