UseResponse supports single sign-on using SAML 2.0 with an identity provider to be the ADFS server. It's provided by Microsoft with the ability to use active directory credentials to authenticate in UseResponse.
In order to be able to use ADFS, you would need to meet the following requirements:
- Active Directory with email attribute as it used as a basic connector to UseResponse accounts;
- Microsoft Server 2008 or 2012;
- SSL for the domain where UseResponse is installed or for a custom domain in cloud version on our server;
- SSL certificate for ADFS login page signature and fingerprint.
Authentication Policies
We support only "Form-Based Authentication". Make sure to set up this option in primary authentication.
Setup Relying Party Trust
At first, you need to set up an ADFS connection with the UseResponse environment. Start Adding Relying Party Trust Wizard from ADFS Management and follow below instructions:
- Data Source - select "Enter Data About the Party Manually";
- Specify Display Name - add any name as identification of the party trust. For example, UseResponse Connection;
- Choose Profile - select AD FS profile;
- Configure Certificate - leave options by default;
- Configure URL - check "Enable Support for the SAML 2.0 WebSSO protocol". The service URL will be https://subdomain.useresponse.com/saml/metadata, replacing subdomain with your UseResponse subdomain or the whole domain that you have;
- Configure Identifiers - add useresponse.com This is the only possible value entered here;
- Multi-Factor Authentication - don't configure it or if you have specific instructions, apply them here;
- Authorization Rules - select the option to permit all users to access relying party;
- Finish - review and complete by proceeding to set up claim rules.
Create Claim Rules
You would require at least 2 rules to set up for the system to work correctly. Custom rules are outside of this documentation and can be discussed on an individual basis. To add basic rules, follow below instructions:
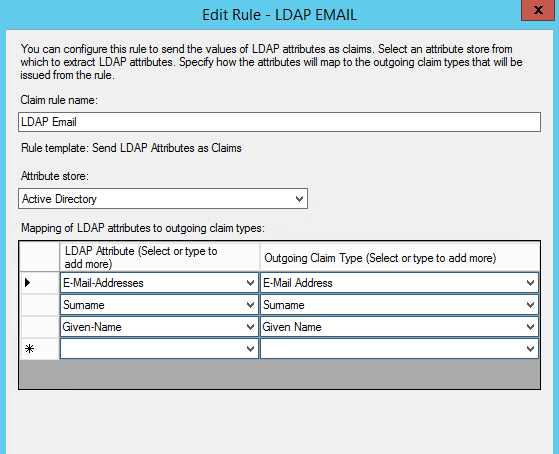
- Add New Rule and select "Send LDAP Attributes as Claims rule";
- Configure Claim Rule - select "Active Directory" under "Attribute store";
In order to map the LDAP attributes with claim types, please follow the screen instructions below.
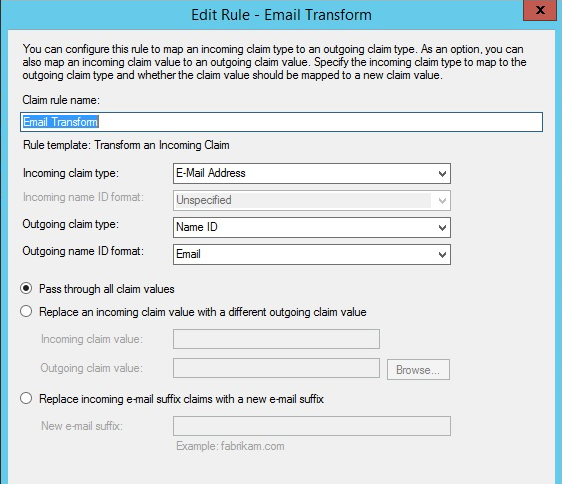
Create another new rule and select "Transform an Incoming Claim as the template". Then select enter and choose the options as shown on the screen and click Ok.
Update Trust Settings
Relying party trust needs some changes as they were not included in the initial setup wizard. To access these settings, select the name of relying party trust that you've entered on the wizard stage and under Properties choose Actions sidebar.
- Advanced tab - select SHA-256 as the secure hash algorithm. SHA1 shouldn't be selected as it's no longer supported by modern browsers and considered to be insecure;
- Endpoints - add SAML as endpoint and select SAML Logout; Choose Post for the Binding;
- Trusted URL - create a URL using the web address of your ADFS server + The ADFS SAML endpoint you noted earlier + The string '?wa=wsignout1.0'. The URL should look something like this: https://sso.yourdomain.tld/adfs/ls/?wa=wsignout1.0.
Save changes and you should have working replying trust for UseResponse.
UseResponse Configuration
Go to Administration » Applications and enable Single Sign-On. Then click Settings and select the SAML method.
You would need to enter at least 3 settings to complete setup ADFS connection on UseResponse side.
At first, get the fingerprint by running command in windows command line with the installed certificate:
C:\> Get-AdfsCertificate
Search for thumbprint of the Token-Signing type certificate. Example: e0:64:71:6a:f5:55:9f:0e:24:e9:3a:fd:82:f5:a2:39:98:cd:9e:c1
Add External Login and Logout URLs.
Finally, your UseResponse SAML settings page should look like this with custom options that you are required to fill out.
- idP Entity ID or Issuer - https://yourdomain.tld/adfs/services/trust
- External Login URL - https://yourdomain.tld/adfs/ls/idpinitiatedssignon
- External Logout URL - https://yourdomain.tld/adfs/ls/idpinitiatedssignon
- Certificate Fingerprint - hash used in your ADFS (see above)
- Name ID Format - Email Address
- Attribute to be used as Email - http://schemas.xmlsoap.org/ws/2005/05/identity/cla...
- Attribute to be used as First Name - http://schemas.xmlsoap.org/ws/2005/05/identity/cla...
- Attribute to be used as Last Name - http://schemas.xmlsoap.org/ws/2005/05/identity/cla...