
Import Data
Import Data
If you want to create multiple products using a spreadsheet or need to automate your shipping updates, you can use our Import layouts and schedules. This section will cover all import types and configuration rules.
What you will learn
- File requirements and how to create a file
- What type of information can be imported
- How to upload a file
- How to map your information to the correct system field
- How to set up automated imports
Create your file
Whether you are just getting started and need to upload product information for all of your items, have a new product range you would like sell on online marketplaces, or are expanding into new territory, creating products using a file will save you a lot of time compared to creating products one by one. You can integrate your product feed with few to no changes as long as it meets the requirements outlined in this section.
The system accepts files in the following formats:
- Delimited files, such as .csv, .psv, .tsv
- Spreadsheets in .xlsx
The file encoding should be set to UTF-8 to avoid issues with special characters, which is a common problem when listing on international marketplaces.
Under File Specifics, we have listed the unique identifiers and mandatory fields for each import type. Usually, these are the product SKU or order ID. Headers are not mandatory, but will make it easier to map your data to system fields. Mapping also allows you to skip columns, so there is no need to remove unused columns prior to uploading a file. Remember to clear any formulas from your file. That can be quickly done by selecting the range of cells you would like to import, copying them, and pasting them as values in a new file.
Files shouldmust be under 100 MB or the upload willould fail.
There are no specific requirements, when it comes to how you would name your files, for file names. hHowever, we recommend including:
- tThe import type, as this is usually used as a filter, when setting up automatic imports
- aAn indication as to whether the file includes all of your records or only a fraction
- aA time stamp, to stay on keep track of the last uploaded file and identify request status more easily
A sample file name that , which follows these recommendations would be: 'StockLevels_IncrementalUpdate_161120171105.csv'.
To recap the requirements, files must:
- Files should bBe in one of the accepted formats
- The encoding should beHave encoding set to UTF-8
- They must iInclude a unique identifier and mandatory fields
- NoContain no formulas should be present
- The file size should be Be less than 100 MB

Import types
The first step when creating a Manual or Automatic import is to select one of the various import types, which are designed to access specific parts of the system, based on the data type. In this section, you willould find more information about the layouts you canould use, and the additional configurations and system fields you can access.
-
Items Import
Items Import Layout Overview
The Items Import is used when you would like to create or update multiple products at once. You can upload information per one account at a time so multiple files would be requires if you want to manage the content for more than one marketplace.
Under Type Specifics:
- Select Items Import from the drop-down menu.
- Select the respective Account where you want to list or update your products.
- Select Seller profile from the drop-down if you have integrated suppliers.
- Tick Update only existing SKU's field, if you do not want to create new products and only want to update already existing ones.
- Tick Update only existing Product Accounts field, if you do not want to create new product accounts and only to update the existing ones

Field Specification
The following lists cover the system fields, which can be populated with data via an import. Please note each marketplace has their own requirements when it comes to mandatory information or format of the datadata format. You can also create custom fields and import data into already existing ones.
Products
Field Pentagon Field Name Required Field Description SKU SKU Yes Unique product identifier. InventoryTitle Inventory Title No Generic product title. ConditionID ConditionID No Item condition. MainImage Main Image No Main product image URL. ListingImage Listing Image No Not in use. PictureURL More Picture URLs No Additional product image URLs. VariationGroup Variation Group No Identifier that groups individual SKUs in a variation listing. barcode Barcode No Self-generated barcode. UPC UPC No Universal Product Code. ISBN ISBN No International Standard Book Number. EAN EAN No European Article Number barcode. is_bundle Is Bundle No Specifies whether the product is a bundle . calculate_price Calculate Price No Specifiesy whether the bundle price should be taken from the individual components. MPN MPN No Manufacturer part number. Product accounts
Field Pentagon Field Name Required Field Description AutoPay Immediate Payment No States that immediate payment is required when the product is bought. Subject to marketplace functionality. ConditionDescription Condition Description No More detailed description of the product condition. delete_me Specific field for deleting items No Field used for deleting products/product accounts in bulk. "Delete specific items" functionality in System Tasks → More Actions tab uses this field. Description Description No Product description. discount_price_info Discount Price Info No Specify the price to be pushed as RRP, if the marketplace account supports strike through pricing. DispatchTimeMax Dispatch Time Max No Dispatch time on product account level. Overrides the default value set in the Account settings. Set to -1 if the value in Account settings is used. duty Duty No Product duty in local currency. Reserved for future use. end_item End Item No If ticked, the system will attempt to end an item. ending_reason End Reason No Field to specify the reason for ending an item. home_VAT Home Country VAT Rating No Reserved for future use. item_closed Closed No Specifies whether a product is discarded. If checked, the system willould not attempt to list the product. ItemSpecifics Item Specifics No Contains product specifications such as "Material,", "Style,", "Pattern," ectc. Map this fileld with all columns in your file that, which contain item specifics. * list_logic List logic No Not in use. ListingDuration Listing Duration No Duration the product will be live on the marketplace before de-listing. ListingType Listing Type No Type of the listing on the marketplace (auction, fixed- price item). location Location No Virtual warehouse where the product is stored within the system. original_price Original Price No The original, non-converted price of a product. payment1 Payment Method 1 No Payment method used to collect the payment when a product is ordered on the marketplace. payment2 Payment Method 2 No Second payment method used to collect payments (optional). price_incl_vat Prices Includes VAT No Reserved for future use. PrimaryCategoryID Primary Category ID No Primary marketplace product category. protect_price Protect Price No If checked, the system wouldill not import a new price for the selected product selected. protect_whole_item Protect Whole Item No Protects the products from any changes being made to it. return_policy1 Return Policy No Return policy on product account level. Overrides the default return policy set in the Account settings. revise_item List / Update the Whole Item No Field used to list/create a product on the marketplace. RRP RRP No Recommended Retail Price. SecondaryCategoryID Secondary Category ID No Secondary marketplace product category. seller_id Seller No Product's seller name within the system. shipping_amount Shipping Amount No Reserved for future use. shipping_template_id Shipping Template No Shipping template on product account level. Overrides the default shipping template set in the Account settings. StartPrice Price No Sale price of the listing in the appropriate currency according to the marketplace the product is being listed on. StoreCategoryID Store Category2 ID No eBay store design category 2. StoreCategory2ID Store Category ID No eBay store design category 1. SubTitle Sub Title No Sub title of the listing on the channel. tags Tags No Internal to the system field with the only use to store common information for different products. target_VAT Target Country VAT Rating No Reserved for future use. TemplateID Design Template No Design template on product account level. Overrides the default value set in the Account settings. Title Title No Title of the listinghe listing title that will be shown on the channel. update_price Update Price No Field used to update the price of a product on the channel. update_quantity Update Quantity No Field used to update the quantity of a product on the channel. VariationGroup Variation Group No The variation group that states which products with the same details (title, item specifics) but different variation specifics will be listed as one variation listing. VariationSpecifics Variation Specifics No Contains the variation specifications of the product such as '"Size"' and "'Colour'." Map this fileld with all columns in your file, whichthat contain variation specifics.* VATPercent VAT No VAT, set on the product account level. -1 means no VAT is used or calculated in any way. Sample Templates
-
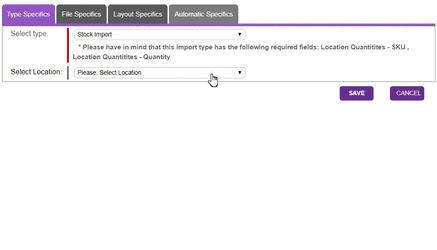
Stock Import
Stock Import Layout Overview
The Stock Import accommodates regular stock level updates to ensure only available products are listed for sale. The system allows you to create different locations, which gives you greater control and flexibility when your stock is stored in multiple fulfillment centers.
When creating a new Stock Import, under Type Specifics:
- Always specify the Location, which would that will hold the stock, even if you have only one fulfillment center.
- If you are setting up an Automatic iImport, and the feed wouldill always include all of your products that are in stock, you can use the Zero Stock script, which willould set the quantity to 0 in the chosen location, for all products that are not present in the file compared to the previous one. This is only recommended if you do not provide a quantity of 0 prior to removing a SKU from the feed. To set this up:
- Tick Use Zero Stock.
- Enter In Percent for zero stock, to define the allowed percentage of changes in the number of SKUs., fFor example, if you set it it set to 20%, your first feed contained 100 products, and the file, you attempt to upload, contains 79, the system wouldill block the file.
- Mails for file zero stock notification will send an email to a list of addresses, if there is a blocked file. Use comma Separate email addresses by commas "," to add more than one recipient.
Field Specification
Field Pentagon Field Name Required Field Description Stock Number SKU Yes Must match a SKU in the Pentagon system. Stock Level Quantity Yes The quantity of a particular product that is available for sale. Sample Templates
-
Price Import
Price Import Layout Overview
The Price Import is used when you would like to update your sale and RRP* prices on a particular marketplace account. The prices in the file should be in the local currency of the marketplace where you sell. When you want to update more than one marketplace, you have to import one file per account.
Under Type Specifics:
- Select Price Import from the drop-down menu.
- Select the Account where you would like to update your prices.
- Tick Use File Price Difference field if you would like the system to check whether the number of price changes is above a certain threshold. For example,You can set the import to either block the file upload or send you an alert. For example, if the threshold is set to 30%if and you haveupload a file containing 100 products, of which in your file and 30 of them have new prices, this would trigger the block or alert. compared to the prices in the system, you can set the import to either block the file upload or send you an alert, if the threshold is set to 30%.
- Tick Use Product Price Difference field if you would like the system to check for each product whether each product'sits price in the file, varies from its the product price set in the tool. If there is a difference higher than the set threshold, the system can block the item from being updated or send you an alert. For example, if an item is selling for £100, the price in the file is £20, and the threshold is set to 80%, the selected action will be triggered.
- To set -up File or Product Price Difference:
- Tick the respective checkbox.
- Specify the threshold in Percent for file price difference.
- Select an action to be performed by the system.
- Notification will send an email to a list of addresses set in Mails for file price difference. Use commas "," to add more than one recipient.separate email addresses if you have more than one recipient.
- Block File / Price Update would not process the update.will prevent the update from processing.
- Both Operations should be selected if you wish to receive a notification and block the updates.
Field Specification
Field Pentagon Field Name Required Field Description Stock Number SKU Yes Must match a SKU in the Pentagon system. Price StartPrice Yes The price of a particular product that is available for sale. RRP RRP No The recommended retail price. You should provide RRP only if it is higher than the sale price. - Subject to marketplace functionality and local regulations.
Sample Templates
-
Bundle Import
Bundle Import Layout Overview
The Bundle Import is used when you offer several products for sale as one combined product, such as multi-packs or kits. A bundle is a collection of multiple SKUs, therefore they are not physical items and the stock is defined by the individual components. In order to create bundles with this import, both the parent and bundle SKUs should be already created.already exist.

Field Specification
Field Pentagon Field Name Required Field Description Parent Bundle SKU Product Details - SKU Yes The product, which would be listed on the marketplace as a collection of SKUs. Must match a SKU in the Pentagon system. Child Bundle SKU Bundles - SKU Yes The stock number of a product, which is part of the bundle. Must match a SKU in the Pentagon system. Child Bundle Quantity Bundles - Quantity No Defines how many items of the Bundles - SKU are required to form the bundle product. Sample Templates
-
Kcodes Import
Kcodes Import Layout Overview
The Kcodes Import is specifically built to support the eBay Fitment functionality which allows VPA sellers to specify the compatibility of an accessory or a spare part with а set of vehicles. This import allows you to set a Ktype value from the Master Vechicle List, exclude specific years or add notes related to the fitment. To add multiple Ktypes to the same SKU, simply add more rows in the file.
Under Type Specifics:
- Select Kcodes Import from the type drop-down menu.
- Select the Account where you would like to list products using the eBay Fitment*.
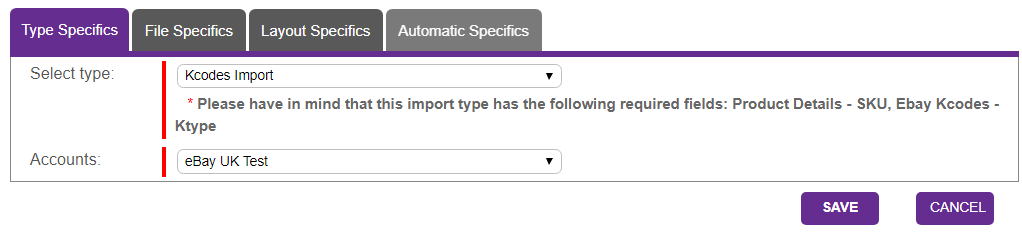
- Please note that not all eBay sites support the Fitment functionality. You can still upload Kcodes to Accounts, which do not support eBay Fitment, however the information would not be displayed on the respective marketplace.
Field Specification
Field Pentagon Field Name Required Field Description Stock Number Product Details - SKU Yes Must match a SKU in the Pentagon system Ktype EBay Kcodes - Ktype Yes The eBay MVL Ktype value to be added to the Product Account Notes EBay Kcodes - Notes No Additional fitment information, which would be displayed to the buyer Deletion EBay Kcodes - Deletion No List of year(s) an automotive part does not fit. Use pipe " , " to list all deletions. If you would like to delete any Kcodes this is possible as well with file import you have to follow the same structure but in EBay Kcodes - Notes to specify [DELETE]
Sample Templates
-
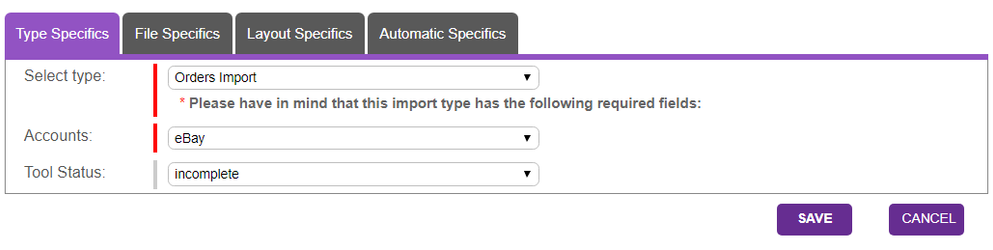
Orders Import
Orders Import Layout Overview
The Orders Import is built for specific integration solutions. If you need to create a replacement order, we recommend doing this manually. Do not hesitate to contact our Integration & Support team, if you would like to regularly integrate multiple orders.
-
Shipping Import
Shipping Import Layout Overview
The Shipping Import allows you to mark as shipped multiple orders and triggers an update to the marketplace channel where the sale took place. It can be used in order to process automatically data from your warehouse management system or to upload manually a file on an ad hoc bases.
Under Type Specifics:
- Select Shipping Import from the drop-down menu.
- Untick the Raise flag Shipping Update box to prevent shipping update to be sent to the channel.
- If the Order ID in your file contains a prefix, you could specify it in the Remove OrderID Prefix field

Field Specification
Field Pentagon Field Name Required Field Description Order ID ID Yes Must match the Pentagon Order ID Carrier Shipping Carries Yes Carrier used to deliver the order Tracking Number Shipping Track Number No The number assigned by the carrier to track the shipment. Sample Templates
Uploading a file
After you have started creating either a Manual or Automatic Import and you have selected the import type and configured it's Type Specifics, you should proceed with uploading the file. To do so go to File Specifics and:
- Click on Choose file to Locate the file you have already prepared.
- Click on the Upload button.
- If there is an upload error, you should review the file and layout requirements outlined above.
If you are setting up an Automatic Import and you would like to use one of the already existing layouts, you can skip the file upload. This is only recommended when you are confident that your file matches the selected data mapping.

Map your data
Once you load the file you would like to import, you should proceed with mapping your data with the relevant system fields. In this section, we would review how this is done when importing data for the first time and what you can do in order to speed the process going forward.
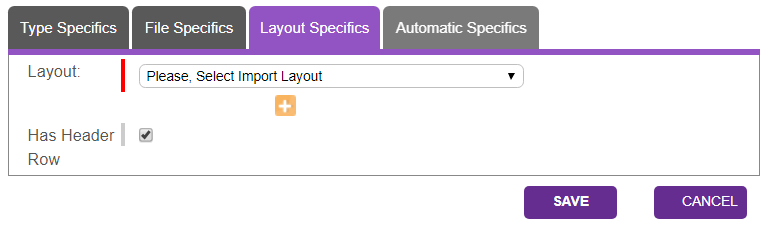
Under Layout Specifics you would find two fields:
- Layout allows you to map your file columns with the tool's system fields. When importing data, you can create a new layout or choose from already existing ones.
- Has Header Row identifies whether the file contains a header row. When ticked, the system would start the import from the second row.
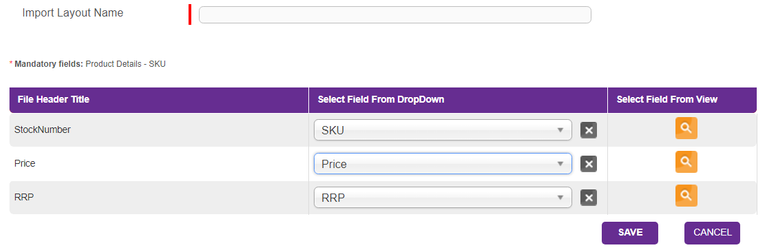
While uploading the file, the system will read its headers and try to find a similar import layout. When doing this for the first time, it is most likely to find out no such layout is available. You would be prompted to create a new one. To do so:
-
Click the Create icon . A new screen would pop-up.

-
Enter a name for your Import Layout.
-
The data from the header row in your file would be displayed in the first column. To select a corresponding system field you can either:
- Select a field from the drop-down list or
-
Click on the Search icon under Select Field From View to browse through the tool interface in order to locate and select the field you want to update.

-
Save the new layout.
-
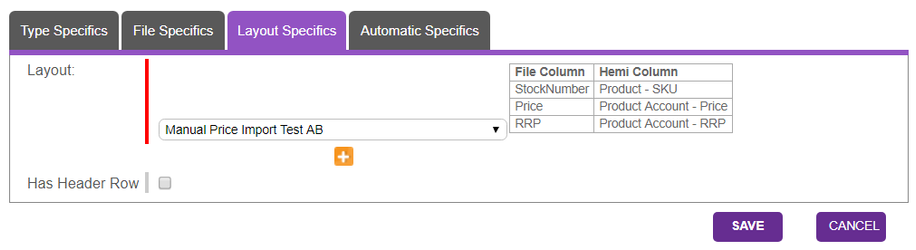
Go back to Layout Specifics
- If you are creating a Manual Import, click Save in order to import the file.
- If you are creating an Automatic Import, proceed to Setting-up Automatic Imports.
In case there is a match between your file headers and any previously created import layout, you would be able to select an option form the Layout drop-down menu. Therefore it is important to use keywords or specify the system fields when defining the Import Layout Name. This will save you time the next time when you want to upload a similar file. When you select an option from the drop-down list, the mapping will be displayed on the screen. If you want to change the mapping, simply create a new layout or edit the selected one form the Imported Layouts menu, where you can access all previously created layouts.
Automate the import
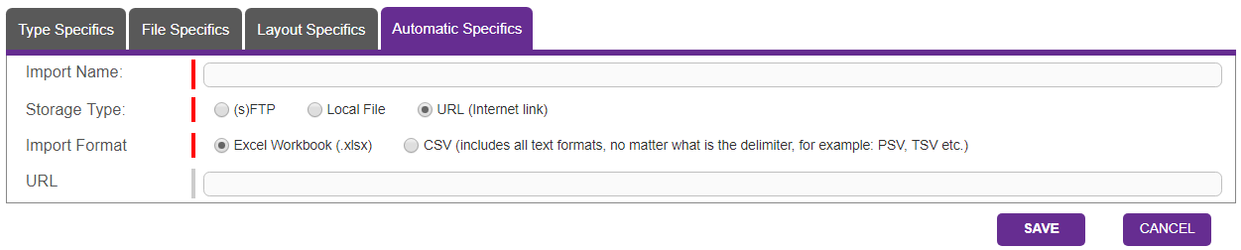
In case you need to update regularly specific fields, you can set up automatic feeds. You can create schedules (cron job) to set the system to search for files on sFTP accounts, the tool's local server or URL links.
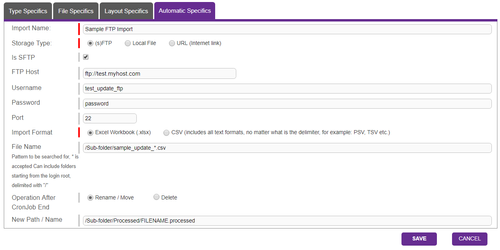
To specify the file location, type and actions after it has been processed, go to Automatic Specifics.
- Enter a name for your Automatic Import Feed.
-
Select where your file is located by choosing one of the available Storage Type options.
-
(s)FTP
Uploading file from (s)FTP
The File Transfer Protocol (FTP) is used for the transfer of files between a client and а server on a computer network, such as the Internet. SFTP is a separate protocol that works in a similar way over a secure connection. The import can be set to upload files from an (s)FTP server and rename and move them to another folder after they have been processed.
To set up a file import form an (s)FTP server:
- Select (s)FTP form the Storage Type options.
- For an sFTP account, tick the Is SFTP checkbox.
- Enter the FTP Host address, e.g. 'test.myhost.com'.
- Enter the Username for the (s)FTP account.
- Enter the Password for the respective Username.
- Specify the Port, where 21 is the default value for an FTP server and 22 for an sFTP connection.
- Enter the relative file path under File Name. You can use a wild card ' *** ' to import files with different names that are in the same folder. This is often required if the filename contains a time-stamp. Valid File Name is in the following format: /Sub-folder/sampleupdate.csv.
- Select an Operation After the CronJob End.
- Rename / Move will change the file name and location once the file gets processed.
- Under New Path / Name enter the new relative file path followed by FILENAME.processed, e.g. /Sub-folder/Processed/FILENAME.processed
- Select Delete, if you would not like to keep a copy of the processed files on the (s)FTP server.
- Rename / Move will change the file name and location once the file gets processed.
-
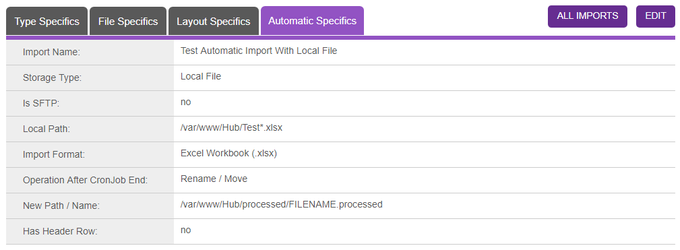
Local File
Uploading file from the local server
The software can also import files which are stored on your WAP system server. This functionality is used for some custom integrations. As it requires an absolute path to the file on the server, this is usually set by our Integration & Support Team.
To set up a Local File import:
- Select Local File form the Storage Type options.
- Enter the relative file path under Local Path.
- Select an Operation After the CronJob End.
- Rename / Move will change the file name and location once the file gets processed.
- Under New Path / Name enter the new relative file path followed by FILENAME.processed.
- Select Delete, if you would not like to keep a copy of the processed files on the (s)FTP server.
- Rename / Move will change the file name and location once the file gets processed.
-
URL
Uploading file from a URL
The WAP Technology System can import files hosed on a URL. Such files are often used by some fulfillment companies, who provide daily shipping updates or supplier sharing stock availability and product data.
To set up a URL import:
- Select URL (internet link) form the Storage Type options.
- Enter your absolute file URL including the protocol. Examples include:
-
- Specify the type of your file from Import Format:
- Excel Workbook is used when uploading spreadsheets in .xlsx format.
- CSV is used for all plain text formats, regardless the delimiter. Once selected, you would be able to specify:
- Fields Delimiter - by default it is set to comma (,)
- Fields Enclosing Character
- Fields Escaping Character
- Character used for Line End
- Click Save to create a new Automatic Import
Once you have created an Automatic Import you should set up a cron job to schedule a regular import of your files. Cron jobs can be set up only by users with administrator access. You can request a cron job to be created for you by submitting an integration request for a new import in our support system. You should specify:
- When the import should be activated.
- The name of the Automatic Import.
- How often you would like the Cron Job to search for files. You can choose anything between 5 minutes and 12 hours.
TIME
16 minute read
AUDIENCE
Content Management
IT and Development
PREREQUISITES
You are familiar with the Data Management module
SearchSKIP AHEAD TO
IN THIS MODULE
- Data Management Glossary
- Import Data
- Export Data
- Import & Export Log
- Importing data into Item Account Ebay table
- New Exports Methodology guide
- Automated Order import functional scope
- Importing data into Product Account Fnac table
- Importing data into Product Account LaRedoute
Previous
Next

-
Page:
-
Page:
Recently updated articles
-
- contributed Nov 22, 2017
-
- contributed Nov 22, 2017
-
- contributed Nov 22, 2017

Not finding the help you need?
Check our FAQ section
Contact the Support team

Provide feedback about this page