
Automated Invoice Emailing Functionality
General overview of the functionality
The purpose of the functionality is to be able to send automatically e-mails to the e-mail addresses received within the order data.
Use cases:
The use cases for this functionality are:
- Sending e-invoice to the end buyer
- Sending e-shipping credit note
- Sending marketing materials over e-mail
Setup:
- Setting up template for the attached file
- Setting up template for the subject and body of the e-mail
- Setting up the SMTP settings
- Setting up when the e-mails would be sent(which order status would be triggering the e-mails)
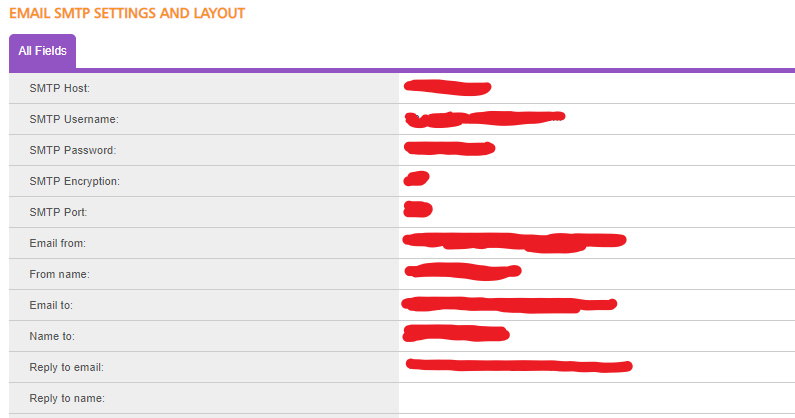
SMTP settings - navigation
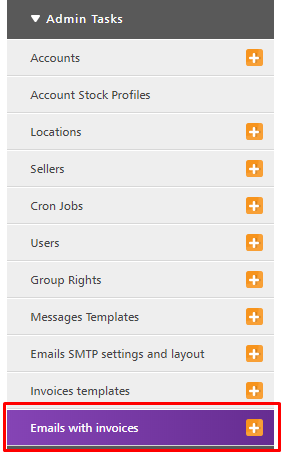
In the user interface Admin section there is a new menu named Emails SMTP settings and layout.

SMTP settings - details
In this new menu the user should be able to assign the SMTP settings and the layout of the e-mail(subject and body). In this section of the document only the SMTP settings will be described.
As seen on the screenshot:
- Assign the SMTP host
- Assign the SMTP username
- Assign the SMTP Encryption
- Assign the SMTP Port
- Set the e-mail from which we are sending all messages
- Set the representation name
- Set to whom we are sending the e-mail by using some variable to select the e-mail address to each order
- Set the name of the receiver
- Set an e-mail on which the receiver can reply to reach out to us
- Set a representation name of the reply to e-mail.
Template for the subject and body of the email - navigation
In the same menu Emails SMTP settings and layout we have to be able to add the layout of the e-mail. By layout please refer to Subject and Body of the e-mail.
Template for the subject and body of the email - details
In this section you would be able to customise your email to your customers as follows:
- Subject
- Body

Template for the attached file - navigation
In the menu you should navigate to the same menu as for the above section Emails SMTP settings and layout.
Template for the attached file - details
This template is quite flexible and there is an editor. There is also the option to use HTML to build the template.
User has the ability to use tags to call out different values from orders and order items using the already know structure - {{tags}}. E.g. {{ORDERS_TOTAL}}.
All fields from orders and order item are available to be pulled using the above mentioned tags.
There are some variables that dynamically calculate their values like:
{{SUBTOTAL}} - Total - Shipping
{{SHIPPING_COST_TOTAL}} - Cost of the shipping excluding VAT.
{{TAX_TOTAL}} - VAT for all items and the shipping cost. The cost of the shipping is split across all items within the order.
{{ITEM_PRICE_NO_VAT}} - The price of the item without the VAT.
For all VAT calculations we use the VAT from Product account for the specific products in the order. If it's empty the functionality will be using 20% as default.
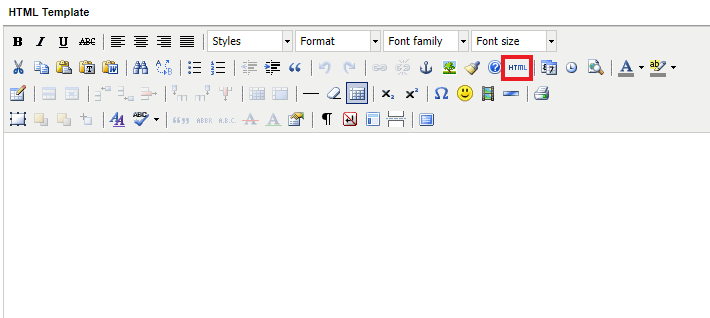
First you would be setting up the Name of the layout.

Next step is to set the actual template body in the section called HTML Template.
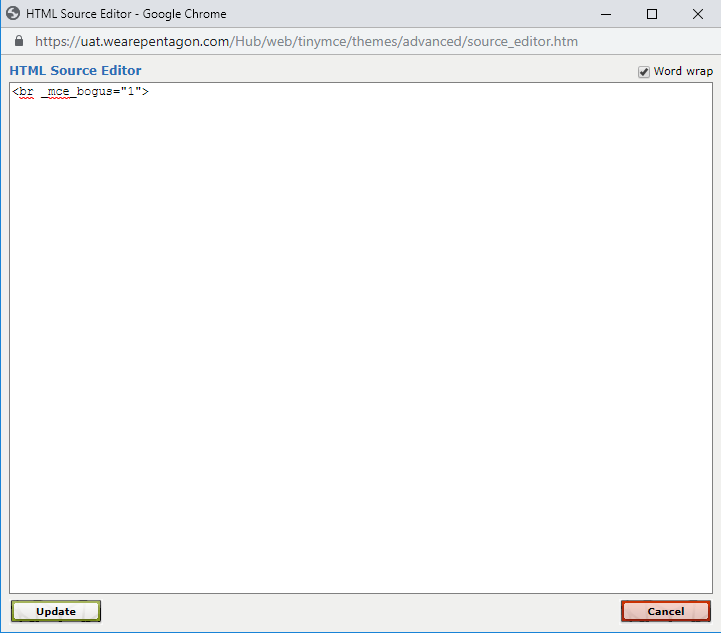
In that section user can prepare the body of the PDF file that would be attached to the automated e-mail. You can use the tools in the editor to manage how your text would be looking. You can be adding tables, styles, font sizes, etc. By pressing the HTML button(highlighted on the screenshot) you will switch to HTML mode and a new pop up window will open. You can paste your code there.
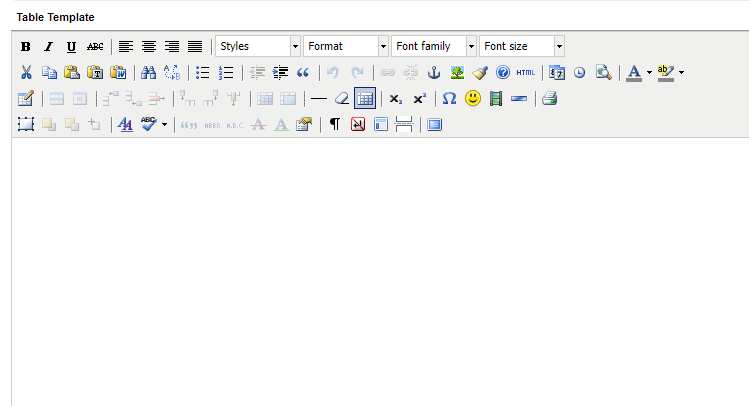
Next step is to set the table for the items description in the Table Template.
For invoices user would be using a table to represent their items. This table can be created in this section with all needed information from order items and it can then be called in the HTML Template using {{ORDER_ITEMS_TABLE}} tag. Again you can see user have the same tools at his/hers disposal to prepare his/hers table in a way you want it to be presented to the receiver.
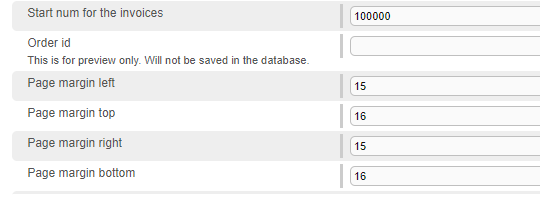
Next step is to set your starting number of your invoice and set your margins.
You can set the start number for your invoices so you can have a specific invoice number when you start sending the email messages.
You can also select a specific order id for which you want to do a preview.
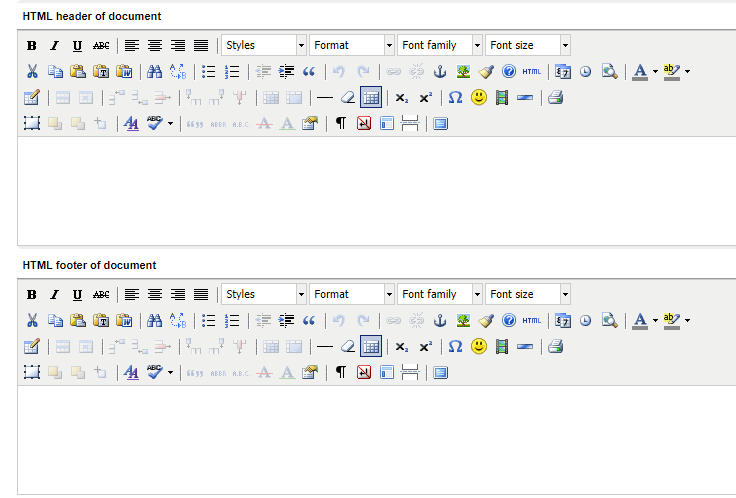
Last but not least is to format the header and the footer of the page.
You have the same tools at your disposal for text formatting. You can again use HTML as well.
Setup when to send the email - navigation
There is a new menu in which user would be able to set on which order status, which e-mail template with which attachment template to be sent.
Setup when to send the email - details
This would be the last step when setting up the functionality.
